Prepare the transfer plate
Before you begin preparing your reagents, please ensure the Base Fluid has been connected to the instrument overnight. If the Base Fluid was not connected in advance, please open a new vial and incubate it for at least 1 hour at 30°C before use
Take all the reagents out of the freezer. The preparation of the transfer plate takes about 1 hour.
Our Quick Start User Guide can be used as a short guide tool how to prepare the transfer plate
The eProtein Discovery™ reagents need to be prepared and loaded onto a 96 well transfer plate following the layout and volumes in figure and tables below.
It is critical to follow this layout exactly because it determines how the reagents are dispensed in the eProtein Discovery™ cartridge.
If an eGene™ construct is missing it must be substituted with 5 µL of Blank Buffer.
Do not substitute a missing eGene™ construct with water as this can have a significant negative impact on the droplet operations on the eProtein Discovery™ cartridge
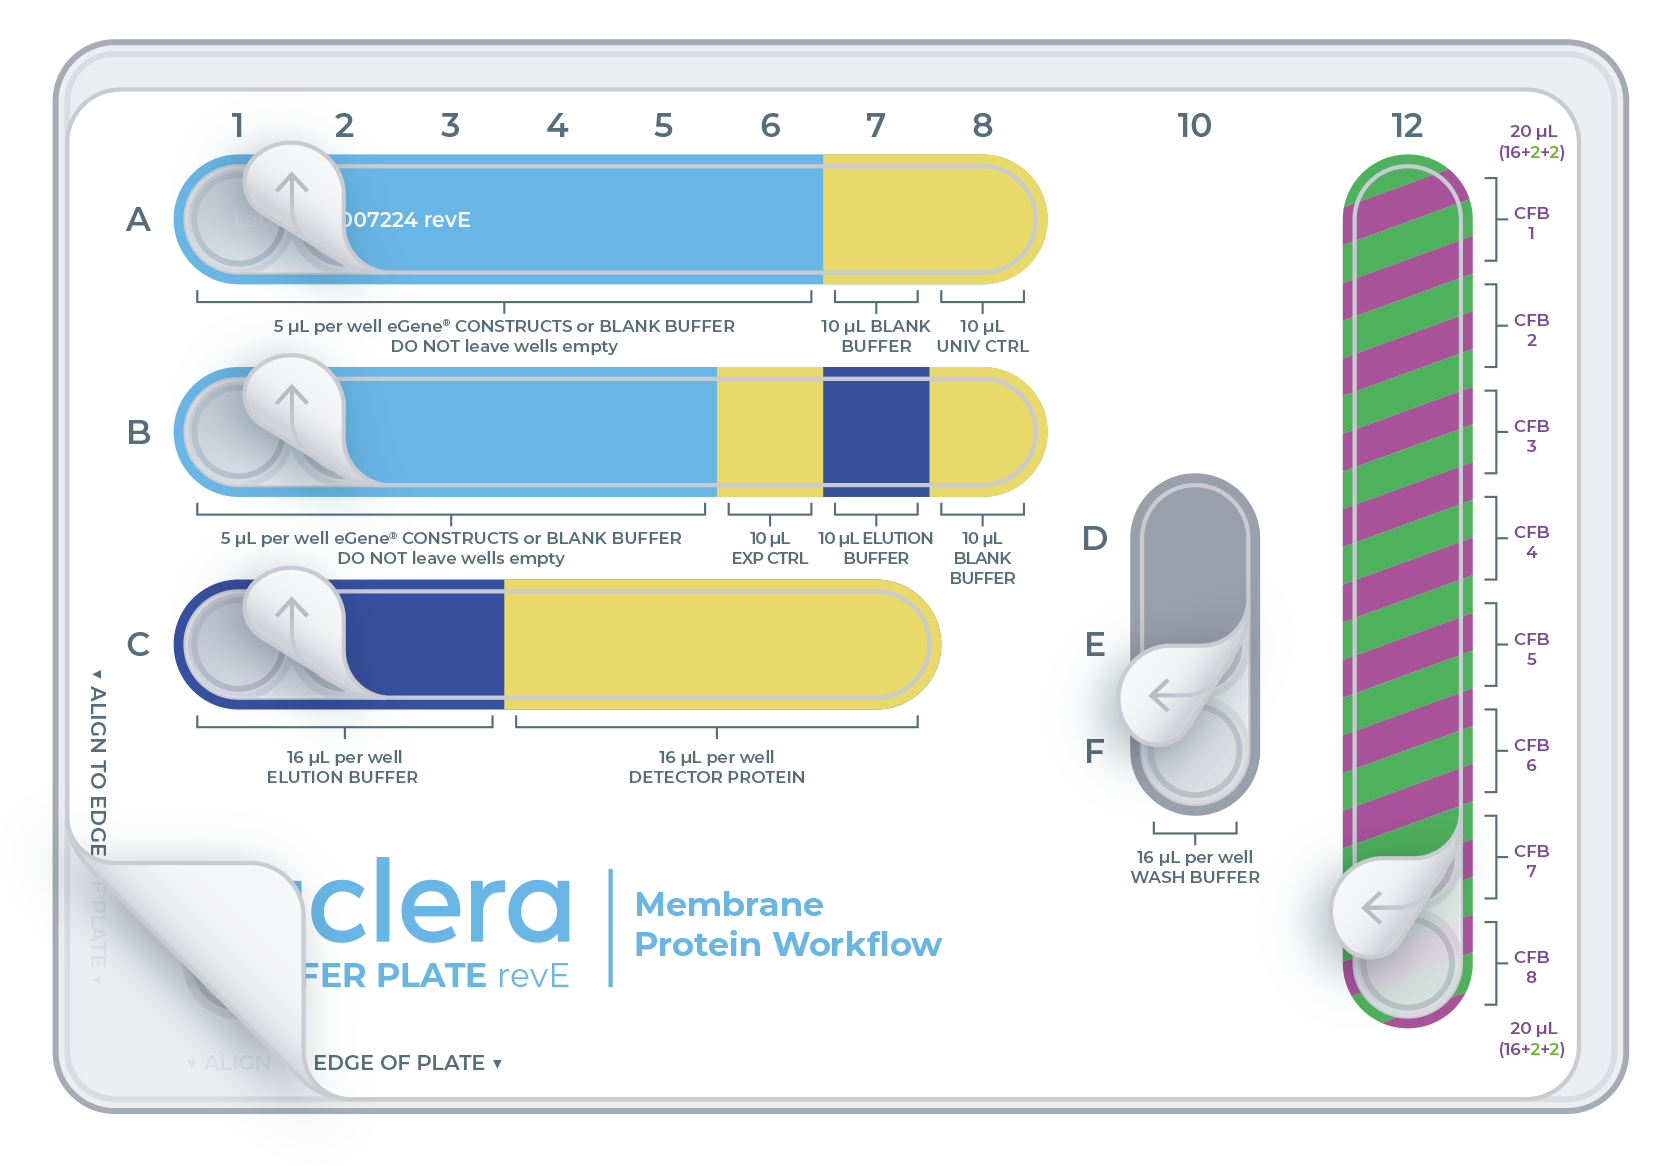
eGene™ DNA construct
| Reagent | Well | Volume (µL) |
|---|---|---|
| eGene™ construct | A1 - A6 | 5 |
| eGene™ construct | B1 - B5 | 5 |
Reagents from NC3013
| Reagent | Well | Volume (µL) |
|---|---|---|
| Blank Buffer | A7 and B8 | 10 |
| Universal Control (Univ. Ctrl) | A8 | 10 |
| Detector Protein (Det. Prot.) | C4 - C7 | 16 |
| Expression Control | B6 | 10 |
| Wash Buffer | D10, E10 and F10 | 16 |
| Elution Buffer | B7 | 10 |
| Elution Buffer | C1-C3 | 16 |
| Cell-free Core (16 µL) + Additive 1 (2 µL) + Additive 2 (2 µL ) | 12A - 12H | 20 (16+2+2) |
Take the Strep Beads from the fridge and the Cartridge Kit reagents (box with the purple stripe on the label) from the -80°C freezer.
Place an empty 96-well transfer plate on ice.
Apply the transfer plate sticker provided in the Cartridge Reagent kit and place the 96 well plate on ice.
The transfer plate should be kept on ice until the transfer of reagents to the Cartridge.
Ensure you prepare the Cell-free Blends last.
Be careful not to introduce any ice into the wells
eGene™ constructs (DNA)
Take the vials or the plates with the eGene™ constructs made in advance using the eGene™ Prep Kit, or provided by Nuclera through eGene™ Service, out of the freezer and thaw on the benchtop at room temperature. This takes approximately 15 minutes.
The vials or the plates should be centrifuged for a few seconds to ensure all the liquid is at the bottom of the wells.
It is critical not to leave any port empty. If a eGene™ construct is missing it must be substituted with 5 µL eGene Blank Buffer, not with water.
Tip: Empty ports can be used for duplicates.
For every eGene™ construct, load 5 µL into the selected well:
- A1 to A6
- B1 to B5
It is critical to load the eGene™ constructs onto the transfer plate in the exact order that they have been finalized in the experiment planned in the eProtein Discovery™ Cloud Software if using a Cloud Connected System.
eProtein Discovery™ purification reagents
Thaw the Wash Buffer and the Elution Buffer on the benchtop at room temperature. This will take about 20 minutes.
- Load 16 µL of Wash Buffer into wells D10, E10 and F10
- Load 16 µL of Elution Buffer into wells C1, C2, C3
- Load 10 µL of Elution Buffer into well B7
eProtein Discovery™ controls
From the kit kept at -80°C, take the controls out and thaw them on ice.
- Load 10 µL of Blank Buffer into wells A7 and B8.
- Load 10 µL of Universal Control into well A8.
- Load 10 µL of Expression Control into well B6
Strep Purification Beads
Beads settle extremely quickly. In all following steps, do not pause between resuspending and taking aliquots. To obtain a proper aliquot, gently pipette up and down 10 times with and then immediately pipette up an 11th time to take the aliquot.
Strep Purification Beads can be provided in 2x 200 or 1x 400 µL aliquots of 5% v/v suspension. Select the relvant tab below for appropriate protocol to follow.
- 2 x 200 µL Magnetic Beads Tube
- 1 x 400 µL Magnetic Beads Tube
- Take the 2x vials of Strep Beads from the fridge and give them a quick spin for 2 seconds in a microcentrifuge to ensure all material is collected at the bottom of the tubes.
- From each tube, resuspend the beads by gently pipetting up and down 10 times with a p200 pipette set on 150 µL and then immediately pipetting up an 11th time to collect 150µL.
- Dispense both 150µL aliquots into a single 1.5mL tube.
- Take the vial of Strep Beads from the fridge and give it a quick spin for 2 seconds in a microcentrifuge to ensure all material is collected at the bottom of the tubes.
- Resuspend the beads by gently pipetting up and down 10 times with a p1000 pipette set to 300µL and then immediately pipette up an 11th time to collect 300µL. Dispense 300µL into a single 1.5mL tube.
- Dispense 300µL into a single 1.5mL tube.
- Place the tube with Strep Beads on a magnetic particle separator and capture for 30 sec.
- Remove the supernatant with a p1000 pipette. Inspect supernatant for aspirated beads. If present, gently pipette back down, allow 30 sec for recapture then try again. If no beads present, discard the liquid.
- Remove the tube with Strep Beads from the magnetic particle separator. Resuspend the beads in 300 µL Wash Buffer by slowly pipetting up and down 10 times.
- Repeat steps 4 to 6 twice more for a total of three washes.
- After the third wash, spin down the tube and place it back on a magnetic particle separator and capture for 30sec.
- Remove all the supernatant with a p1000 pipette and discard the liquid after inspecting for aspirated beads. If present, gently pipette back down, allow 30 sec for recapture, then try again.
- Spin down the tube, place it back on a magnetic particle separator and remove the residual buffer with a p20 pipette, being very careful to not take up any beads.
- Remove the tube with Strep Beads from the magnetic particle separator. Add 35 µL of Wash Buffer to bead pellet to make 30% v/v Strep beads working solution. Make sure all beads covered with Wash Buffer; it is not necessary to homogenise until completely ready to aliquot.
- With a p20 pipette set to 15µL, resuspend the beads by gently pipetting up and down 10 times. Then, WITHOUT PAUSING, pipette up an 11th time and take off a 15µL aliquot and transfer to an Eppendorf tube.
- Repeat resuspension and aliquoting steps twice more to create a total of three 30% v/v Strep Beads working solution aliquots.
- Keep the beads in the tube on the bench, not on ice.
The beads should NOT be loaded onto the transfer plate.
- Using a single-channel p20 pipette, mix the Strep Purification Beads tube by gently pipetting up and down 12 times, avoiding air bubbles, and then immediately pipetting up an 11th time to collect 12µL of magbeads. Immediately dispense into port A10 of the cartridge.
- Repeat the same process for the second and third tubes, dispensing into ports B10 and C10, respectively
Mix, aspirate, and dispense each tube sequentially to prevent bead settling and ensure uniform loading in the cartridge.
Detector Protein
Spin down the tubes for 2 seconds to collect the full volume at the bottom. Load 16 µL of Detector Protein into wells C4, C5, C6 and C7 of the transfer plate as instructed on transfer plate label.
Preparation of the Cell-free Blends
For each expression screening experiment, up to eight distinct 20 µL Cell-free Blends can be prepared by combining 16 µL of Cell-free Core Reagent with 2 µL of a first additive and 2 µL of a second additive. If fewer combinations are used, fill the remaining wells of Column 12 of the transfer plate using 16 µL of Cell-free core + 4 µL of Additive Buffer.
The total volume of blend should always be 20 µL final.
Ensure that the Cell-free blend is thoroughly resuspended by pipetting up and down from near the bottom.
- Thaw Cell-free Core Reagents and Additives on ice
- Once the Cell-free Core reagents and Additives are thawed, vortex each for 2 seconds to ensure they are well mixed.
- Centrifuge for 2 seconds the Cell-free Core reagents and Additives using a microcentrifuge to return any droplets to the bulk aliquot.
- Add 16 µL of Cell-free Core reagent to wells A12-H12.
- Add 2 µL of your first selected additive to wells A12-H12.
- Add 2 µL of your second selected additive to wells A12-H12.
It is critical to load the Cell-free Blends onto the transfer plate in the exact order that they have been finalized in the experiment planned in the eProtein Discovery™ Cloud Software.
Ensure the Cell-free Blend is thoroughly resuspended with the chosen additives by pipetting up and down near the bottom of the tube, making sure that any viscous components are fully mixed.