Initiate Your Experiment
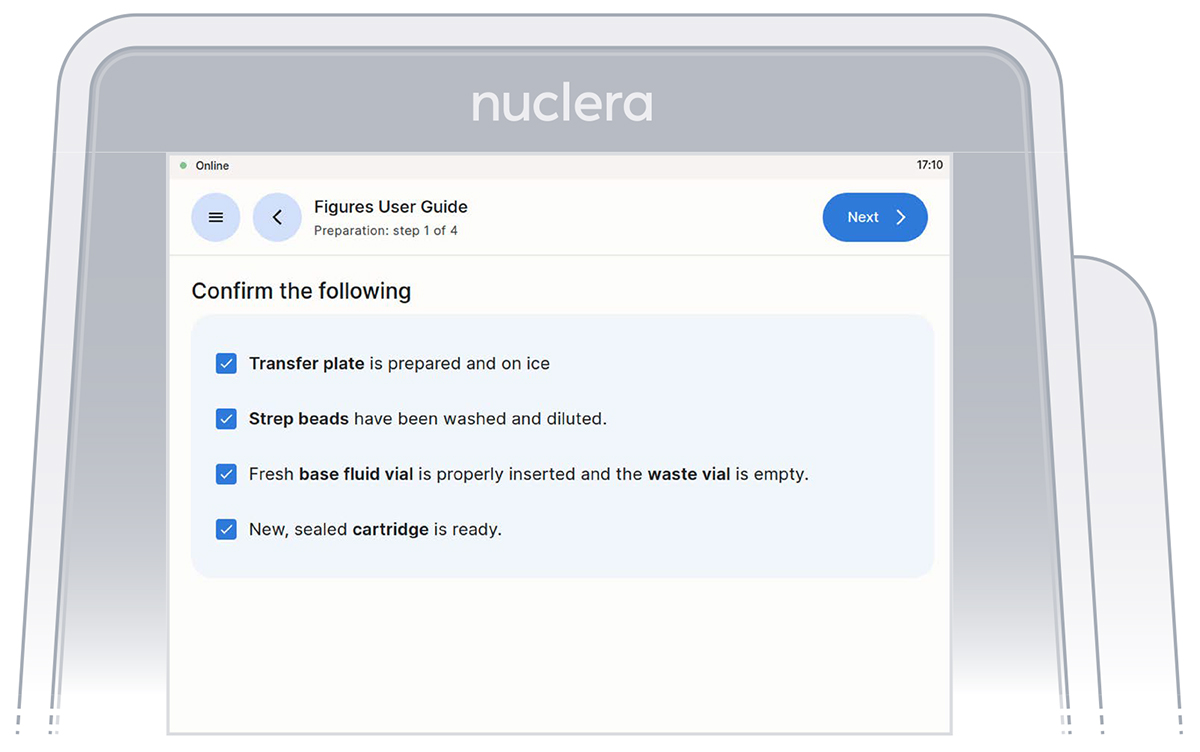
After proceeding to the next step of the checklist, the experiment is initiated and it is not possible to go back and forth on the screen.
Go through and tick the checklist, and press the [Next] button. The drawer will open.
Loading of the cartridge on the eProtein Discovery instrument.
Unpack and load a cartridge as shown on the screen of the eProtein Discovery instrument
Place the cover on the cartridge, avoid touching the electrical connectors, and press the [Next] button.

Note: keep the cartridge packaging to dispose of the cartridge after use.
Keep cover on the cartridge. Markings on the cover will guide you through the loading process.
Set up the pump on the instrument
Follow the on-screen instructions to complete the experiment.
- These instructions will guide you in operating the eProtein Discovery instrument and completing an experiment on the instrument.
- The instructions must be followed in the order shown on the screen.
- You can navigate forward and back through the steps using the buttons at the top.
- You can scroll up and down using the arrows at the bottom right of the screen when shown or with your fingers.
Note: once you start the experiment, the back button on the instrument will be disabled.
On the right hand side of the instrument, ensure the tubings for the integrated pump are placed in the tubes holder, and press the [Next] button.
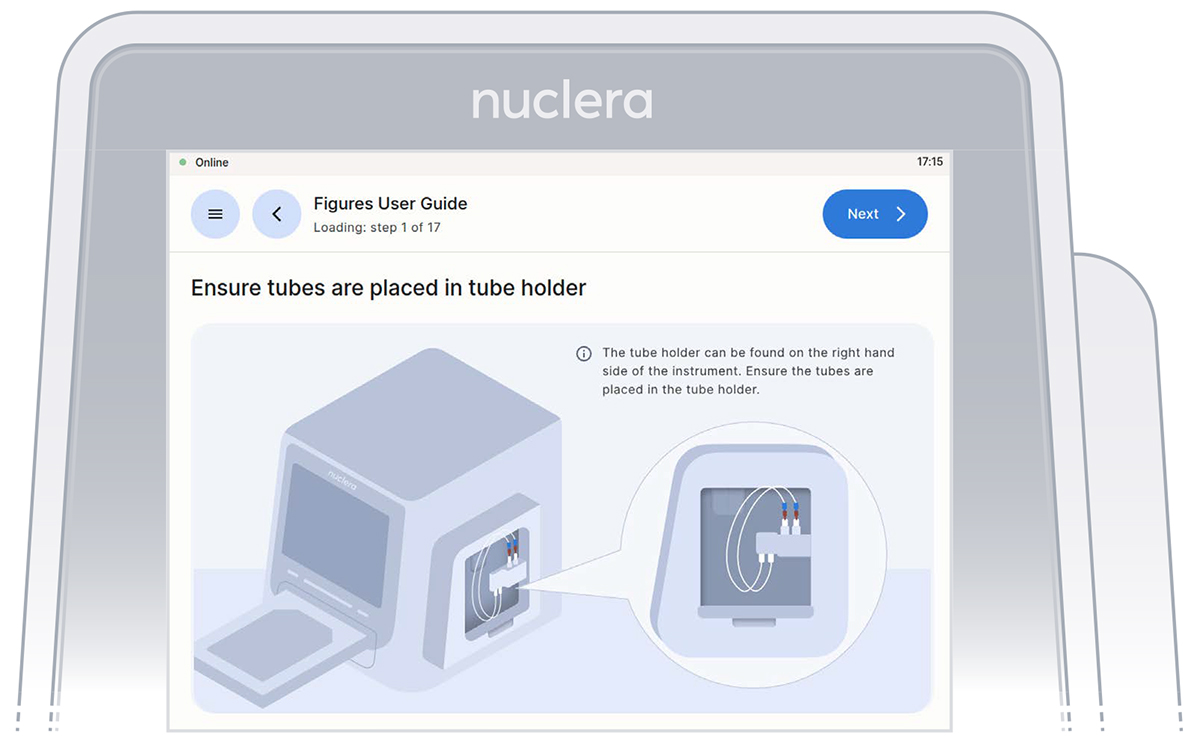
Verification screen that the tubings for the integrated pump are placed in the tubing holder.
Ensure the vial of base fluid and the waste container have been connected to the pump located on the right hand side of the instrument. Press the [Next] button.
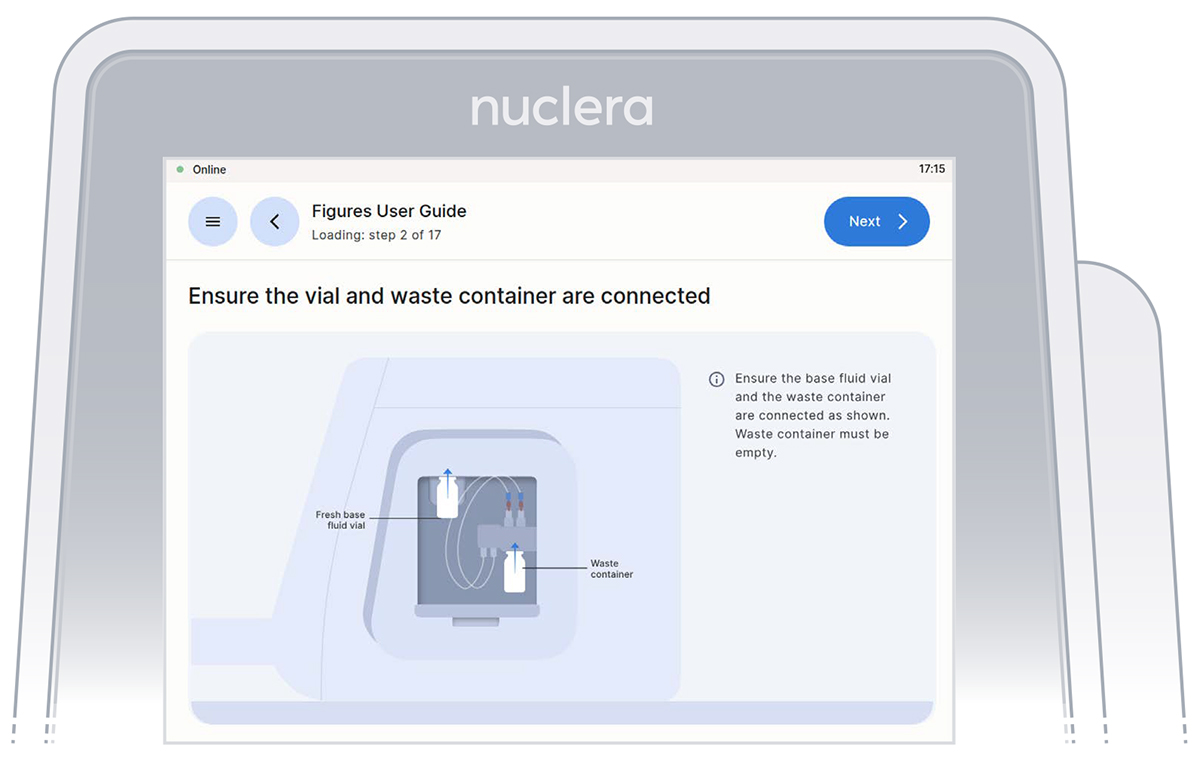
Vial of base fluid and the waste container connected to the pump as shown on the screen
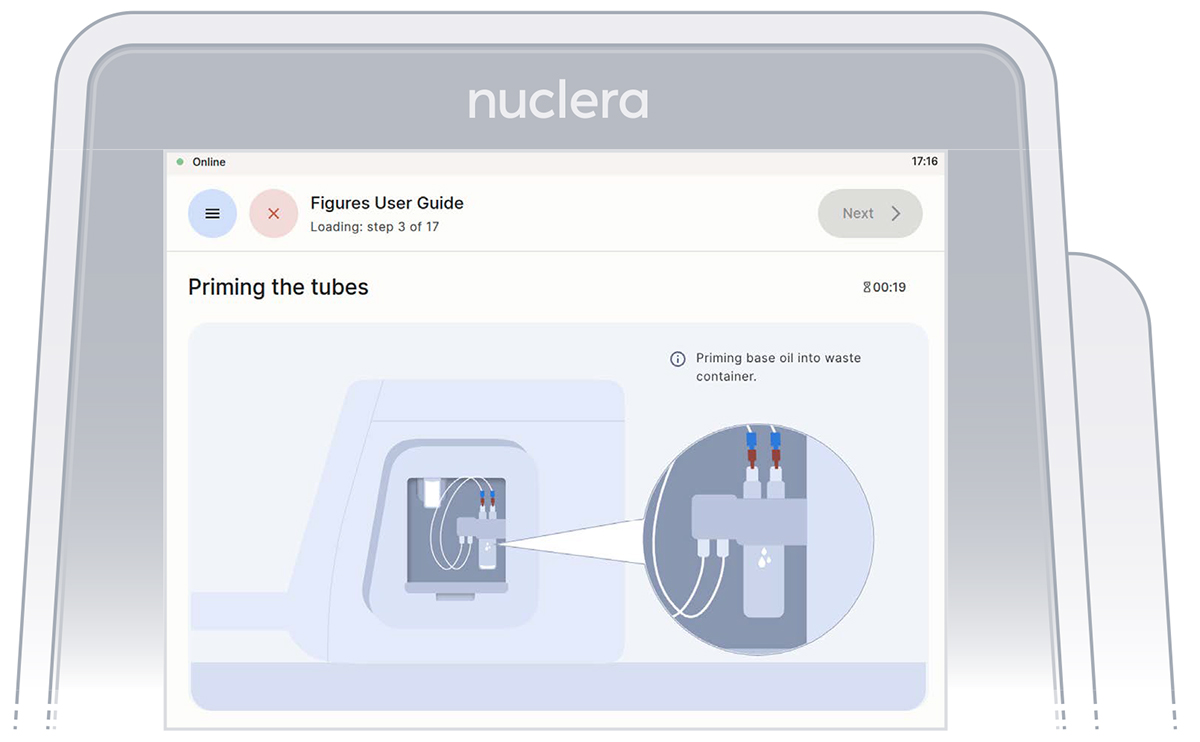
With the tubes and containers in place, ensure that some of the base fluid has dripped into the waste container.
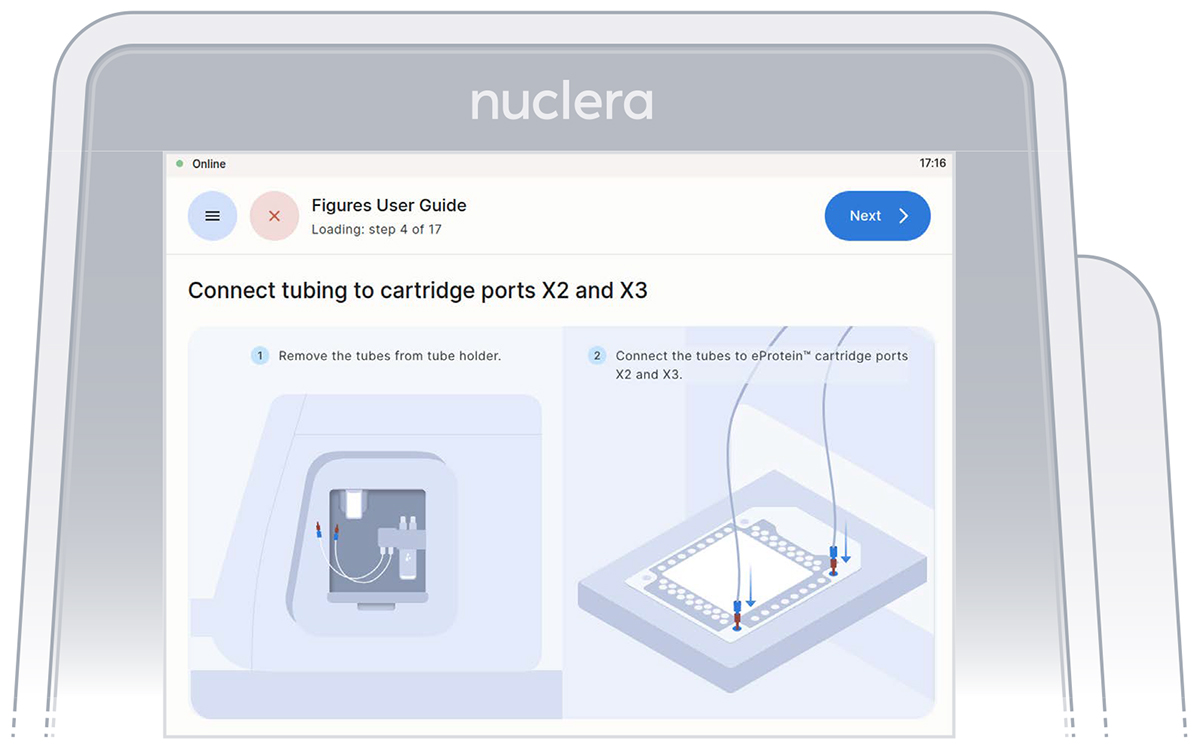
Fill the cartridge with base fluid
Remove the tube connectors from the holder, connect them tightly to the corner ports X2 and X3 of the cartridge, and press the [Next] button. Either connector can be interchangeably inserted into corner port X2 or X3.
Inspection that all the ports on the cartridge are filled with base fluid
Check cartridge
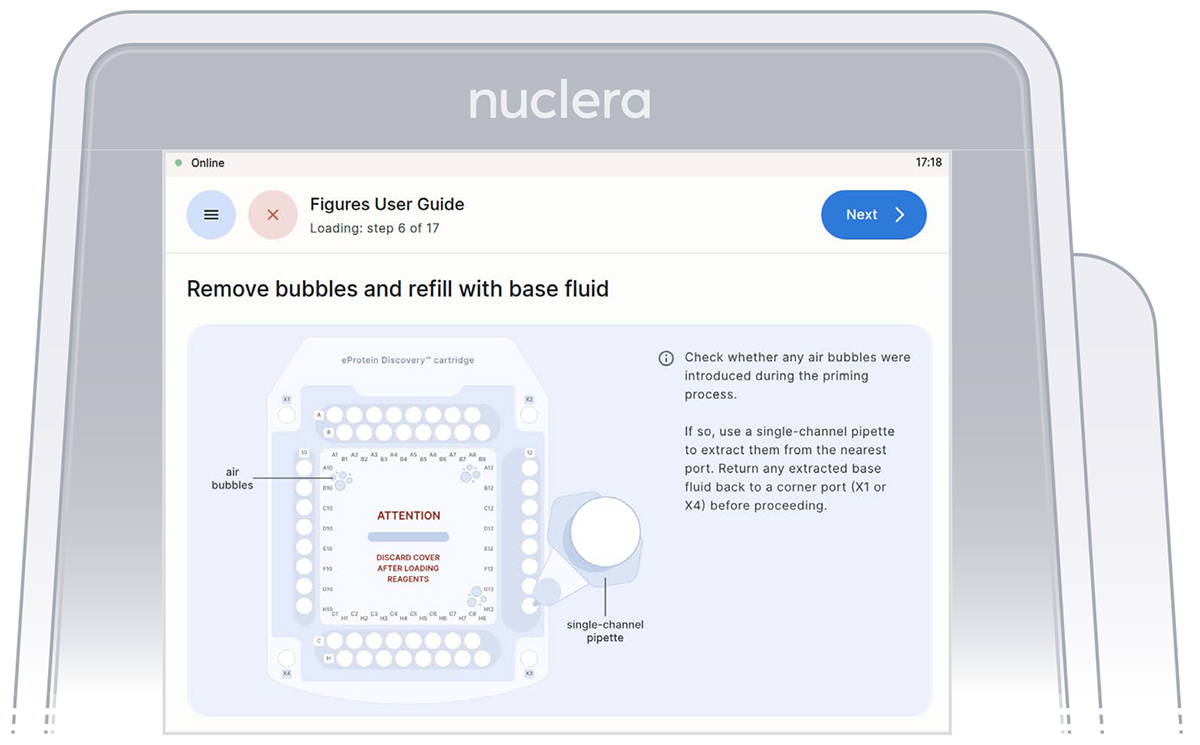
Air bubble
After the base fluid has loaded, inspect the cartridge for air bubbles that may have been introduced during the priming with base fluid.
If any air bubbles persist after base fluid priming, use a single-channel p200 pipette to aspirate the air bubbles from the nearest port and slowly reinject the base fluid that was aspirated into a corner port (X1 or X4). Press the [Next] button.
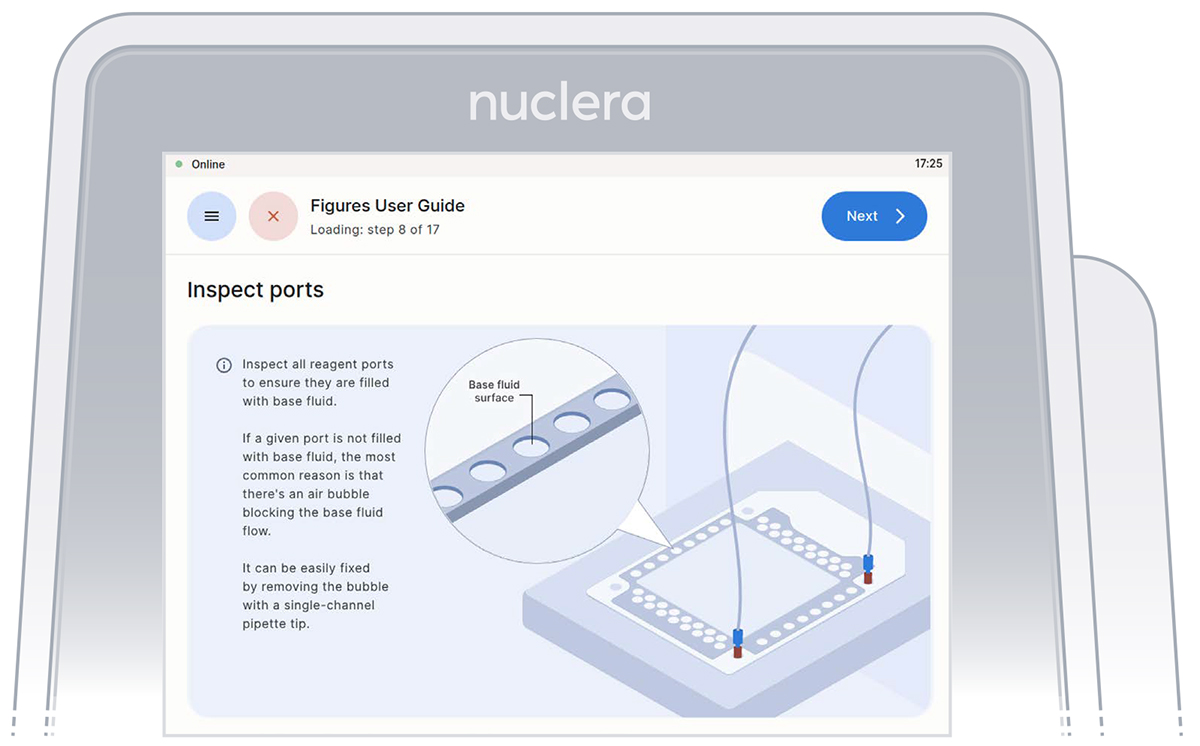
Check base fluid level
Inspect the ports on the cartridge after the priming with base fluid is complete. Ensure all the ports are filled and press the [Next] button.
Confirm that all the ports on the cartridge are filled with base fluid
Load reagents
- Follow the on-screen instructions that will guide you in loading the reagents.
- The loading of the reagents should be done using an 8-channel pipette.
- To facilitate the pipetting of the reagents, the transfer plate can be moved from the ice bucket to the bench.
- Check the plate for the presence of air bubbles. Air bubbles can be removed by spinning the plate in a swing rotor centrifuge for about 10 seconds. Seal the plate before using a plate centrifuge
- After aspirating the reagents, make sure that all pipette tips are filled evenly, and contain no air bubbles.
- Ensure the pipette tips are positioned just below the surface of the base fluid, away from the sides and bottom of the port. Dispense slowly until the first stop of the pipette is reached. Do not insert the pipette tip directly into the base of port.
- Do not engage the pipette tips fully into the ports, the tip ends should not touch the bottom of the ports while dispensing the reagents.
Do not pass the first stop as it would release air bubbles
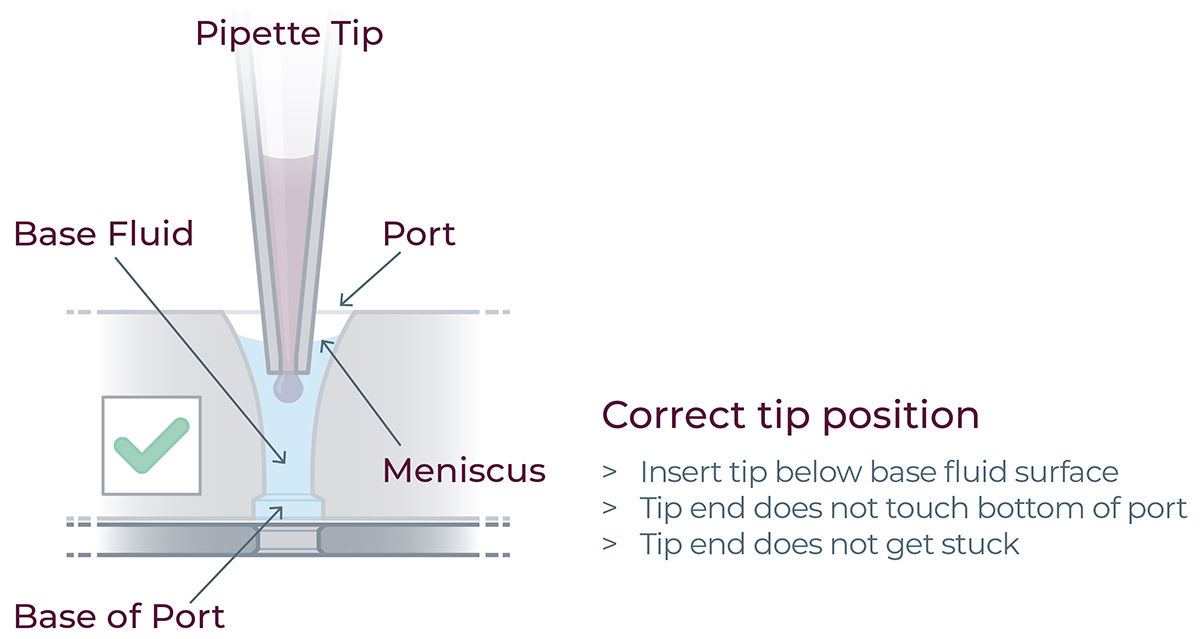
For correct reagent loading the pipette tip is immersed in the base fluid and not touching the bottom of the port
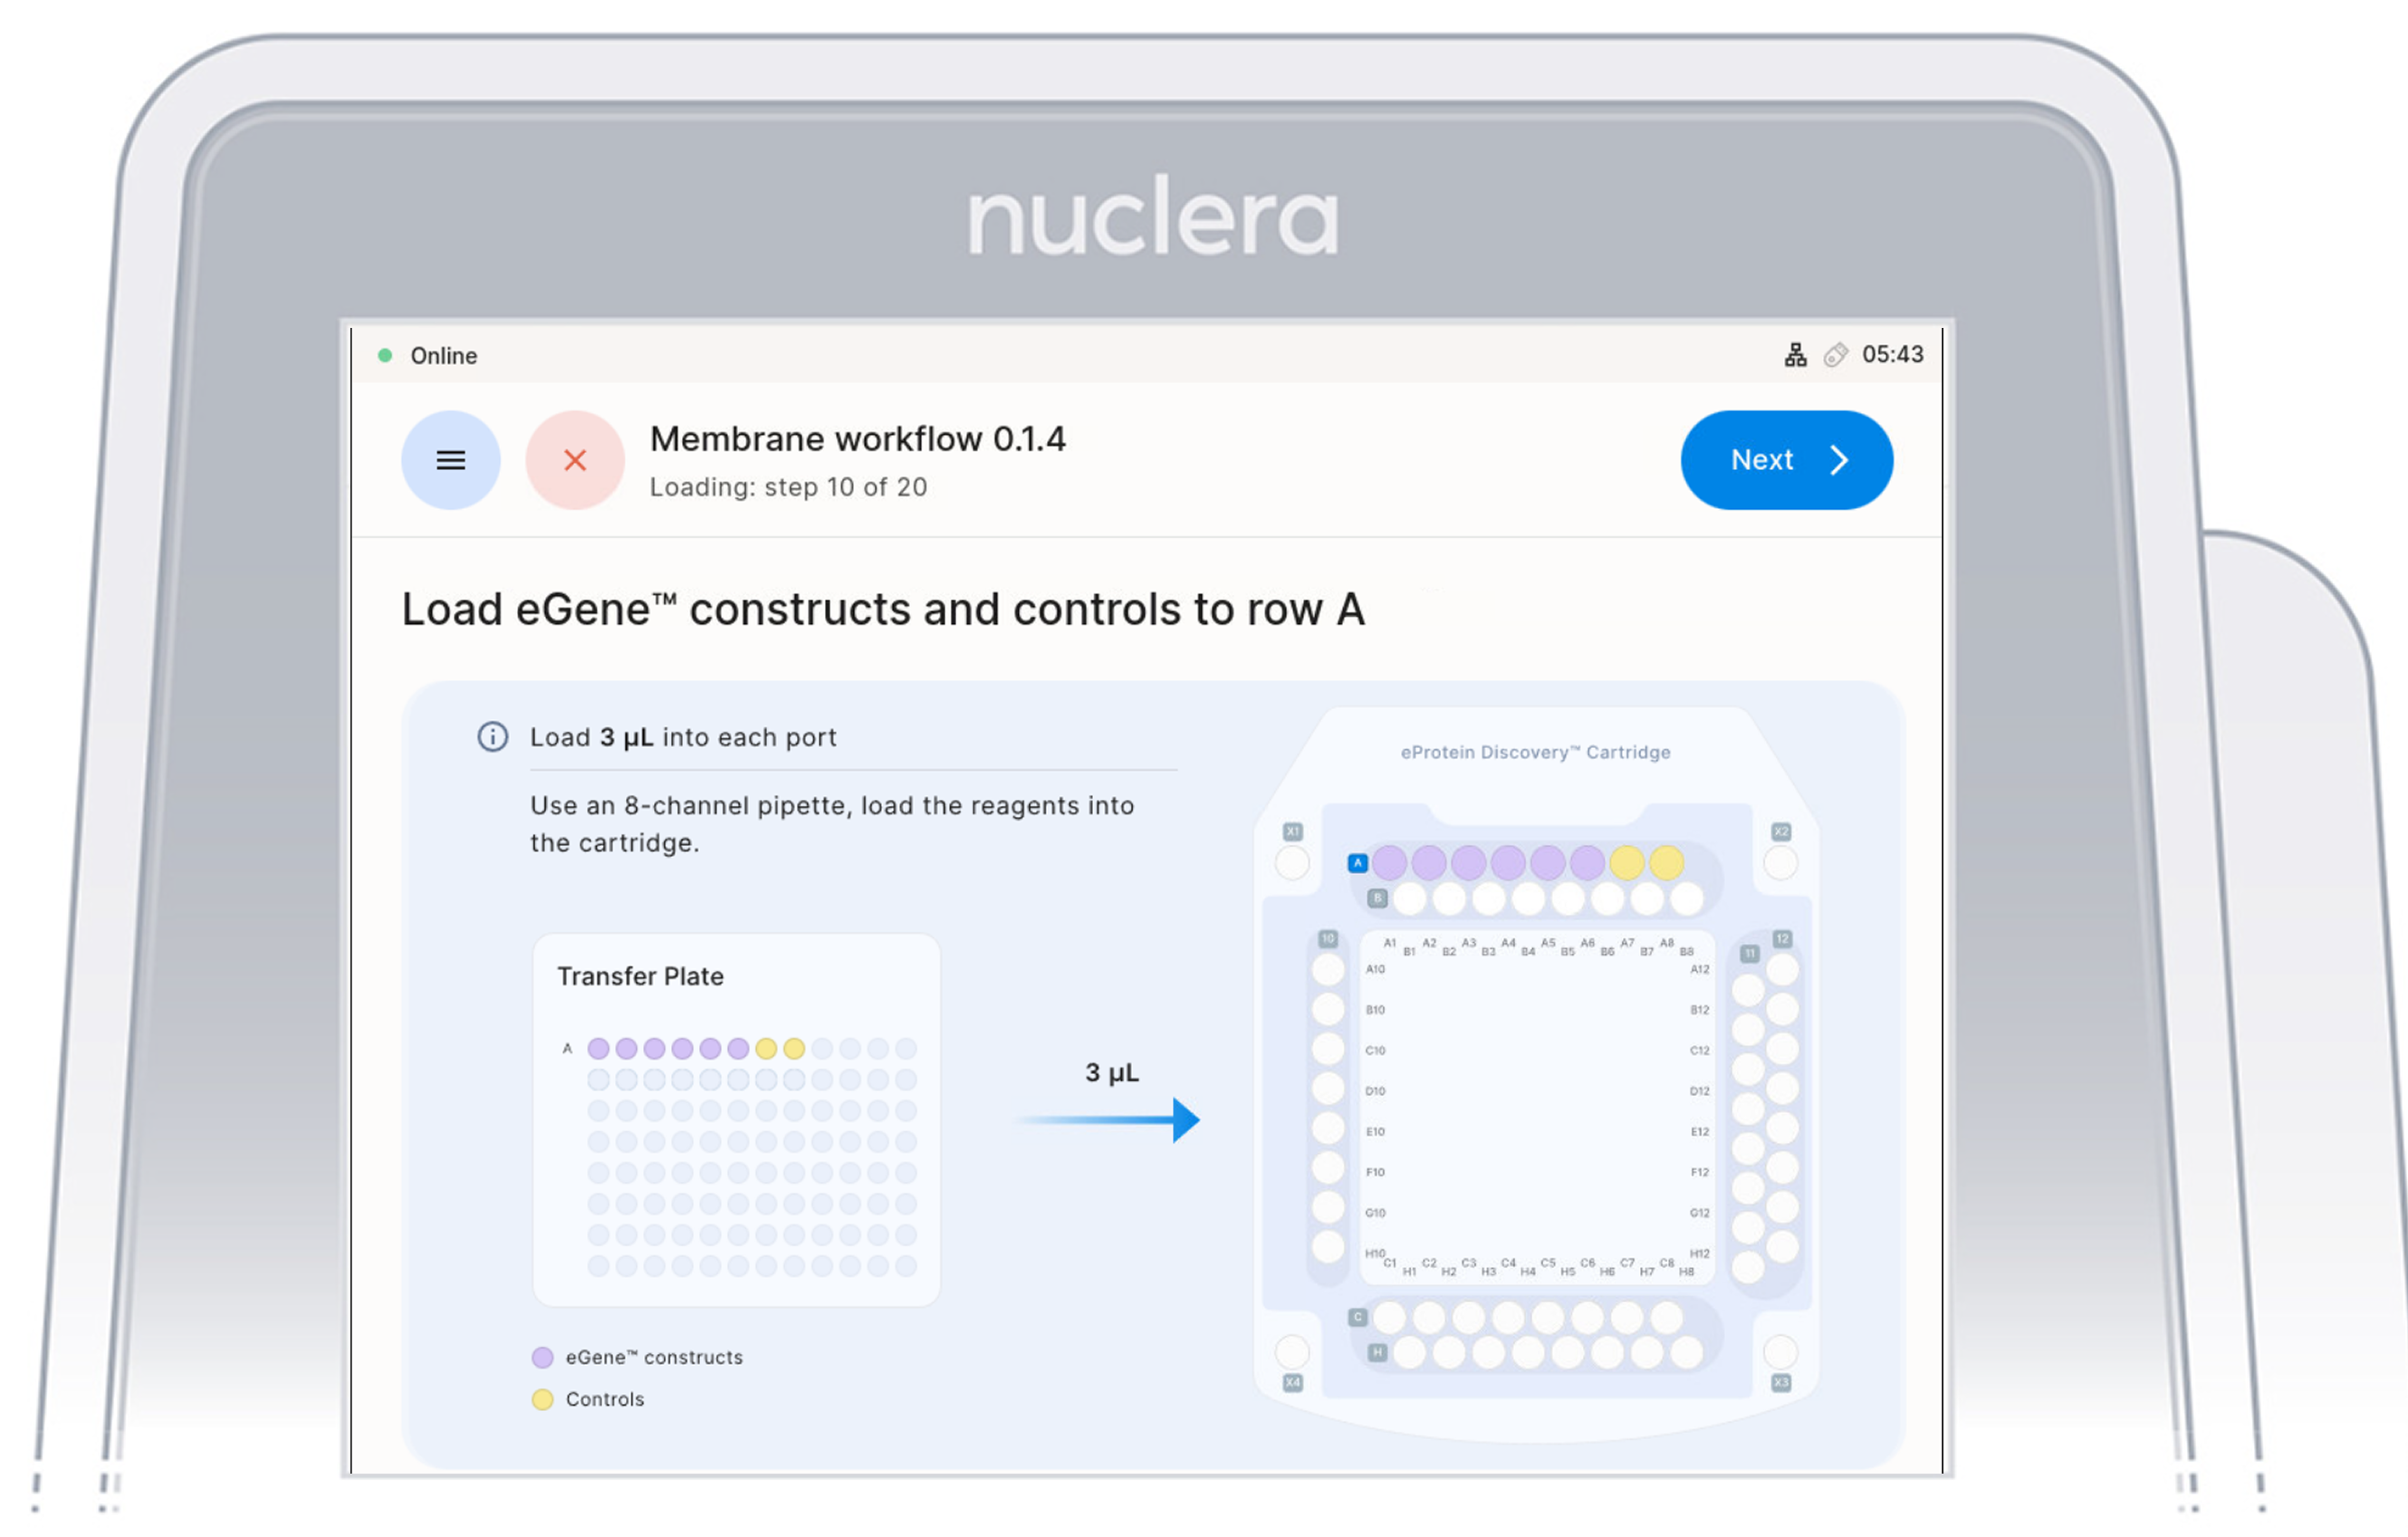
Load reagents - row A
- Load x8 fresh p20 pipette tips and aspirate 3 µL of the reagents from the transfer plate wells A1-A8 into ports A1-A8 of the cartridge.
- Ensure the pipette tips are positioned just below the surface of the base fluid, away from the sides and bottom of the port. Dispense slowly until the first stop of the pipette is reached. Do not insert the pipette tip directly into the base of port.
- Eject the pipette tips into a waste container.
- Press the [Next] button on the screen.
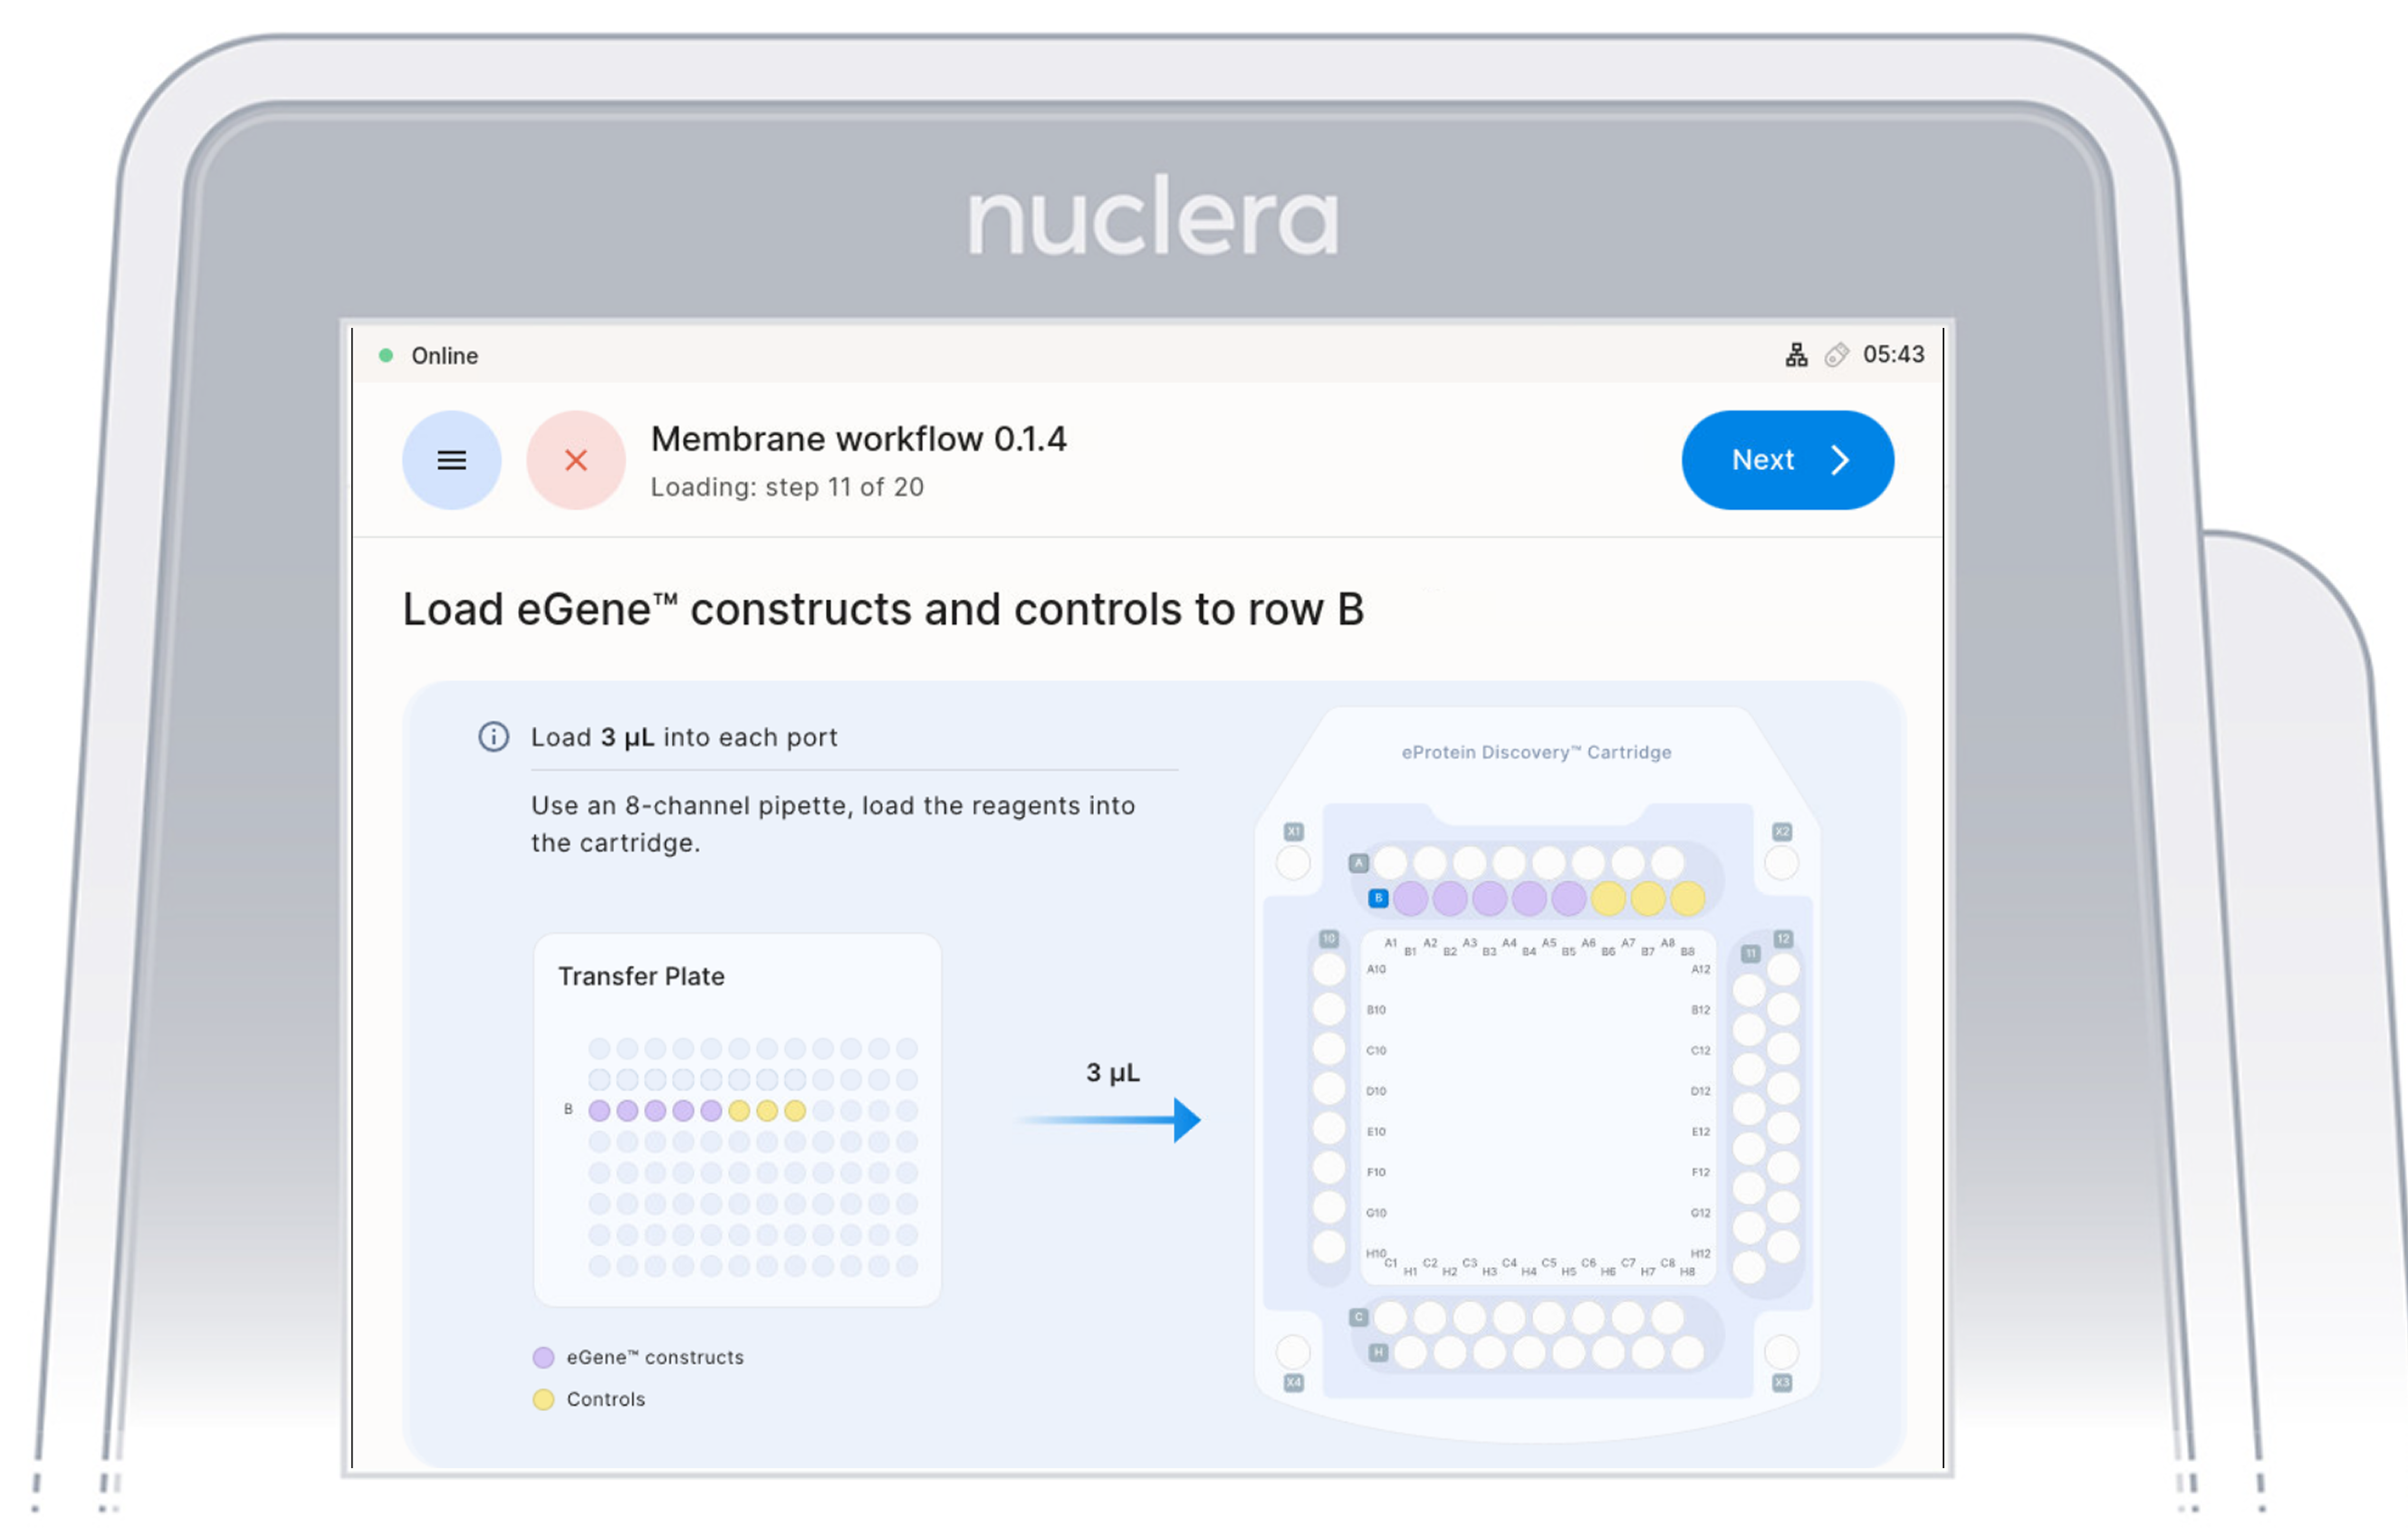
Load Reagents - row B
- Load x8 fresh p20 pipette tips and aspirate 3 µL of the reagents from the transfer plate wells B1-B8 into ports B1-B8 of the cartridge.
- Ensure the pipette tips are positioned just below the surface of the base fluid, away from the sides and bottom of the port. Dispense slowly until the first stop of the pipette is reached. Do not insert the pipette tip directly into the base of port.
- Eject the pipette tips into a waste container.
- Press the [Next] button on the screen.
Load Reagents - row C
- Load 7x fresh p20 pipette tips and aspirate 6 µL of the reagents from the transfer plate wells C1-C7 into ports C1-C7 of the cartridge. Do not use 8 tips as the purge of an empty tips might create air bubbles in the cartridge
- Ensure the pipette tips are positioned just below the surface of the base fluid, away from the sides and bottom of the port. Dispense slowly until the first stop of the pipette is reached. Do not insert the pipette tip directly into the base of port.
- Eject the pipette tips into a waste container.
- Press the [Next] button on the screen.

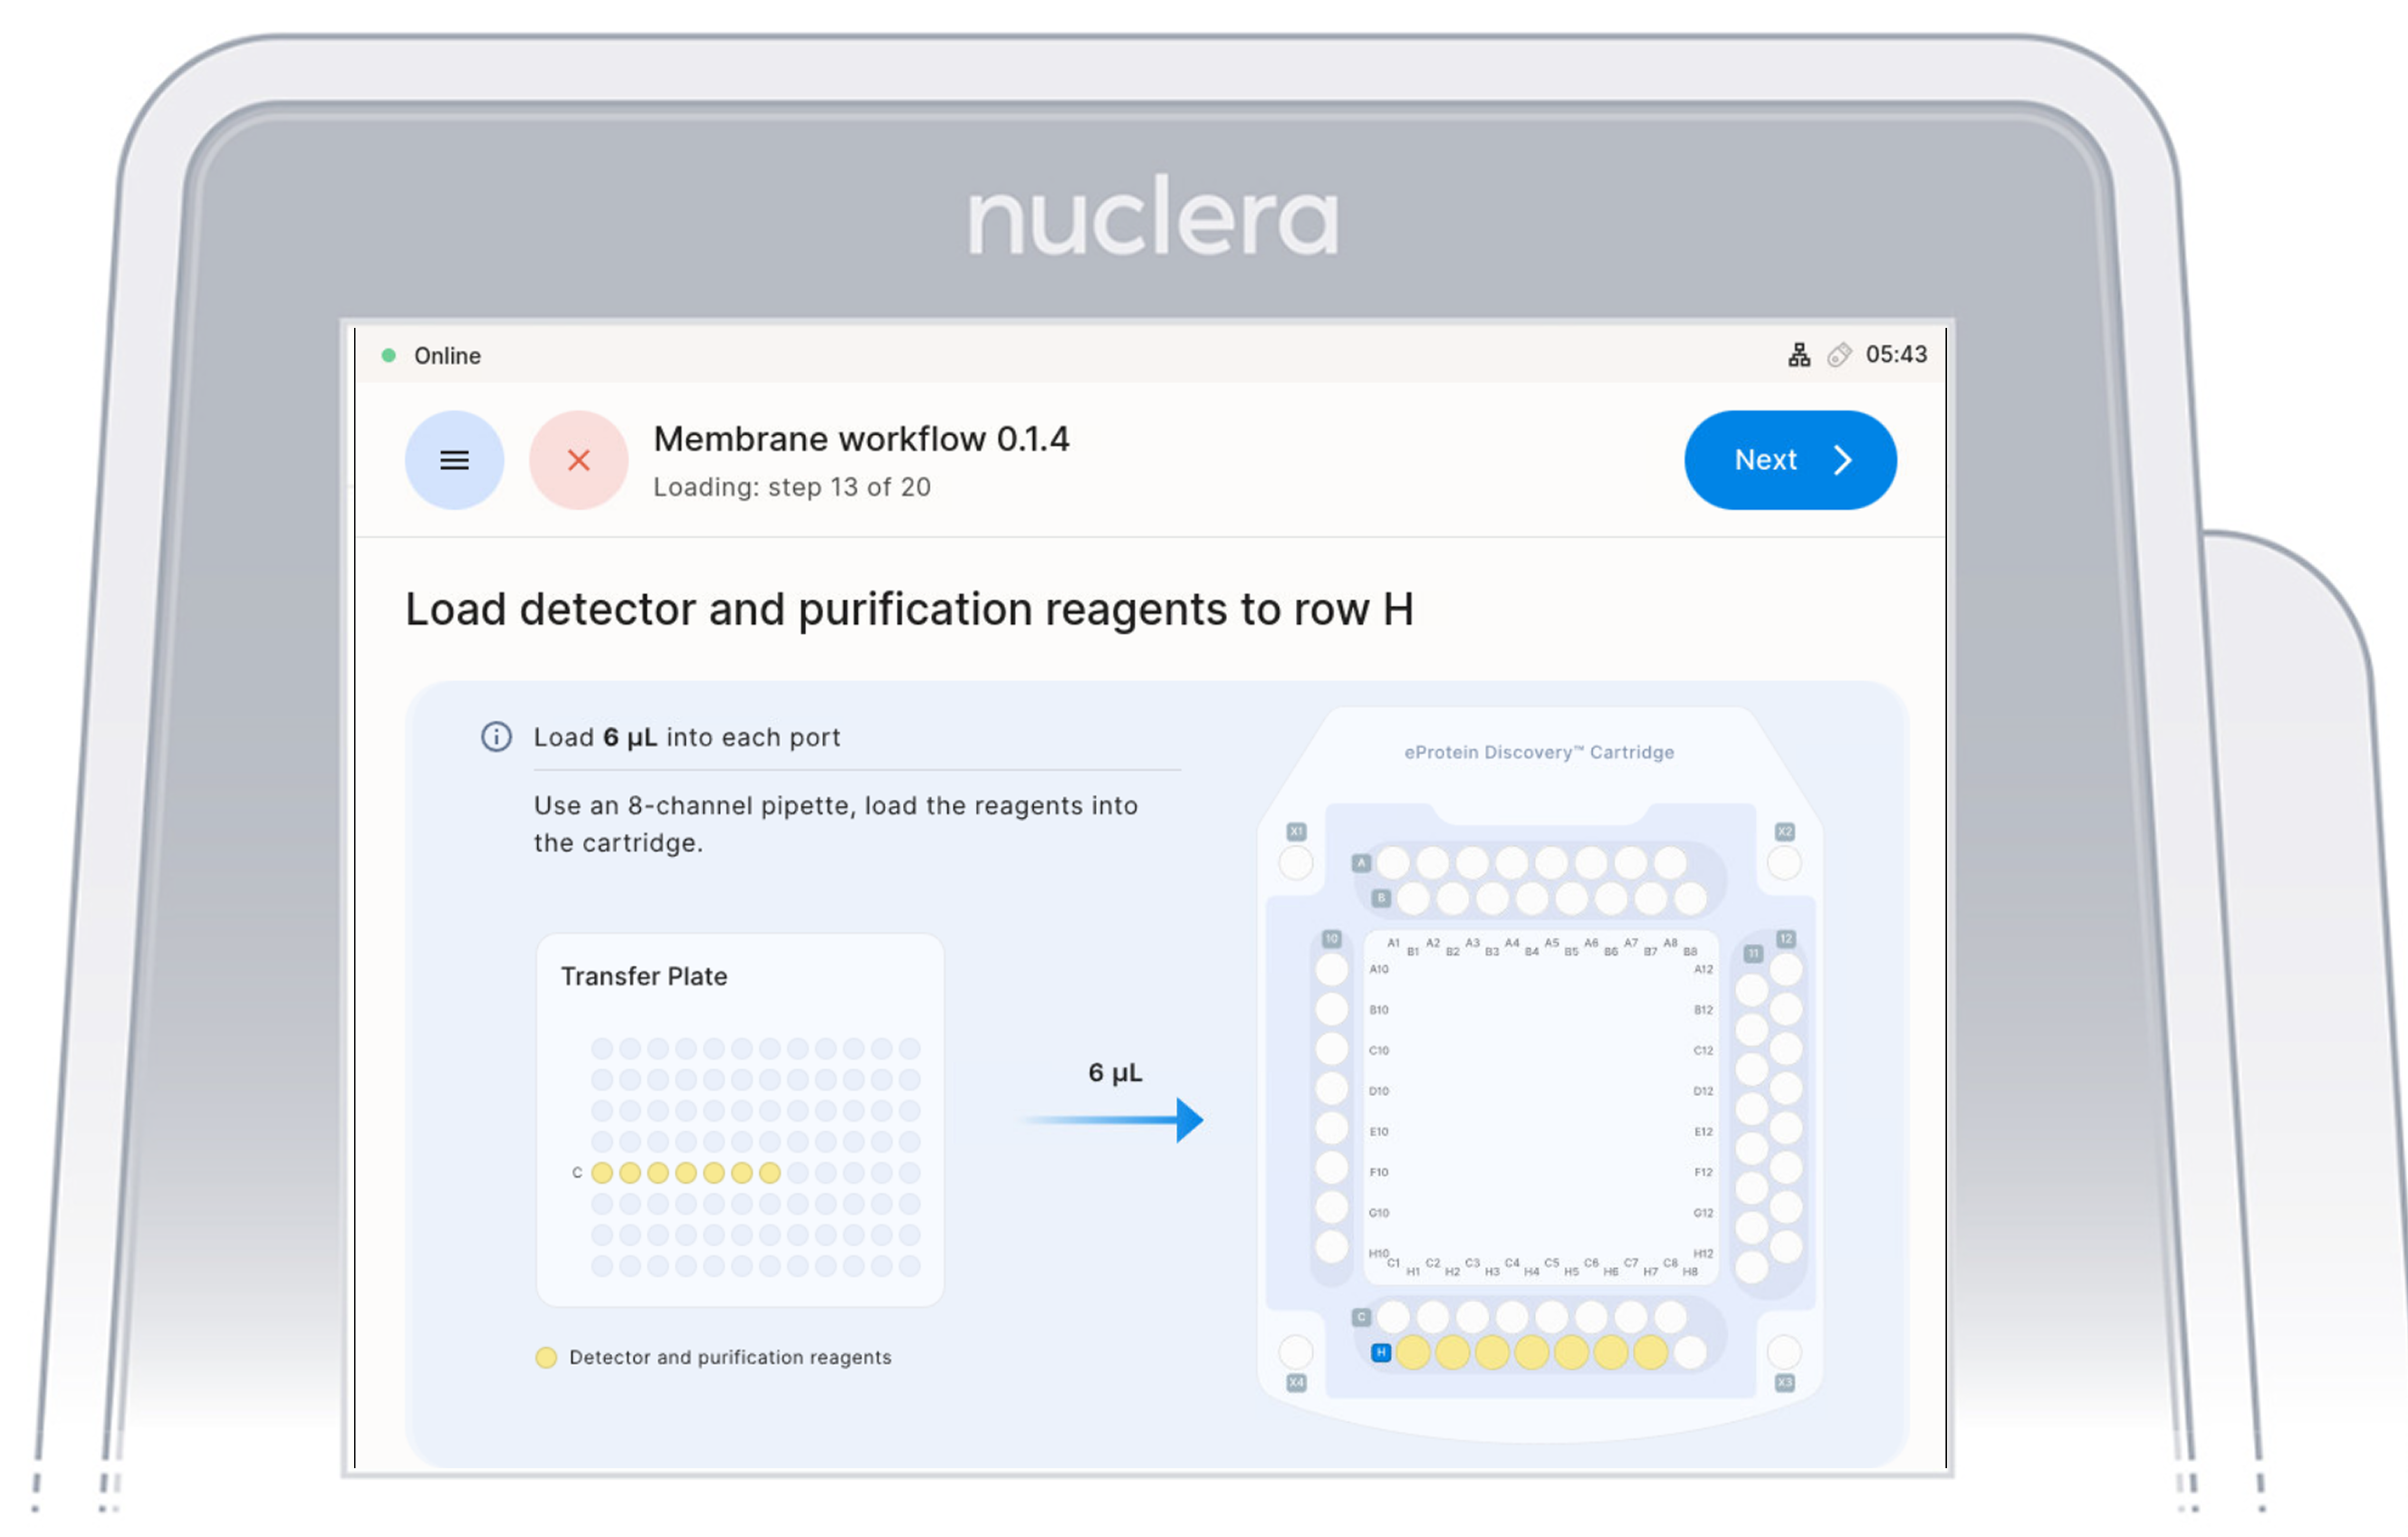
Load Reagents - row H
- Load 7x fresh p20 pipette tips and aspirate 6 µL of the reagents from the transfer plate wells C1-C7 into ports H1-H7 of the cartridge.
Do not use 8 tips as the purge of an empty tips might create air bubbles in the cartridge
- Ensure the pipette tips are positioned just below the surface of the base fluid, away from the sides and bottom of the port. Dispense slowly until the first stop of the pipette is reached. Do not insert the pipette tip directly into the base of port.
- Eject the pipette tips into a waste container.
- Press the [Next] button on the screen.
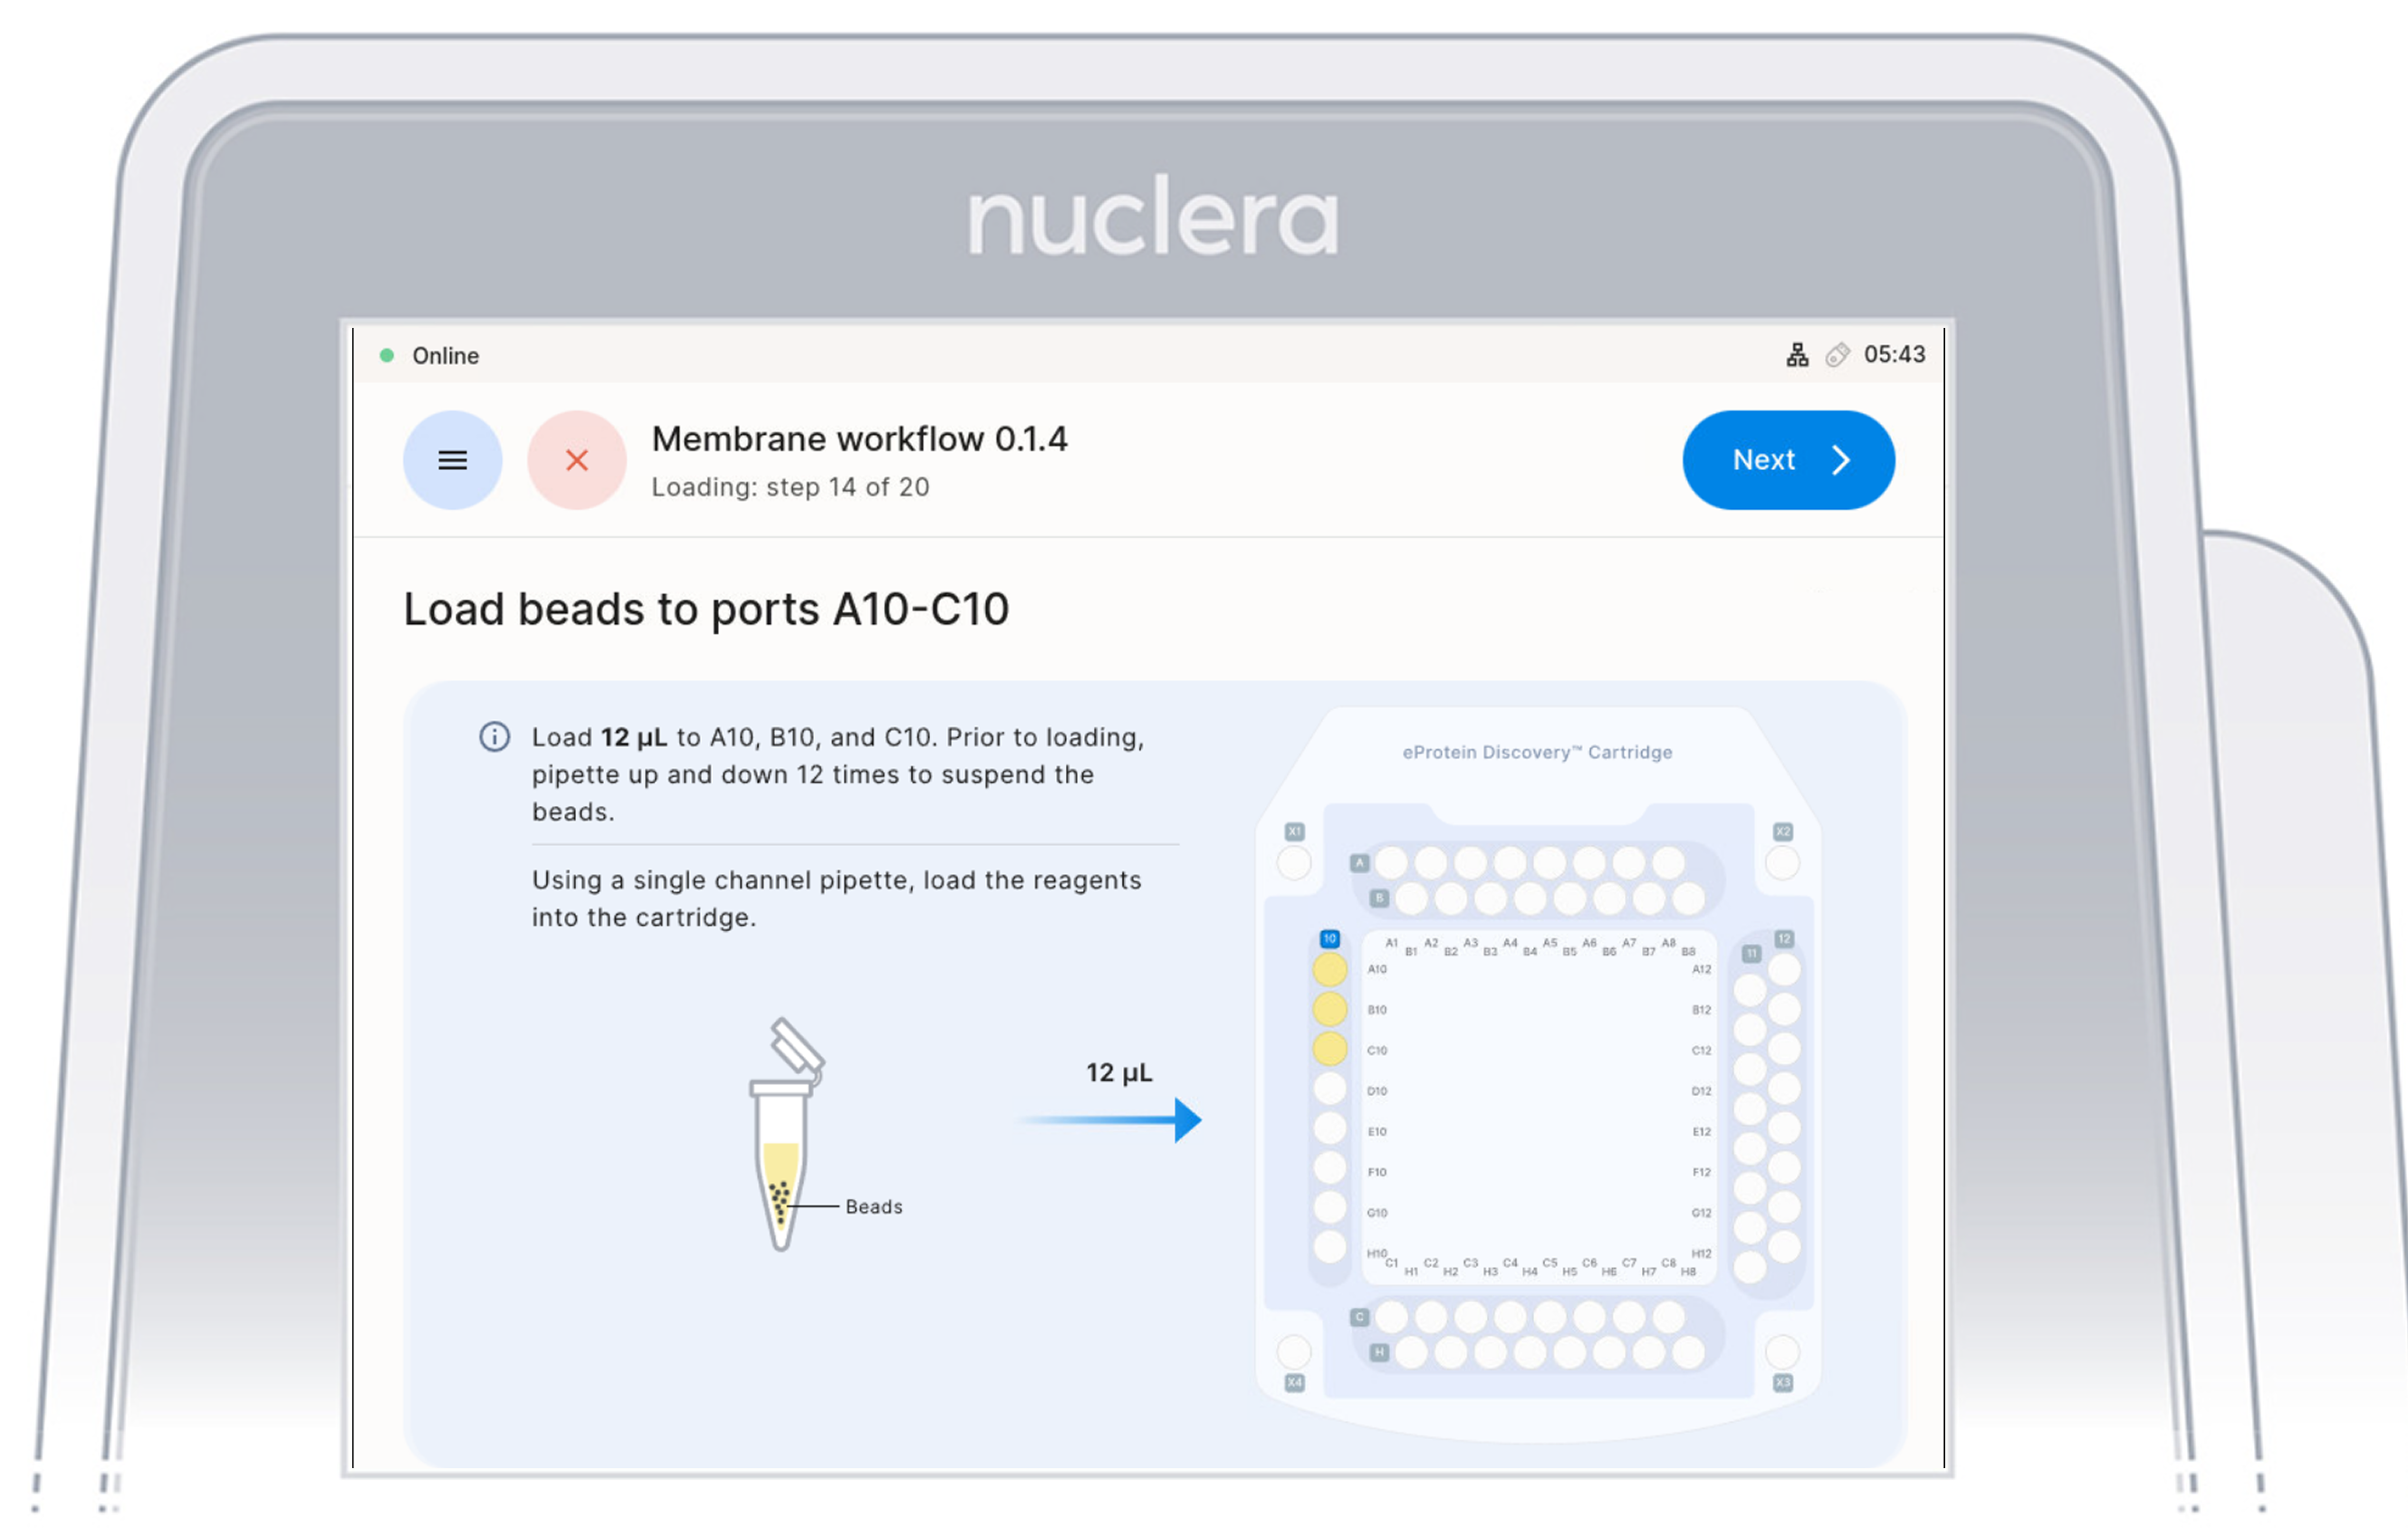
5. Strep Purification Beads - ports A10-C10:
- Using a single-channel P20 pipette, mix the first Strep Purification Beads tube by gently pipetting up and down 12 times, avoiding air bubbles. Immediately aspirate 12 µL and dispense into port A10 of the cartridge. Repeat the same process for the second and third tubes, dispensing into ports B10 and C10, respectively.
Mix, aspirate, and dispense each tube sequentially to prevent bead settling and ensure uniform loading in the cartridge.
- Ensure the pipette tip is positioned just below the surface of the base fluid, away from the sides and bottom of the port. Dispense slowly until the first stop of the pipette is reached. Do not insert the pipette tip directly into the base of port.
- Eject the pipette tip into a waste container.
- Press the [Next] button on the screen.
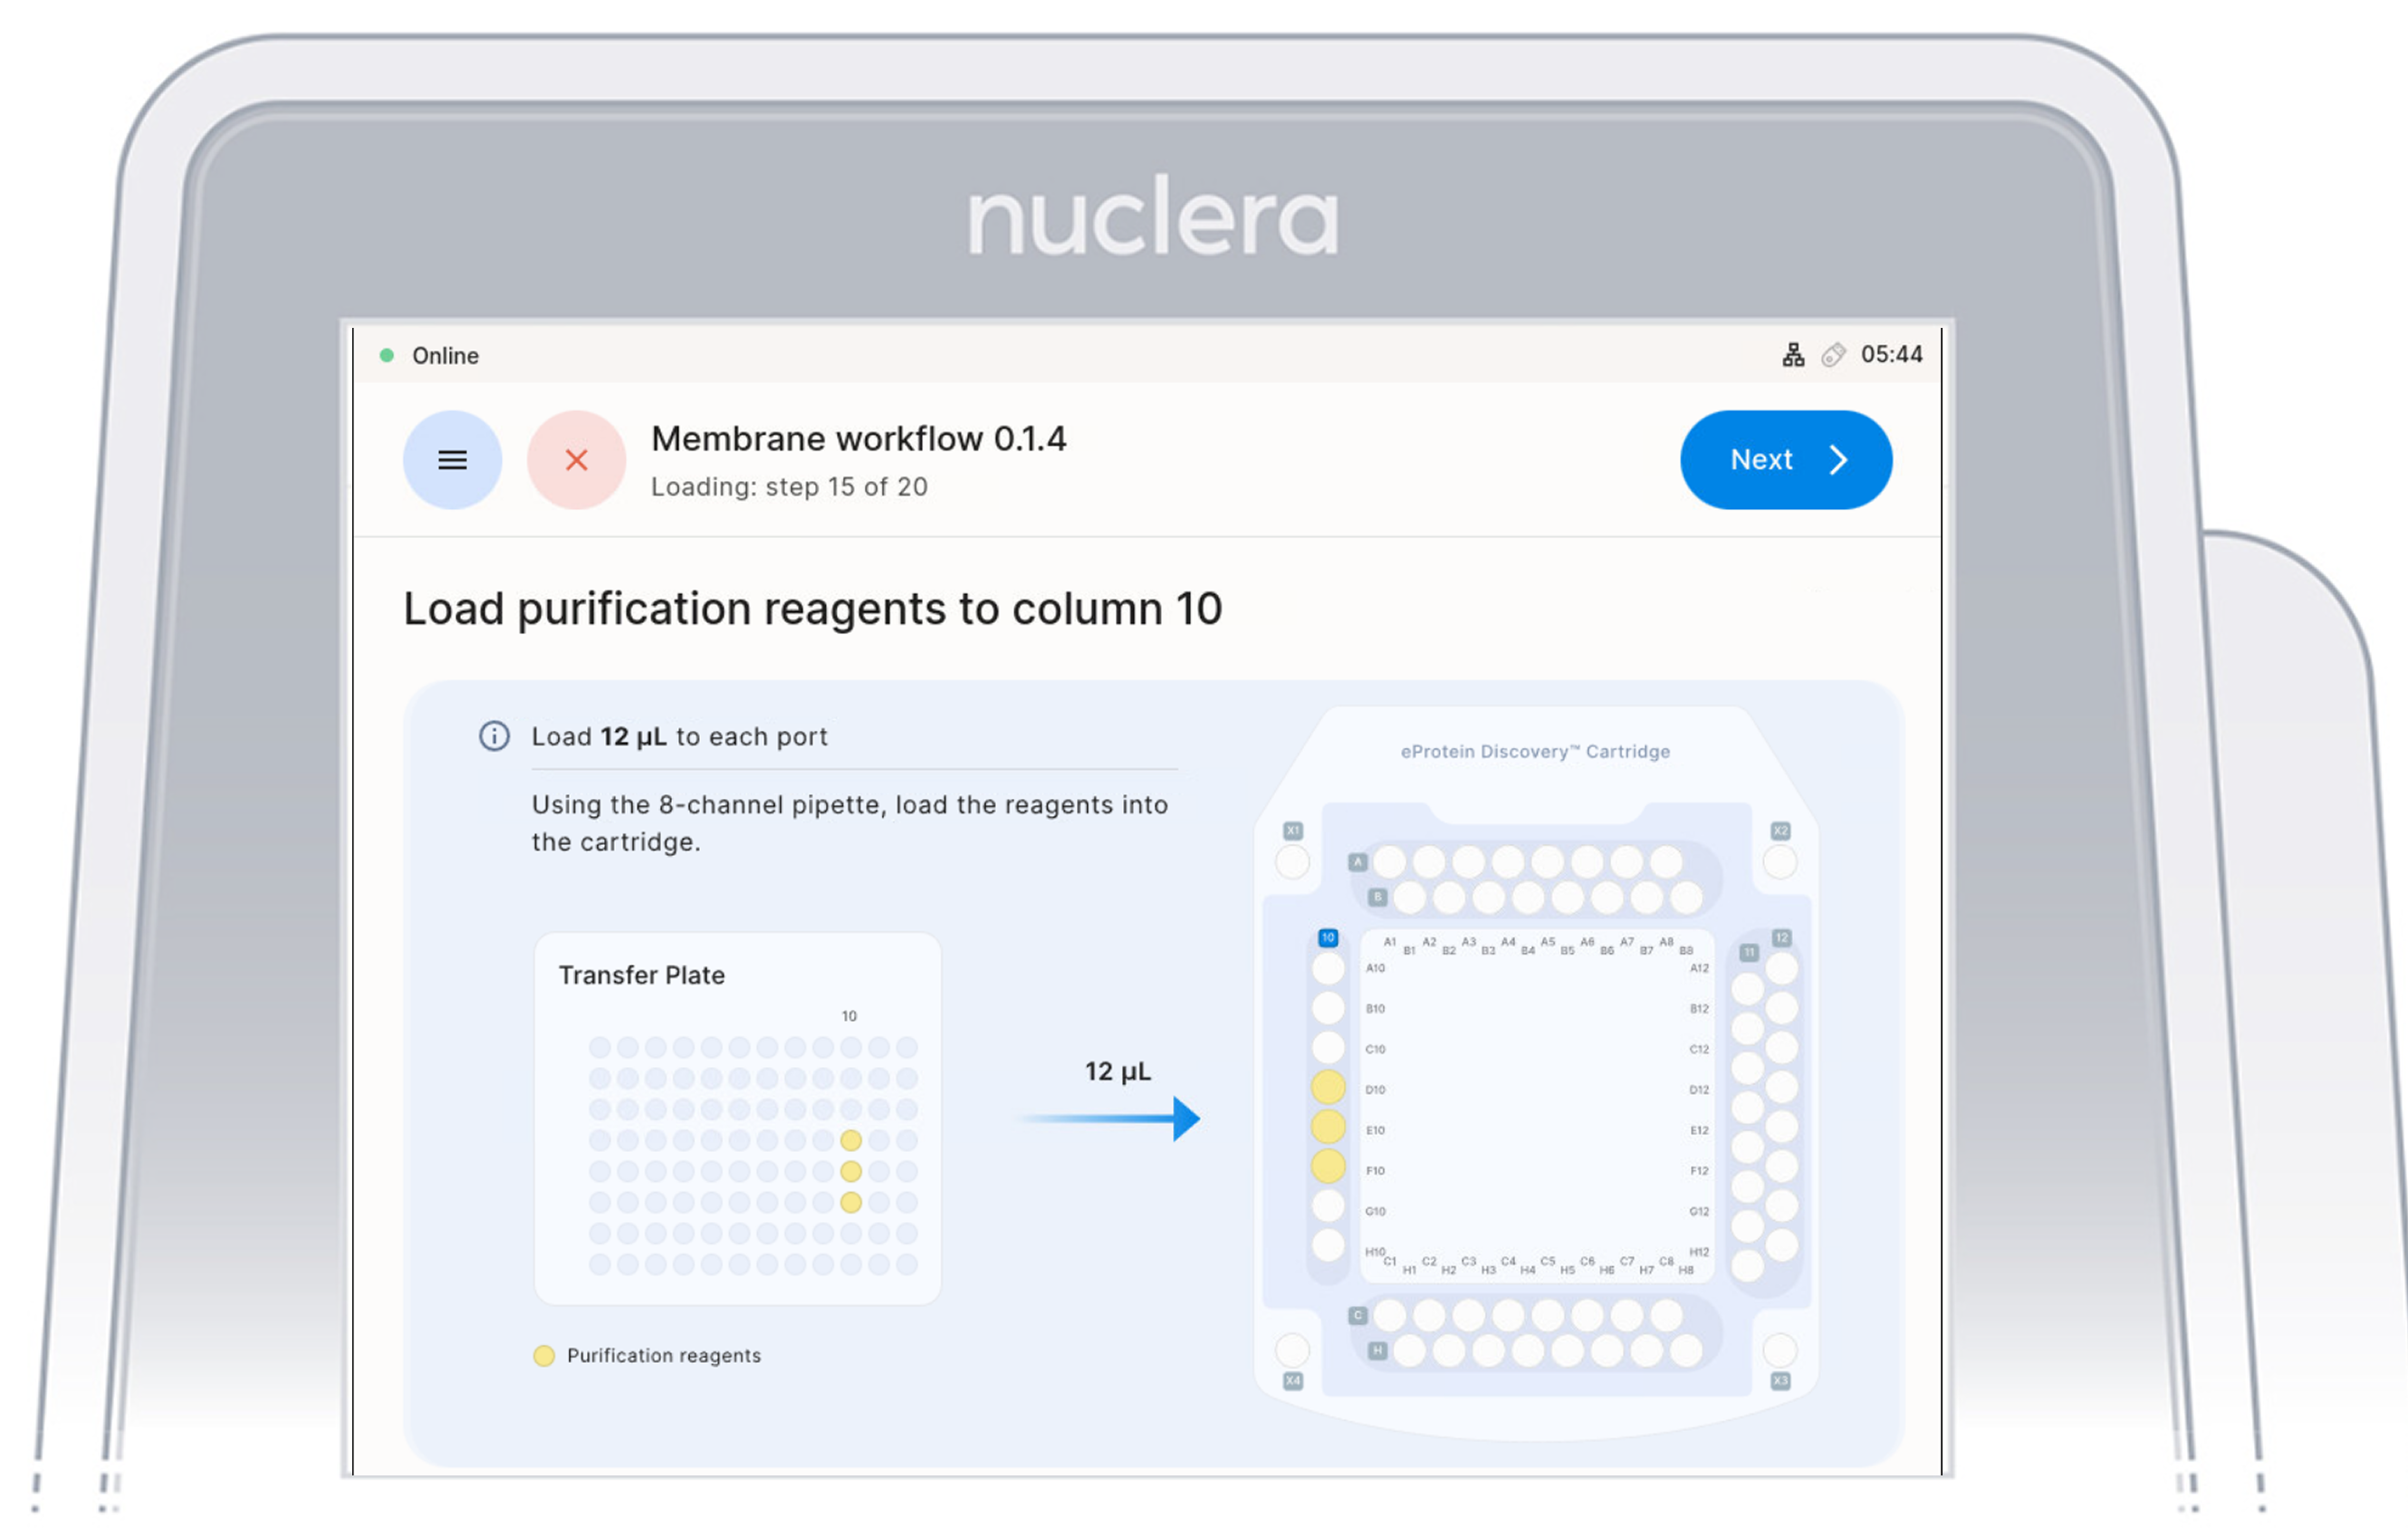
Load Purification Reagents - ports D10-F10
- Aspirate 12 µL of purification reagents from D10-F10 wells of the transfer plate and dispense it to column 10 on the cartridge.
- Ensure the pipette tips are positioned just below the surface of the base fluid, away from the sides and bottom of the port. Dispense slowly until the first stop of the pipette is reached. Do not insert the pipette tip directly into the base of the port.
- Eject the pipette tips into a waste container.
- Press the [Next] button on the screen.
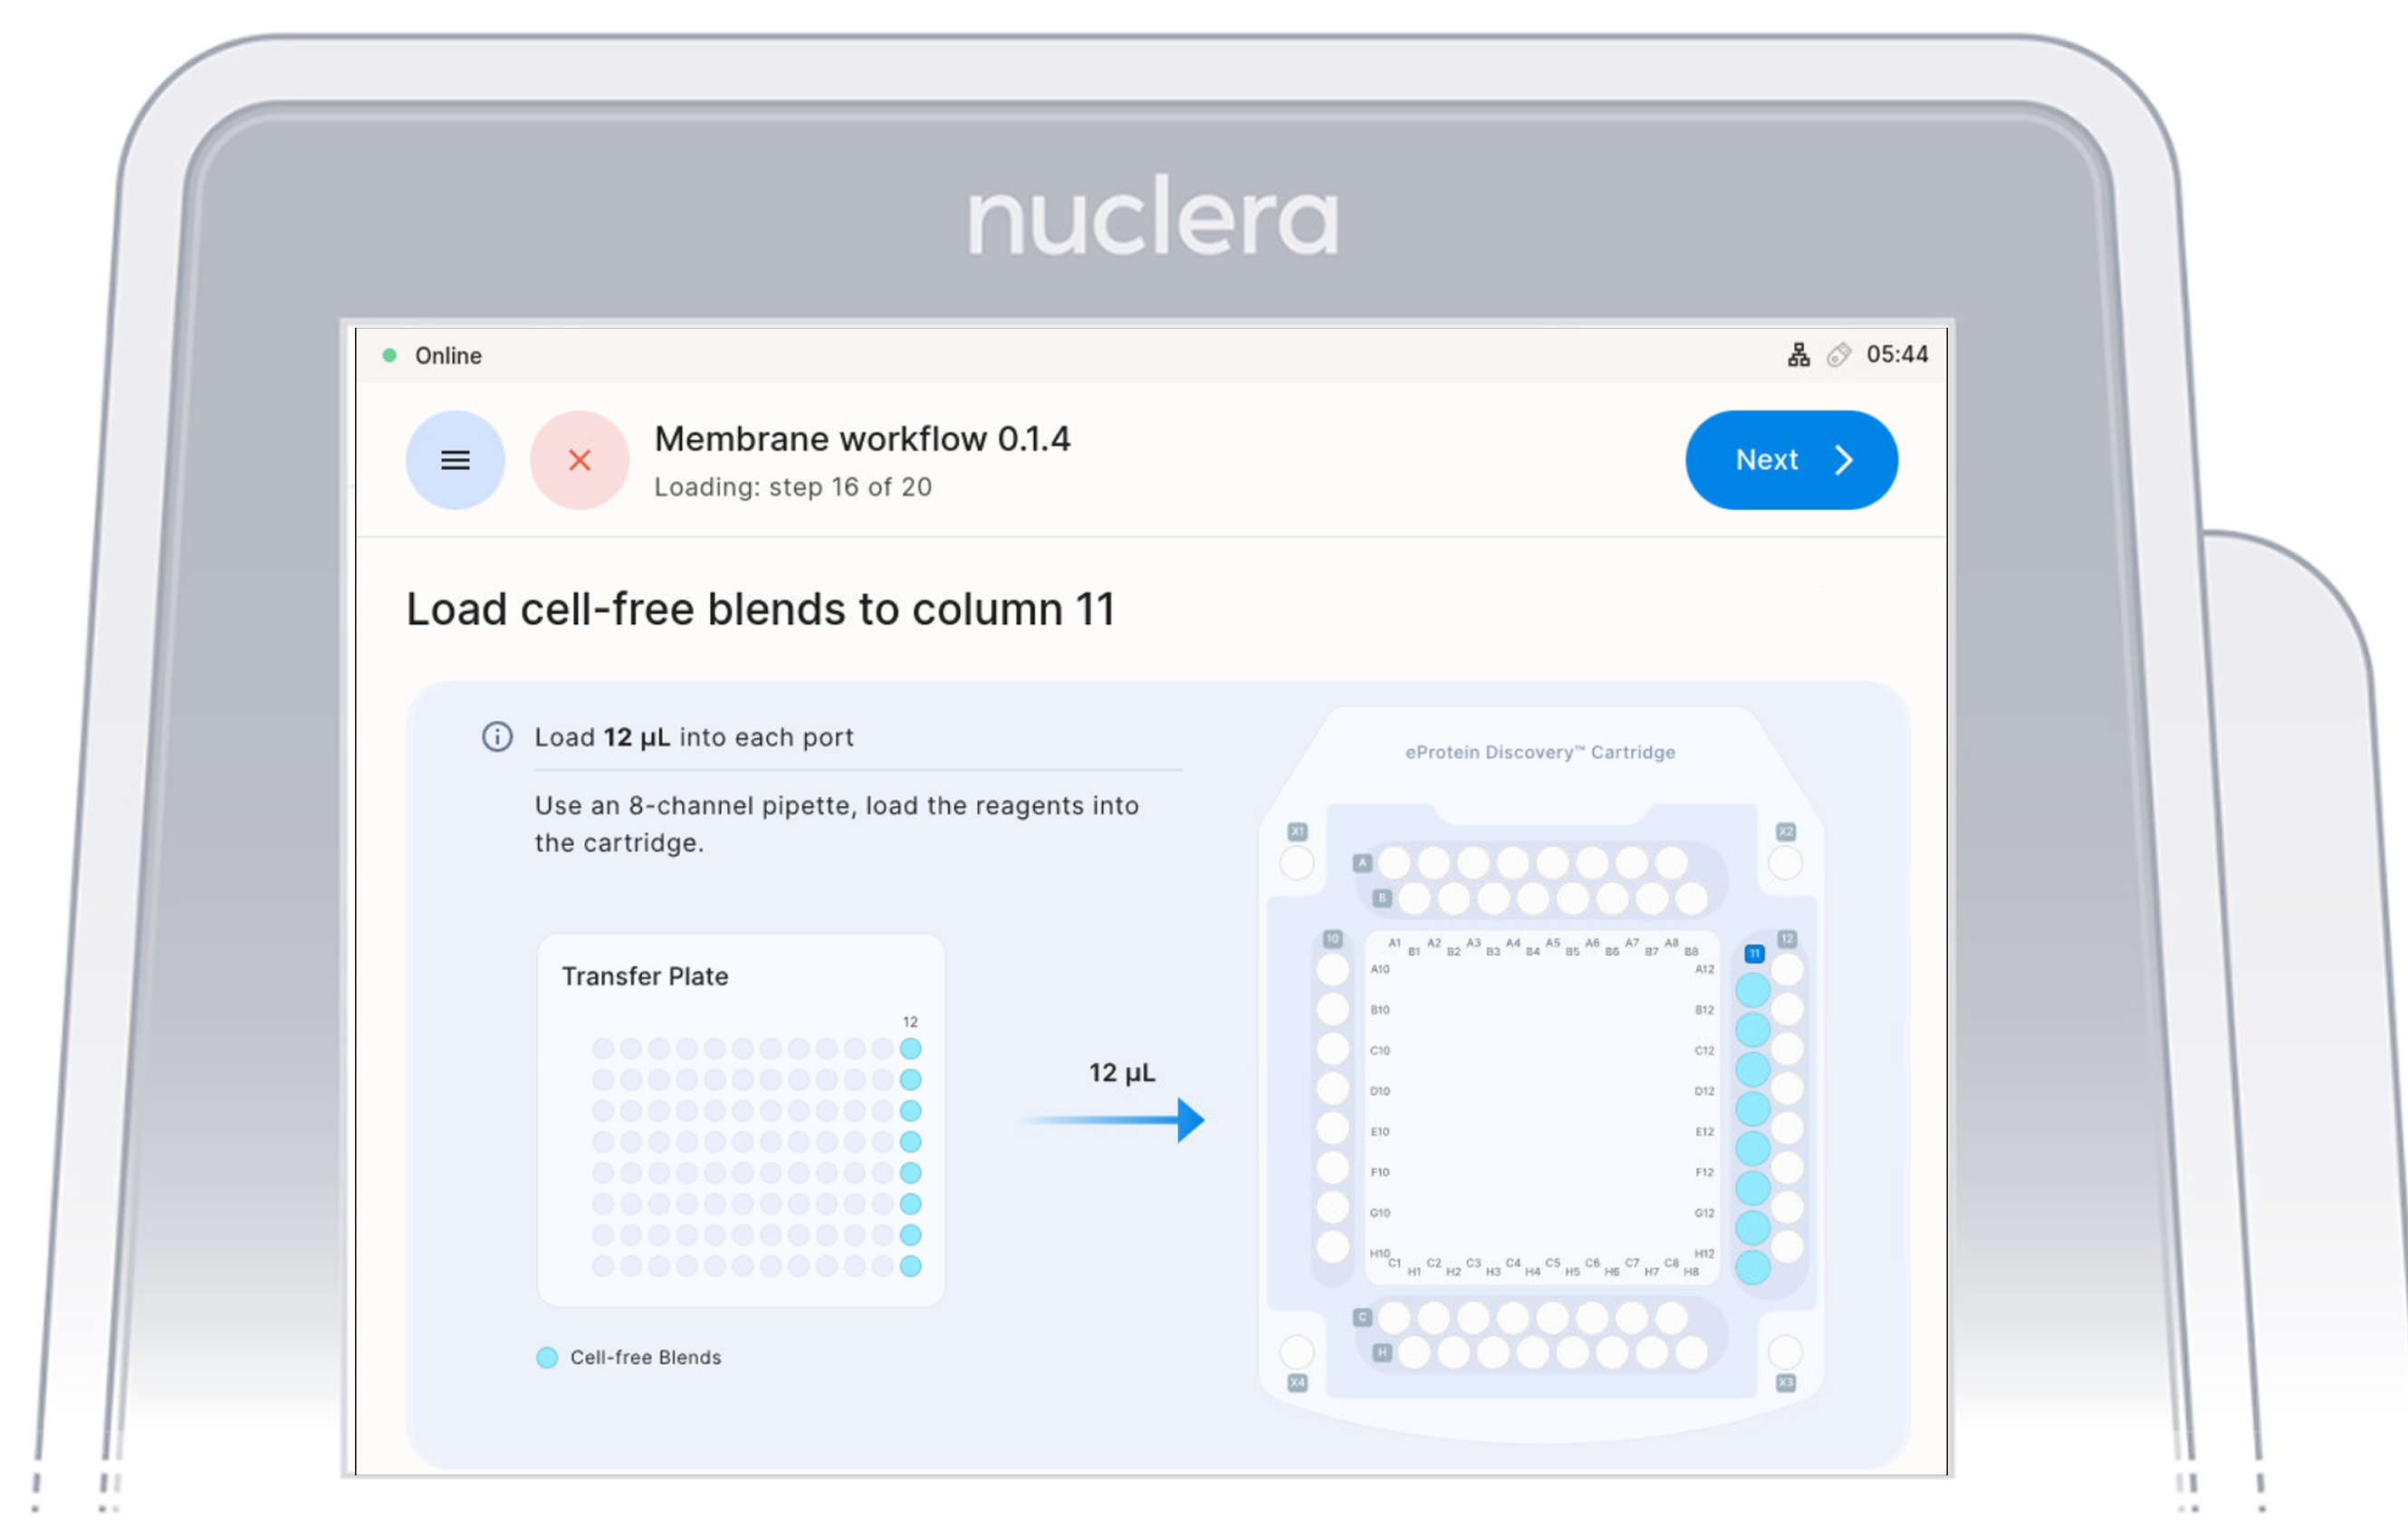
Load Cell Free Blend Reagents - ports Column 11
- Load 8x fresh p20 pipette tips and mix the Cell-free Blends in the transfer plate in column 12 by gently pipetting up and down 12 times.
Be careful not to introduce air bubbles in the ports.
Aspirate 12 µL of the Cell-free Blends from the transfer plate wells
- Aspirate 12 µL of cell-free blend from the transfer plate wells and dispense it to column 11 on the cartridge.
- Ensure the pipette tips are positioned just below the surface of the base fluid, away from the sides and bottom of the port. Dispense slowly until the first stop of the pipette is reached. Do not insert the pipette tip directly into the base of port.
- Eject the pipette tips into a waste container.
- Press the [Next] button on the screen.
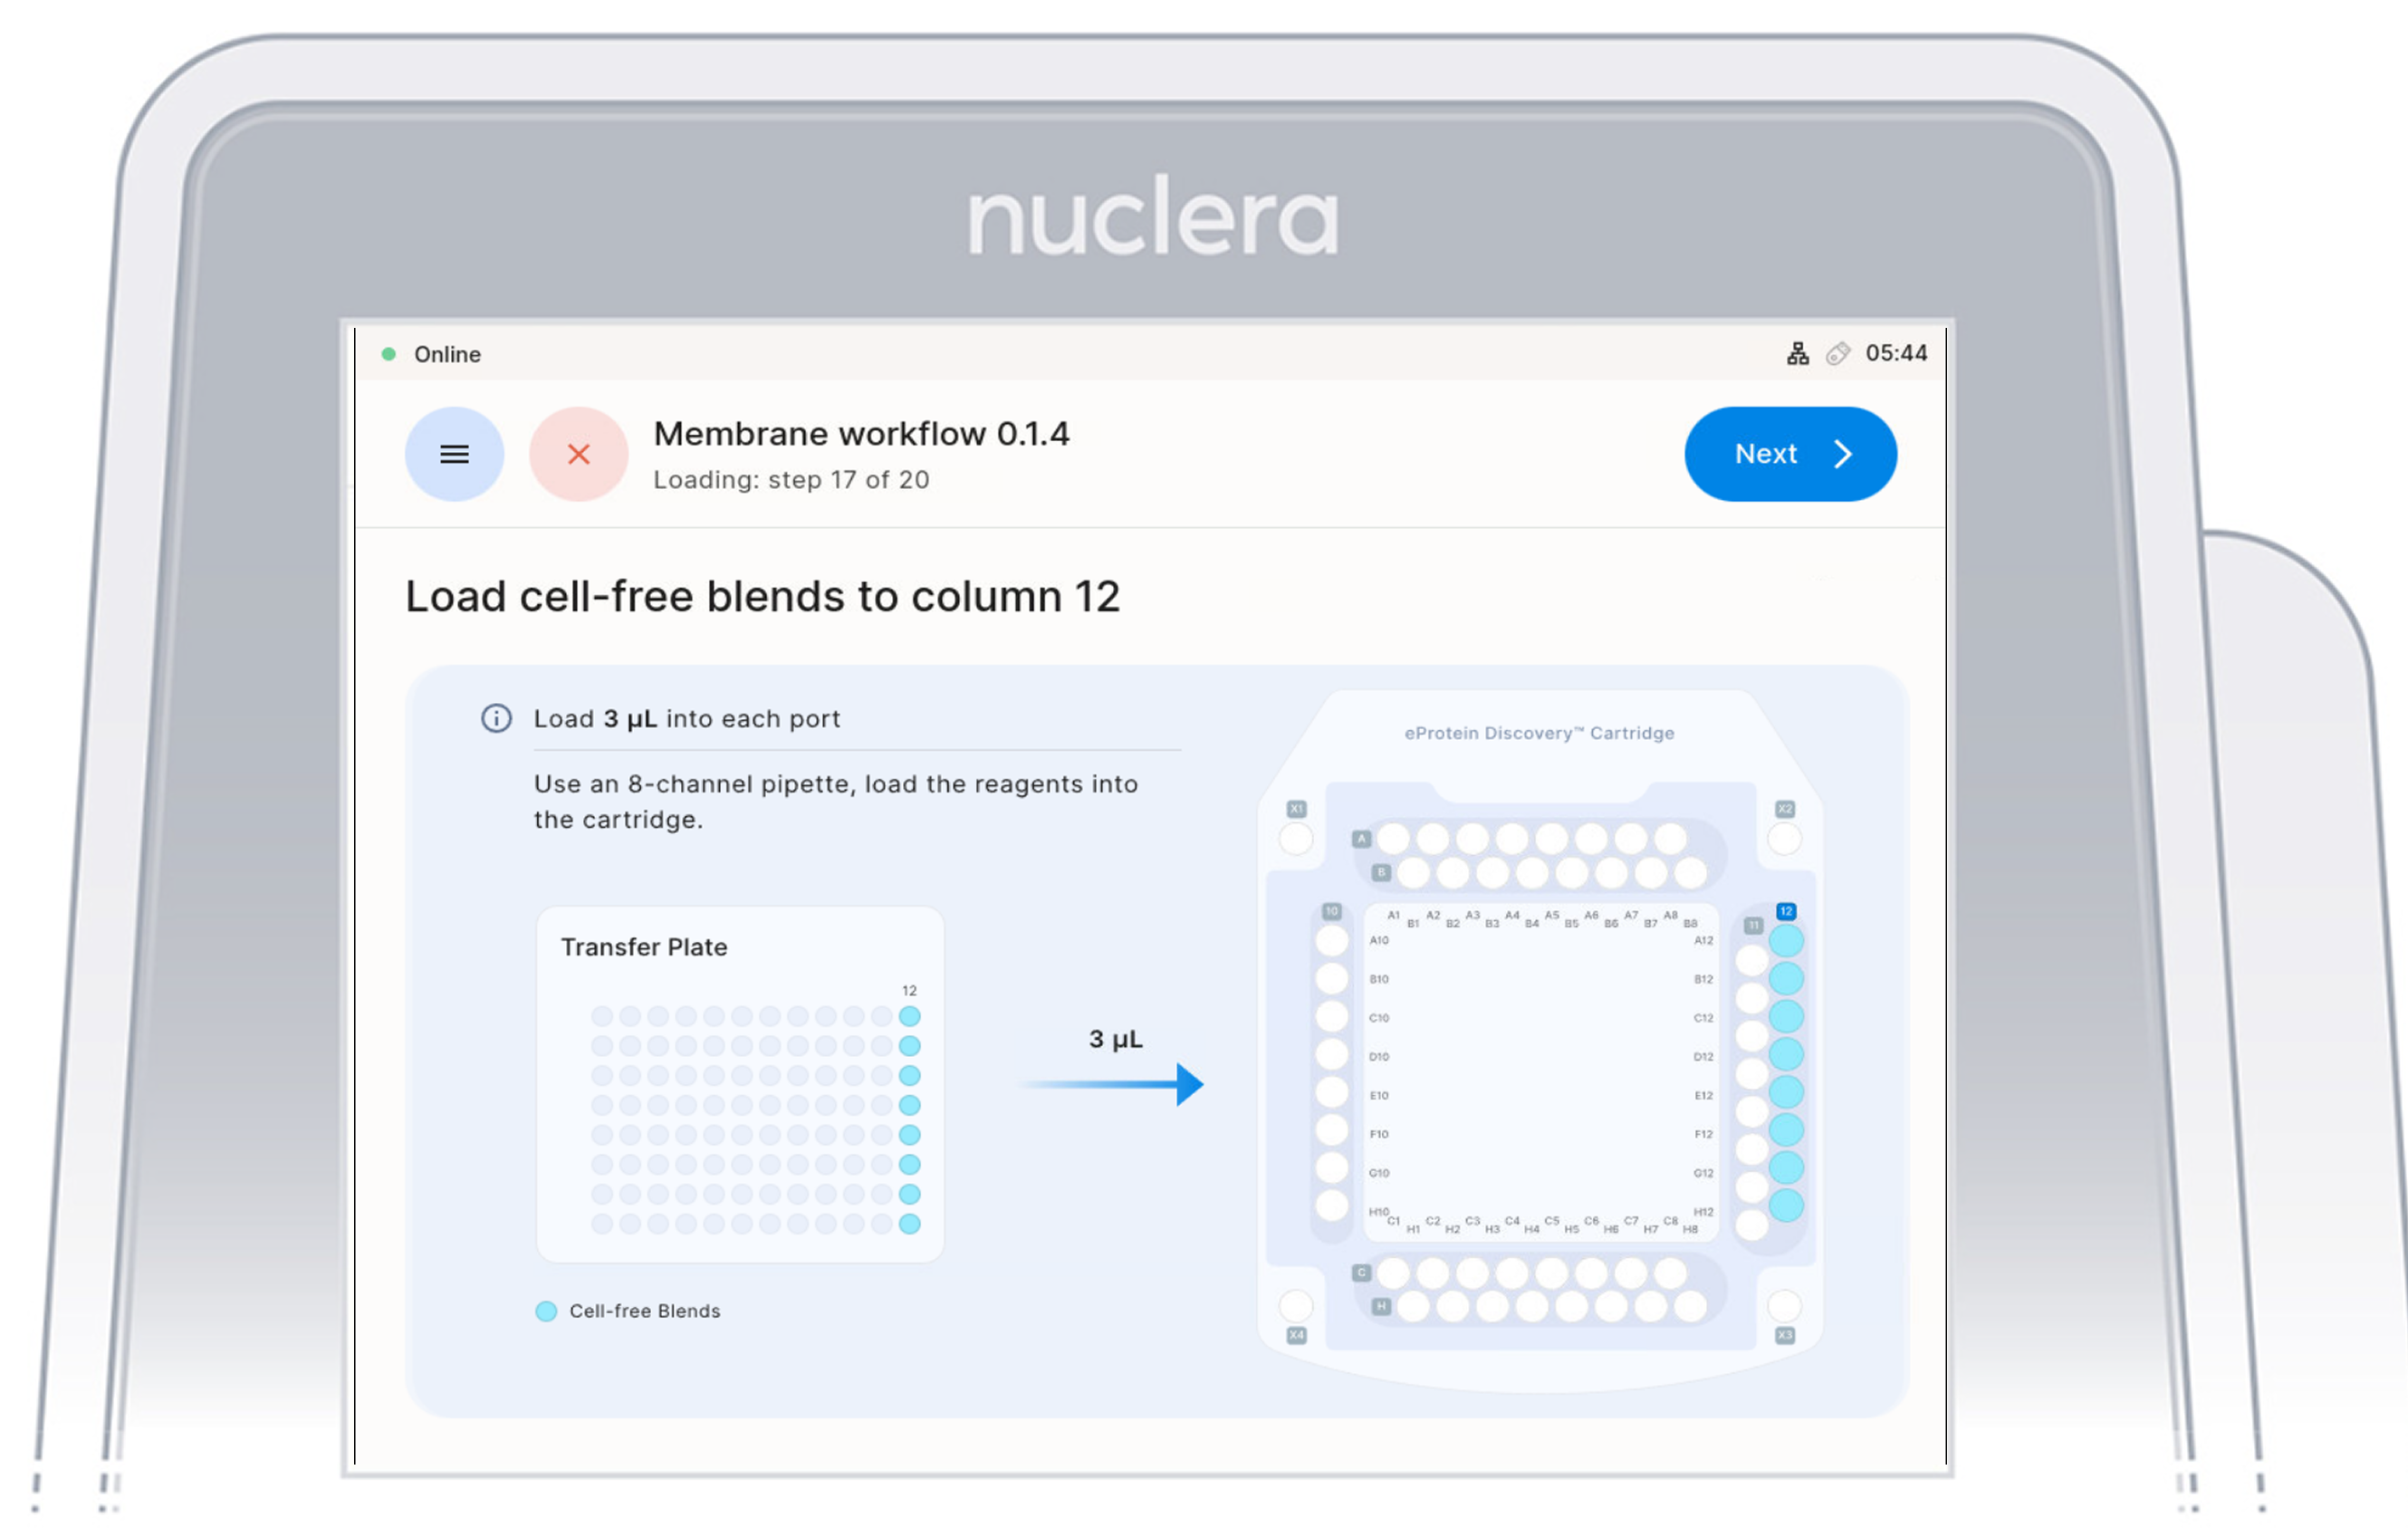
Load Cell Free Blend Reagents - ports Column 12
- Aspirate 3 µL of cell-free blend from the transfer plate wells and dispense it to column 12 on the cartridge.
- Ensure the pipette tips are positioned just below the surface of the base fluid, away from the sides and bottom of the port. Dispense slowly until the first stop of the pipette is reached. Do not insert the pipette tip directly into the base of port.
- Eject the pipette tips into a waste container.
- Press the [Next] button on the screen.
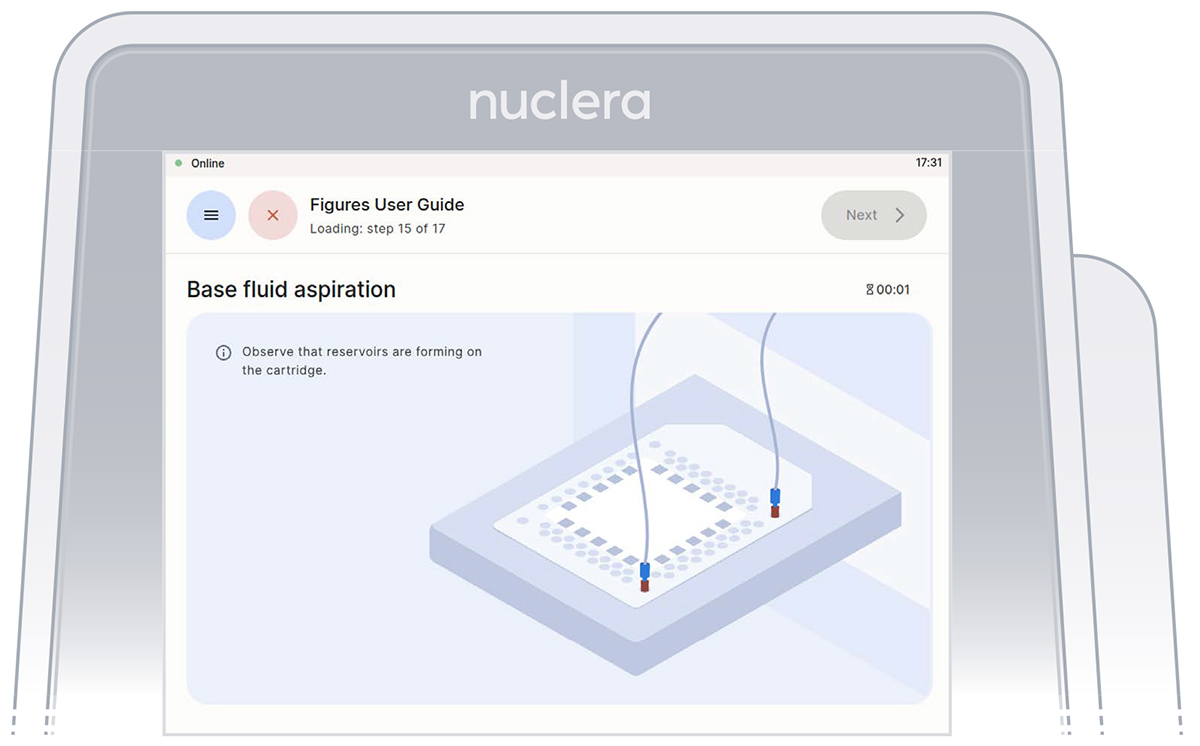
Aspirate reagents in the cartridge
Press the [Next] button to start the aspiration of the base fluid and the loading of the reagents on the cartridge.
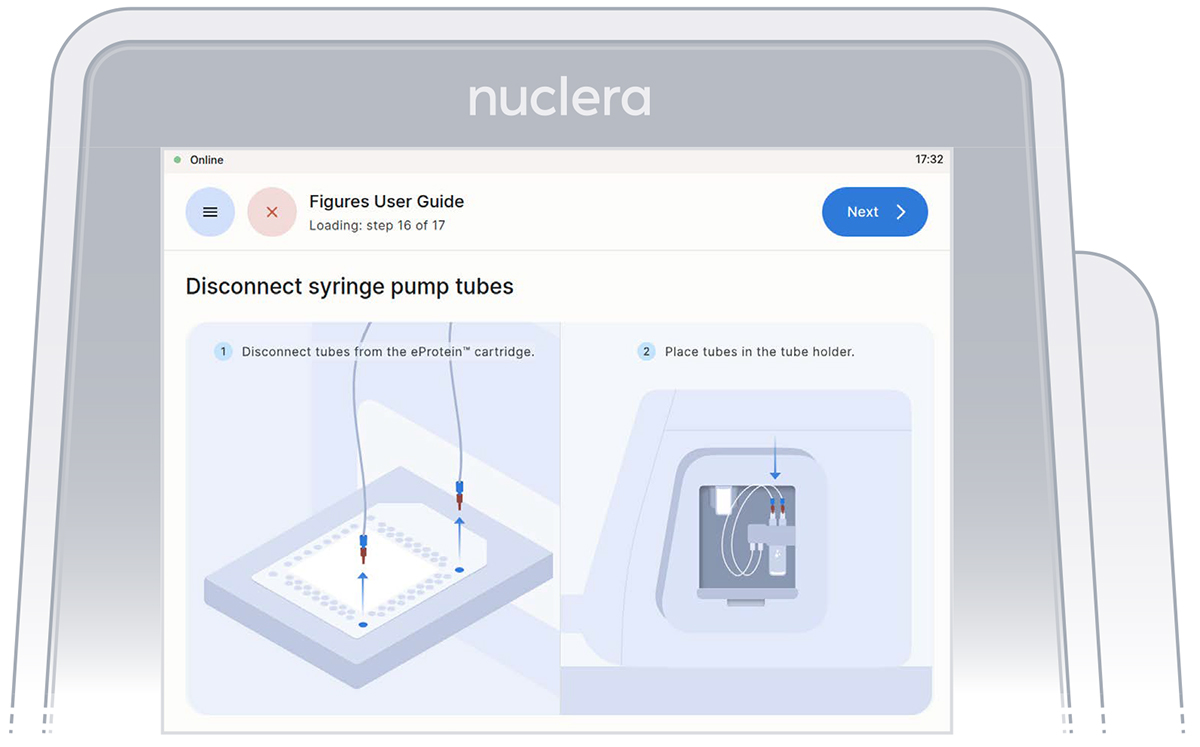
Disconnect the tubes from the cartridge and place them in the tube holder on the right hand side of the instrument. Press the [Next] button on the screen, and the drawer will close. Quality controls will be performed. The experiment will start.
Nuclera Technical Support:
UK Phone +44 1223 942 761
US Phone: +1 508-306-1297
Email: techsupport@nuclera.com
Offices:
Nuclera UK (HQ):
One Vision Park, Station Road, Cambridge, CB24 9NP, UK
Nuclera USA: 1000 Technology Park Drive, Suite B, Billerica MA 01821, USA www.nuclera.com
Copyright © 2025 Nuclera Ltd. All trademarks are the property of Nuclera, Ltd. Visit nuclera.com/legal for more info.
Genscript is a registered trademark of Nanjing GenScript Biotech Co., Ltd.
GeneArt is a registered trademark of Thermo Fisher Scientific GeneArt GmbH