Initiate Your Experiment
After proceeding to the next step of the checklist, the experiment is initate and it is not possible to go back and forth in the screen.
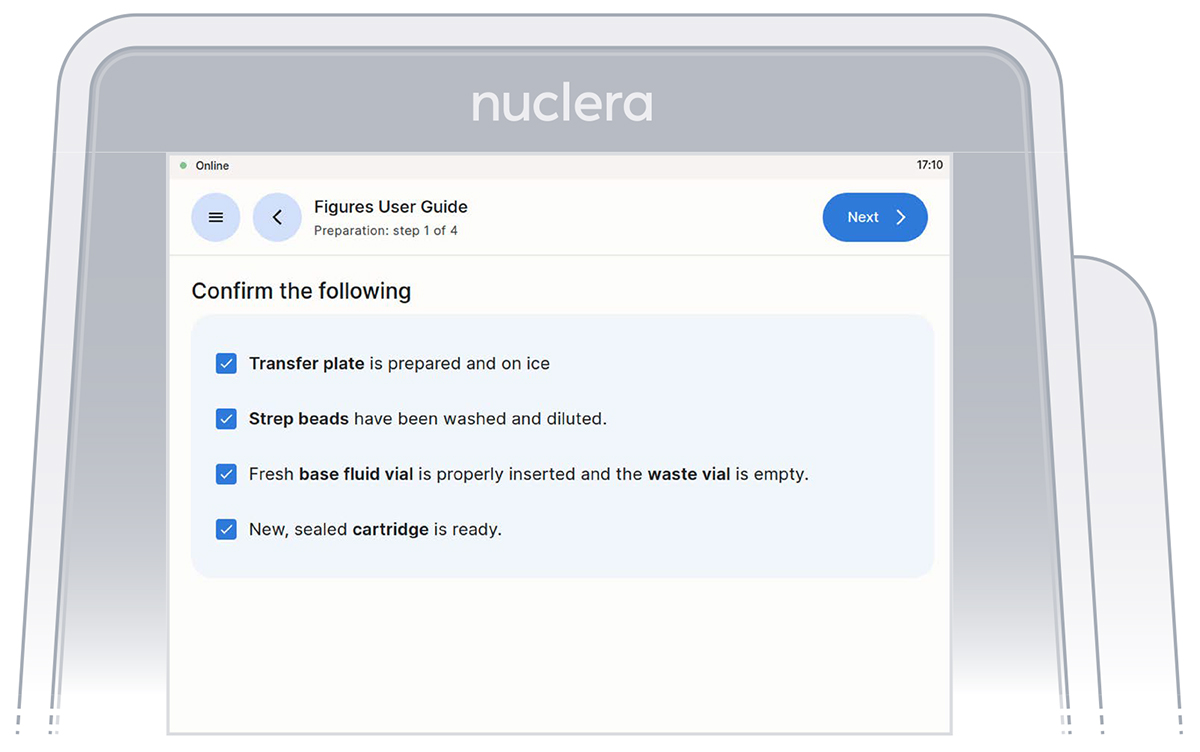
Go through and tick the checklist, and press the [Next] button. The drawer will open.
Loading of the cartridge on the eProtein Discovery instrument.
- Unpack and load a cartridge as shown on the screen of the eProtein Discovery instrument
- Place the cover on the cartridge, avoid touching the electrical connectors, and press the [Next] button.
 Figure 10: Checklist screen before the experiment starts.
Note: keep the cartridge packaging to dispose of the cartridge after use.
- Keep cover on the cartridge. Markings on the cover will guide you through the loading process.
Set up the pump on the instrument
Follow the on-screen instructions to complete the experiment.
- These instructions will guide you in operating the eProtein Discovery instrument and completing an experiment on the instrument.
- The instructions must be followed in the order shown on the screen.
- You can navigate forward and back through the steps using the buttons at the top.
- You can scroll up and down using the arrows at the bottom right of the screen when shown or with your fingers.
Note: once you start the experiment, the back button on the instrument will be disabled.
- On the right hand side of the instrument, ensure the tubings for the integrated pump are placed in the tubing holder, and press the [Next] button.
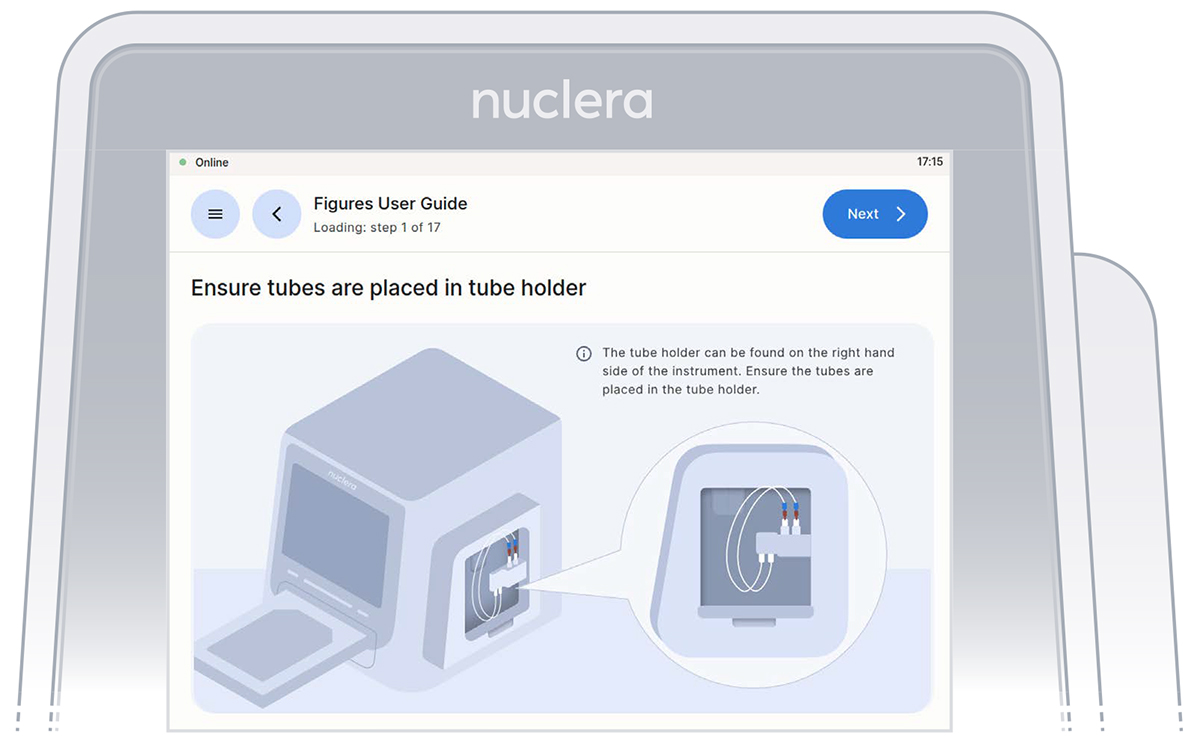
Verification screen that the tubings for the integrated pump are placed in the tubing holder.
- Ensure the vial of base fluid and the waste container have been connected to the pump located on the right hand side of the instrument. Press the [Next] button.
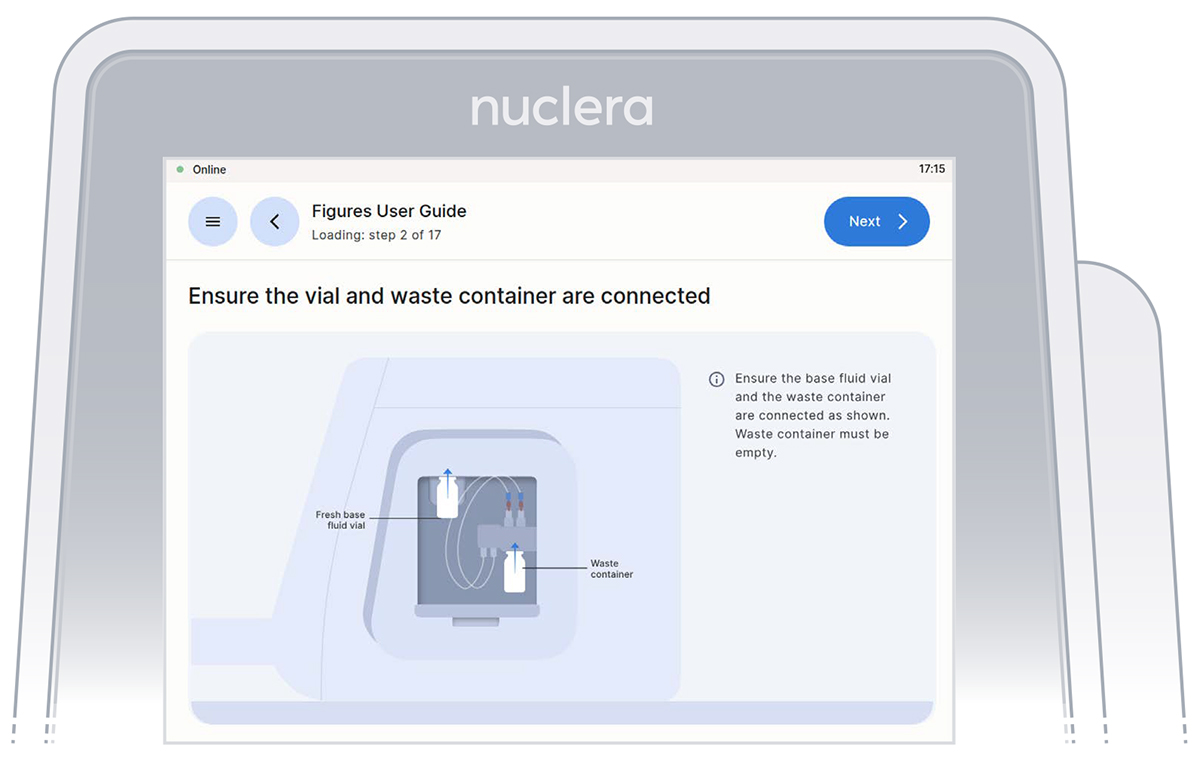
Vial of base fluid and the waste container connected to the pump as shown on the screen
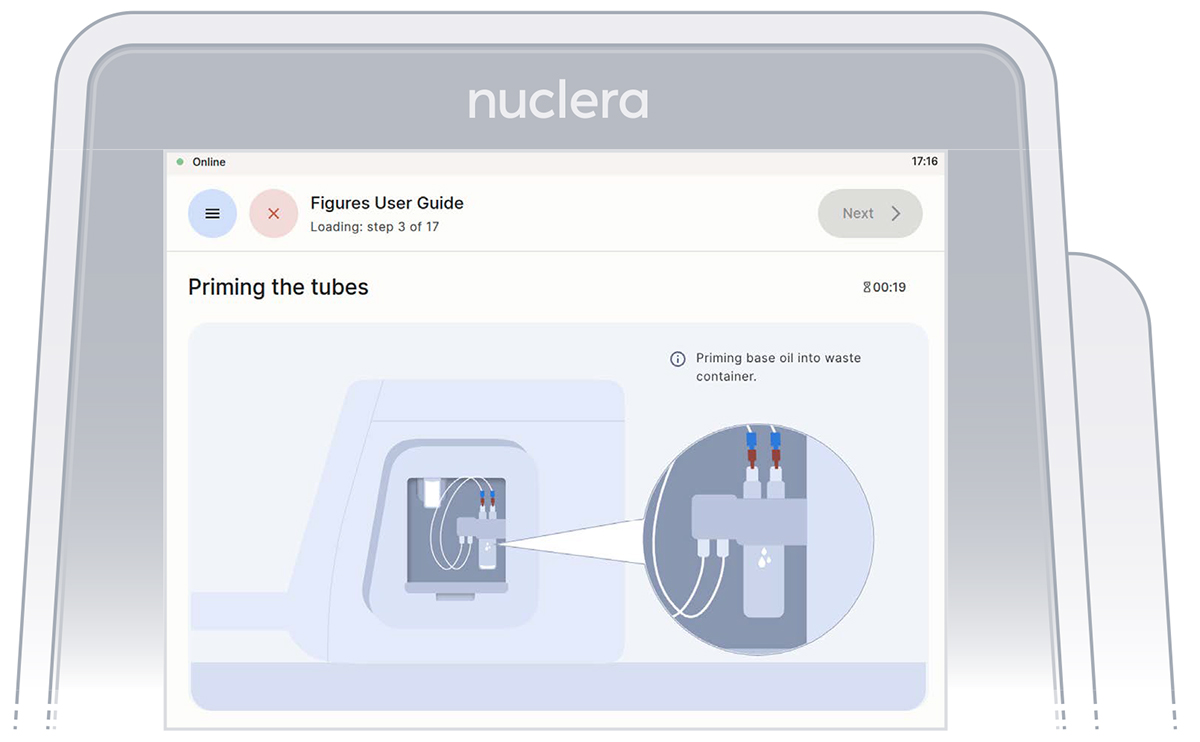
Filling the cartridge with base fluid
- With the tubes and containers in place, ensure that some of the base fluid has dripped into the waste container.
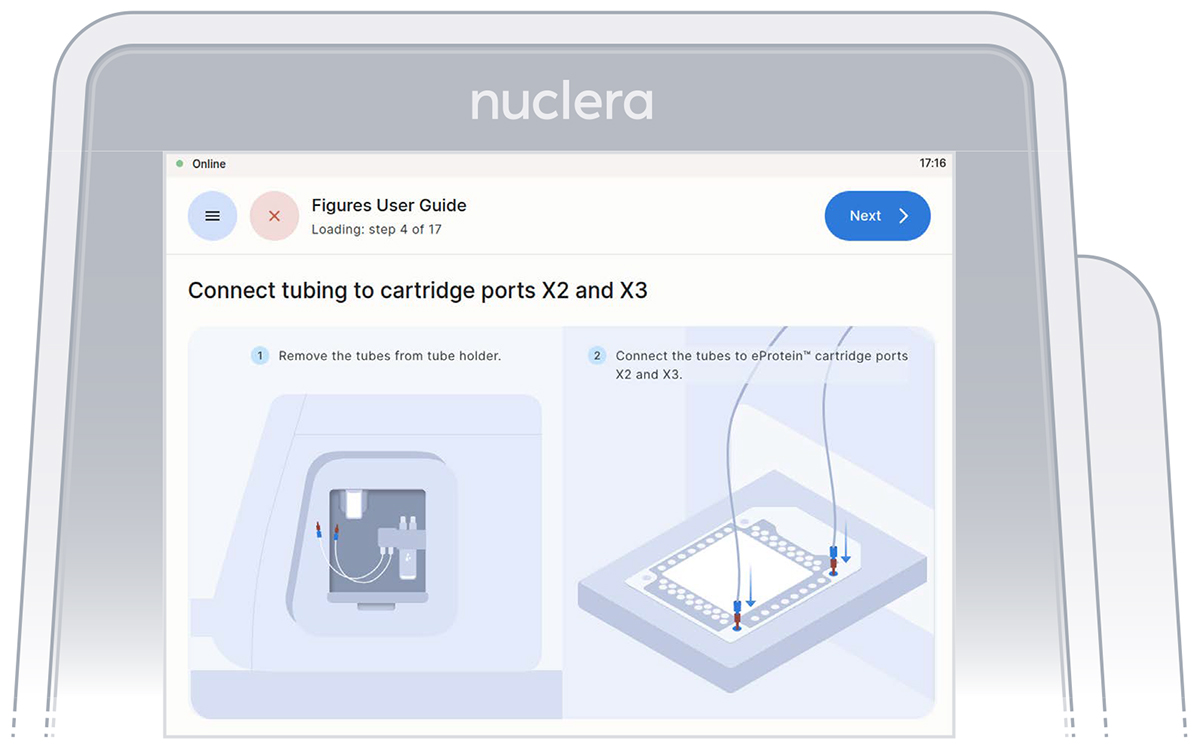
- Remove the tube connectors from the holder, connect them tightly to the corner ports X2 and X3 of the cartridge, and press the [Next] button. Either connector can be interchangeably inserted into corner port X2 or X3.
Inspection that all the ports on the cartridge are filled with base fluid
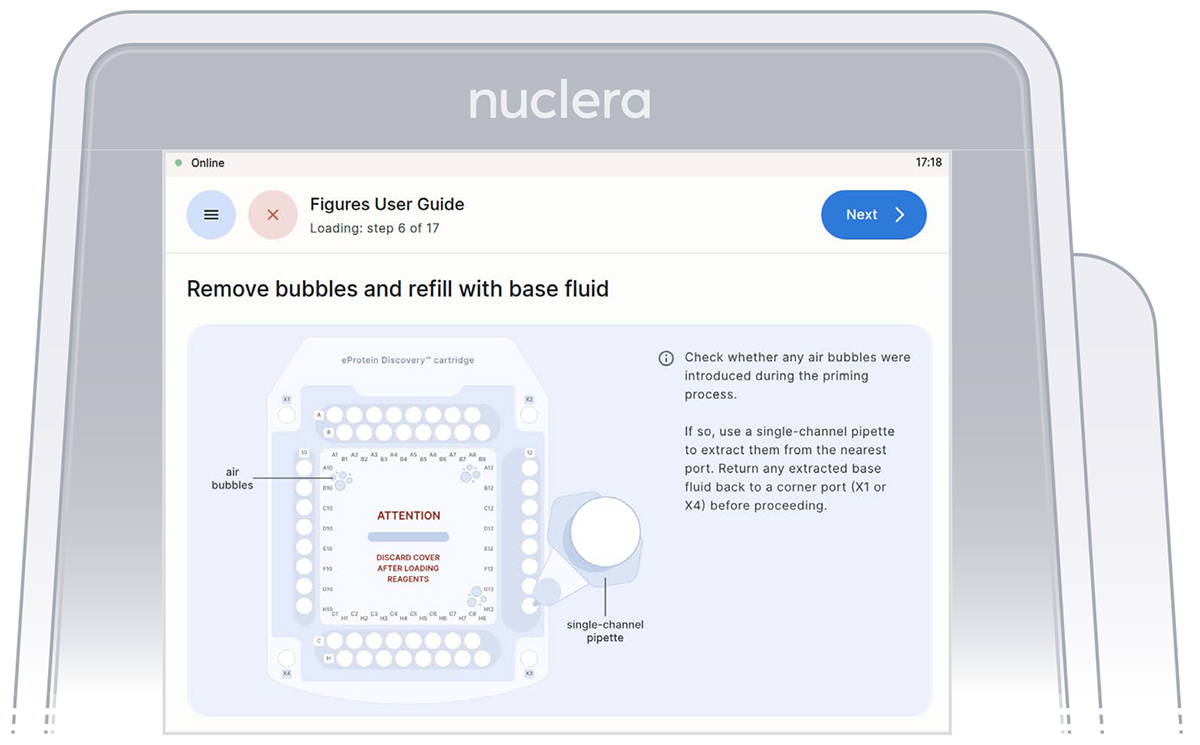
- Inspect the cartridge for air bubbles that may have been introduced during the priming with base fluid.
If any air bubbles persist after base fluid priming, use a single-channel p200 pipette to aspirate the air bubbles from the nearest port and reinject slowly the base fluid that was aspirated into a corner port (X1 or X4). Press the [Next] button.
- Inspect the ports on the cartridge after the priming with base fluid is complete. Ensure all the ports are filled and press the [Next] button.
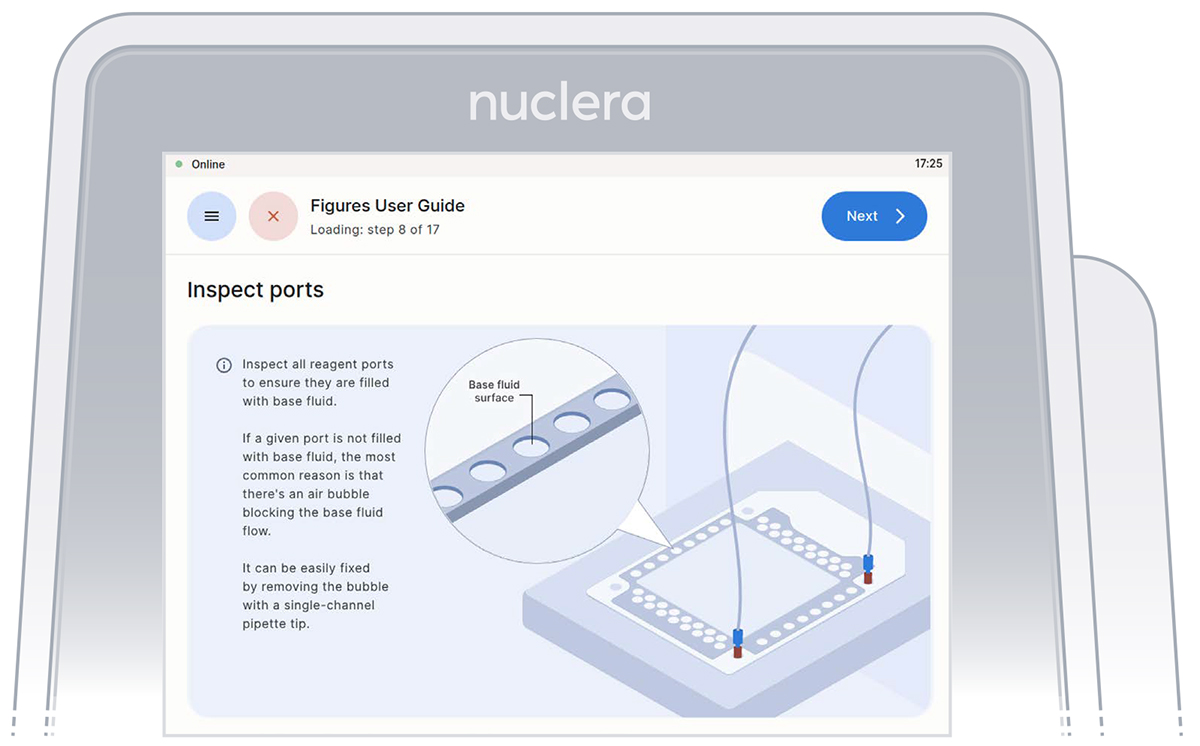
Inspection that all the ports on the cartridge are filled with base fluid
Load the reagents on the cartridge
Tips for a perfect loading:
- Follow the on-screen instructions that will guide you in loading the reagents.
- The loading of the reagents should be done using an 8-channel pipette.
- To facilitate the pipetting of the reagents, the transfer plate can be moved from the ice bucket to the bench.
- Check the plate for the presence of air bubbles. Air bubbles can be removed by spinning the plate in a swing rotor centrifuge for about 10 seconds.
- After aspirating the reagents, make sure that all pipette tips are filled evenly, and contain no air bubbles.
- When loading the reagents into the ports, ensure the tips are immersed just below the surface of the base fluid, and dispense slowly until the first stop of the pipette is reached.
- Do not pass the first stop as it would release air bubbles.
- Do not engage the pipette tips fully into the ports, the tip ends should not touch the bottom of the ports while dispensing the reagents.
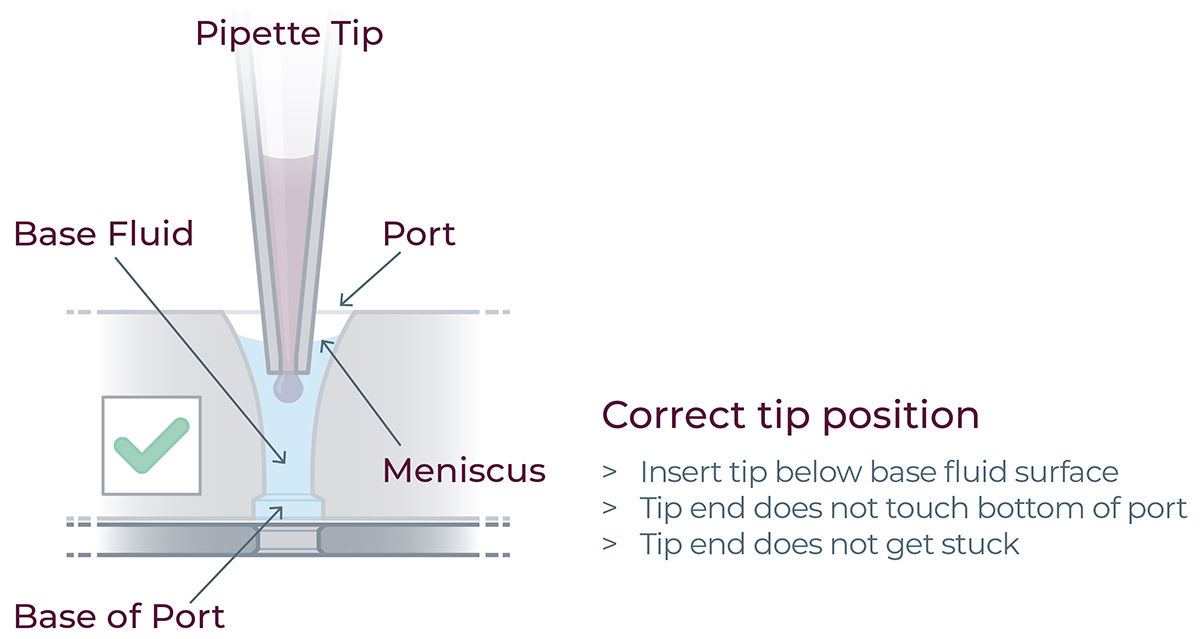
For correct reagent loading the pipette tip is immersed in the base fluid and not touching the bottom of the port
Load eGene™ constructs - rows A, B and C
It is critical not to leave any port empty. If a eGene™ construct is missing it must be substituted with 5 µL eGene™ Elution Buffer supplied in the eGene™ Prep kit, not with water.
Tip: Empty ports can be used for duplicates.
- Load 8x fresh pipette tips and aspirate 3 μL of the eGene™ constructs from the transfer plate wells A1-A8 into ports A1-A8 of the cartridge.
- Load 8x fresh pipette tips and aspirate 3 μL of the eGene™ constructs from the transfer plate wells B1-B8 into ports B1-B8 of the cartridge.
- Load 8x fresh pipette tips and aspirate 3 μL of the eGene™ constructs from the transfer plate wells C1-C8 into ports C1-C8 of the cartridge.
- Ensure the tip is immersed in the base fluid and dispense slowly until the first stop of the pipette is reached. Do not engage the pipette tips fully into the ports.
- Eject the pipette tips into a waste container.
- Press the [Next] button on the screen.
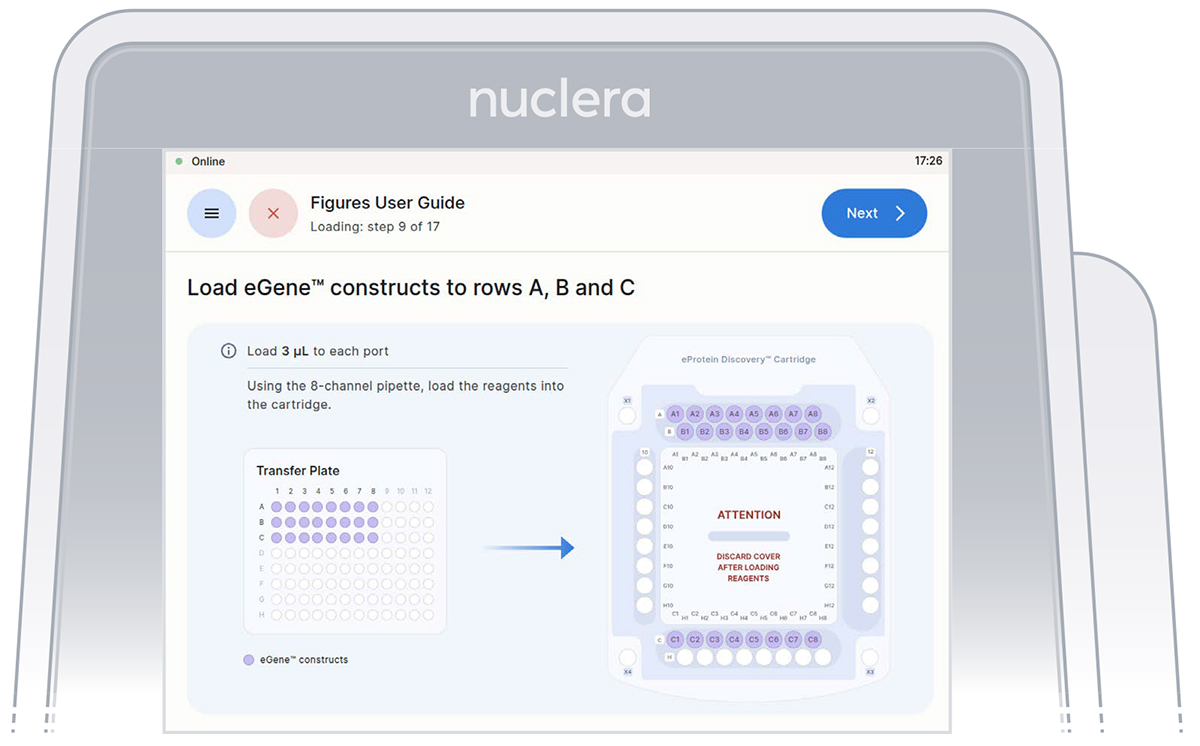
Loading of the eGene™ constructs onto row A, B and C of the cartridge
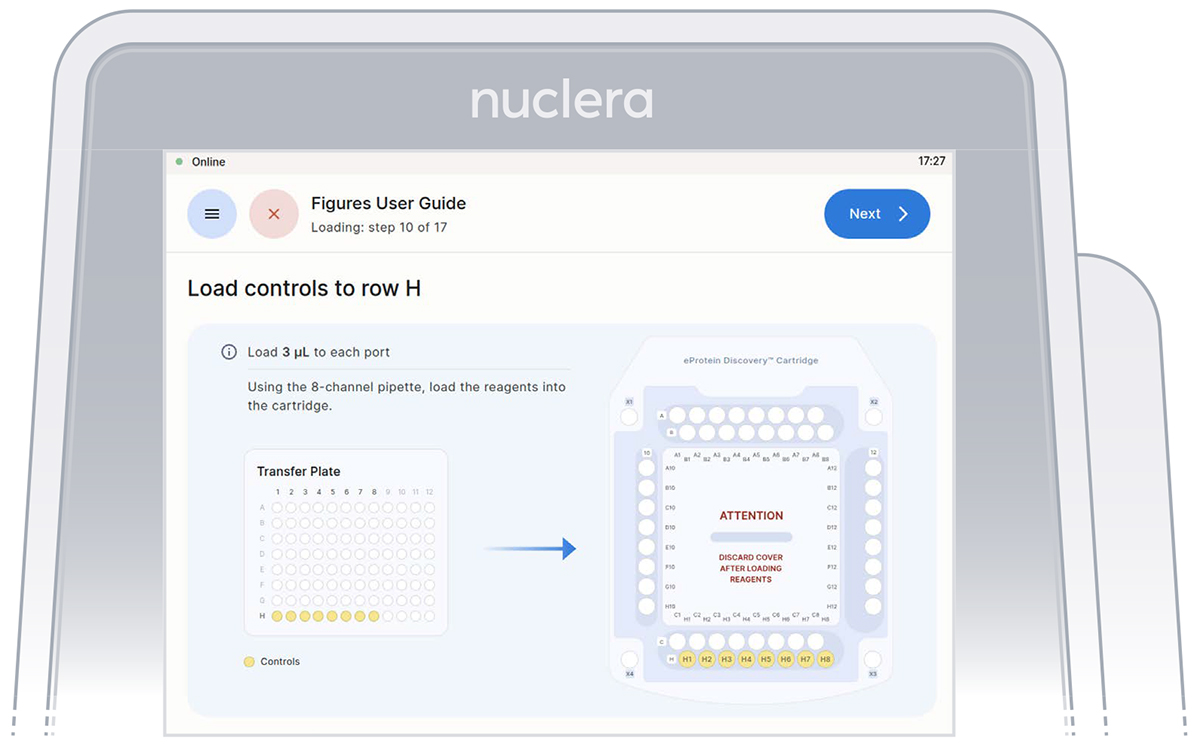
Load reagents - row H, column 12 and column 10
1. Reagents - row H:
- Load 8x fresh p20 pipette tips and aspirate 3 µL of the reagents from the transfer plate wells H1-H8 into ports H1-H8 of the cartridge.
- Ensure the tip is immersed in the base fluid and dispense slowly until the first stop of the pipette is reached. Do not engage the pipette tips fully into the ports.
- Eject the pipette tips into a waste container.
- Press the [Next] button on the screen.
2. Reagents - column 12:
- Load 8x fresh p20 pipette tips and mix the Cell-free Blends in the transfer plate by gently pipetting up and down 12 times.
Be careful not to introduce air bubbles in the ports.
Aspirate 12 µL of the Cell-free Blends from the transfer plate wells
A12-H12 into ports A12-H12 of the cartridge.
- Ensure the tip is immersed in the base fluid and dispense slowly until the first stop of the pipette is reached. Do not engage the pipette tips fully into the ports.
- Eject the pipette tips into a waste container.
- Press the [Next] button on the screen.
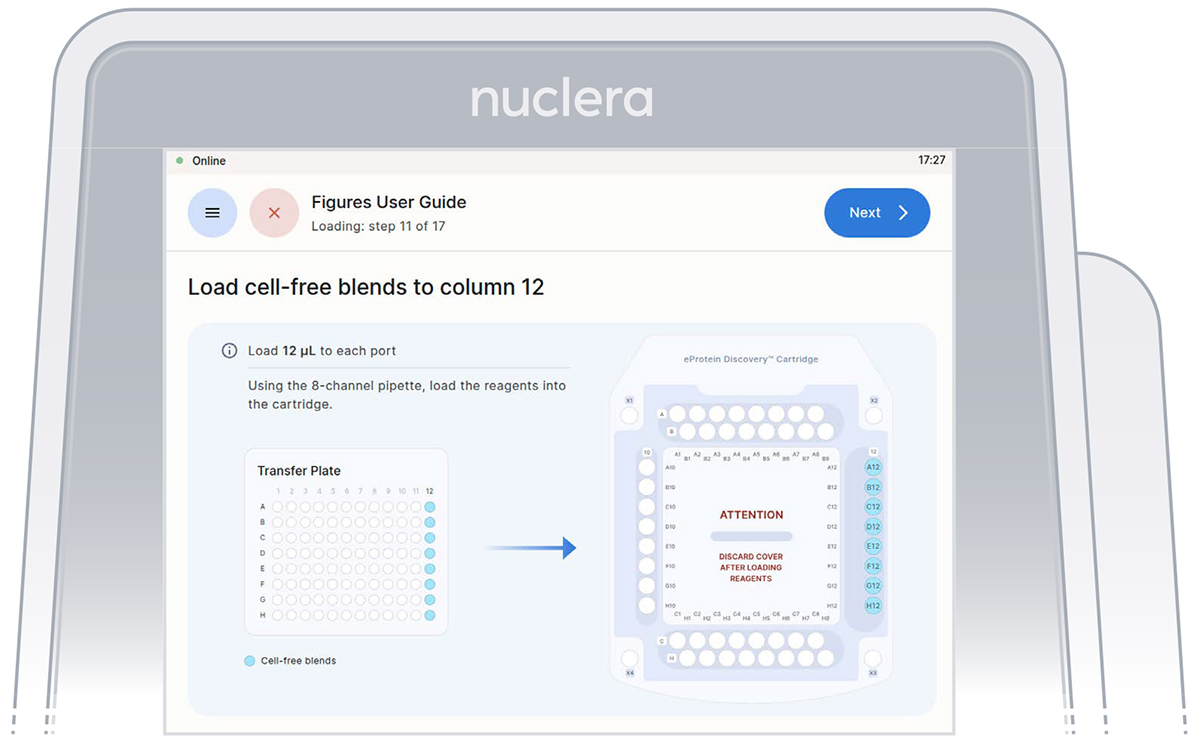
Loading of the Cell-free Blends onto column 12 of the cartridge
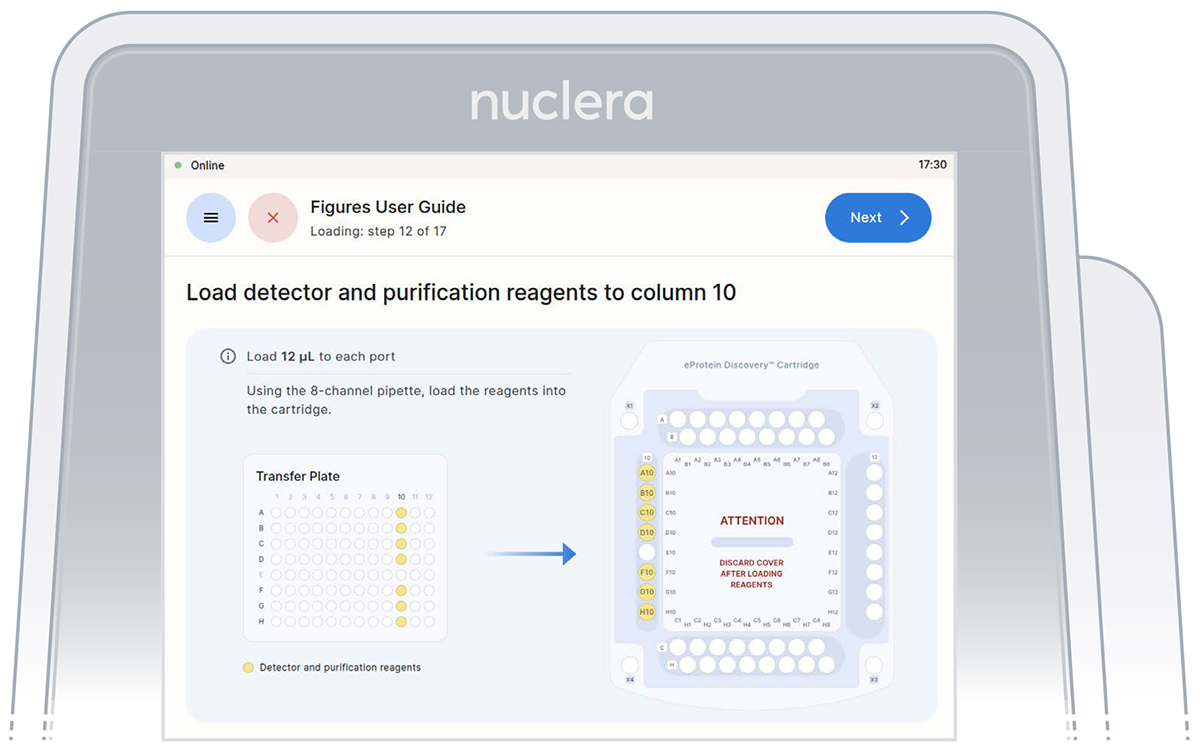
3. Reagents - column 10:
- Load 7x fresh p20 pipette tips and aspirate 12 µL of the reagents from the transfer plate wells A10-D10 and F10-H10 into ports A10-D10 and F10-H10 of the cartridge.
- Ensure the tip is immersed in the base fluid and dispense slowly until the first stop of the pipette is reached. Do not engage the pipette tips fully into the ports.
- Eject the pipette tips into a waste container.
- Press the [Next] button on the screen.
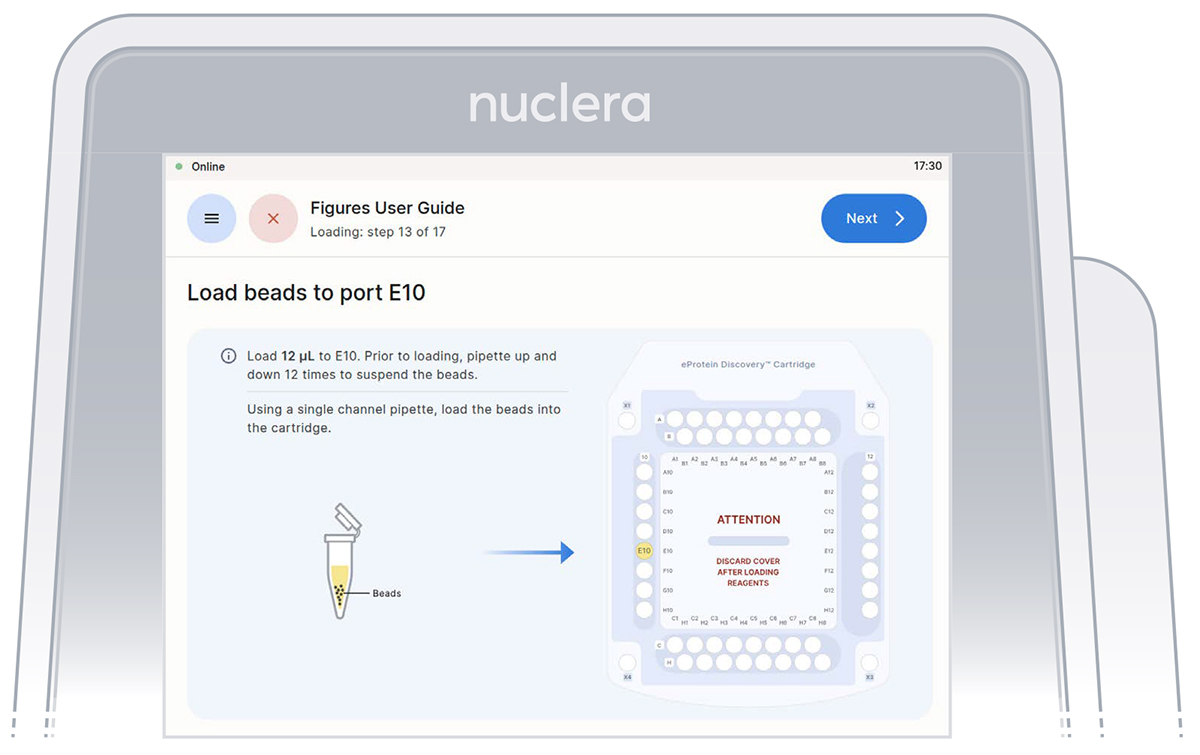
4. Strep Purification Beads - port E10:
- Using a single channel p20 pipette, mix the Strep Purification Beads twelve times by gently pipetting up and down. Be careful not to introduce air bubbles. Aspirate 12 µL of the Strep Purification Beads prepared in a tube and dispense into port E10 of the cartridge.
- Ensure the tip is immersed in the base fluid and dispense slowly until the first stop of the pipette is reached. Do not engage the pipette tip fully into the port.
- Eject the pipette tip into a waste container.
- Press the [Next] button on the screen.
- Remove the cover from the cartridge

Load reagents in the cartridge
- Press the [Next] button to start the aspiration of the base fluid and the loading of the reagents on the cartridge.
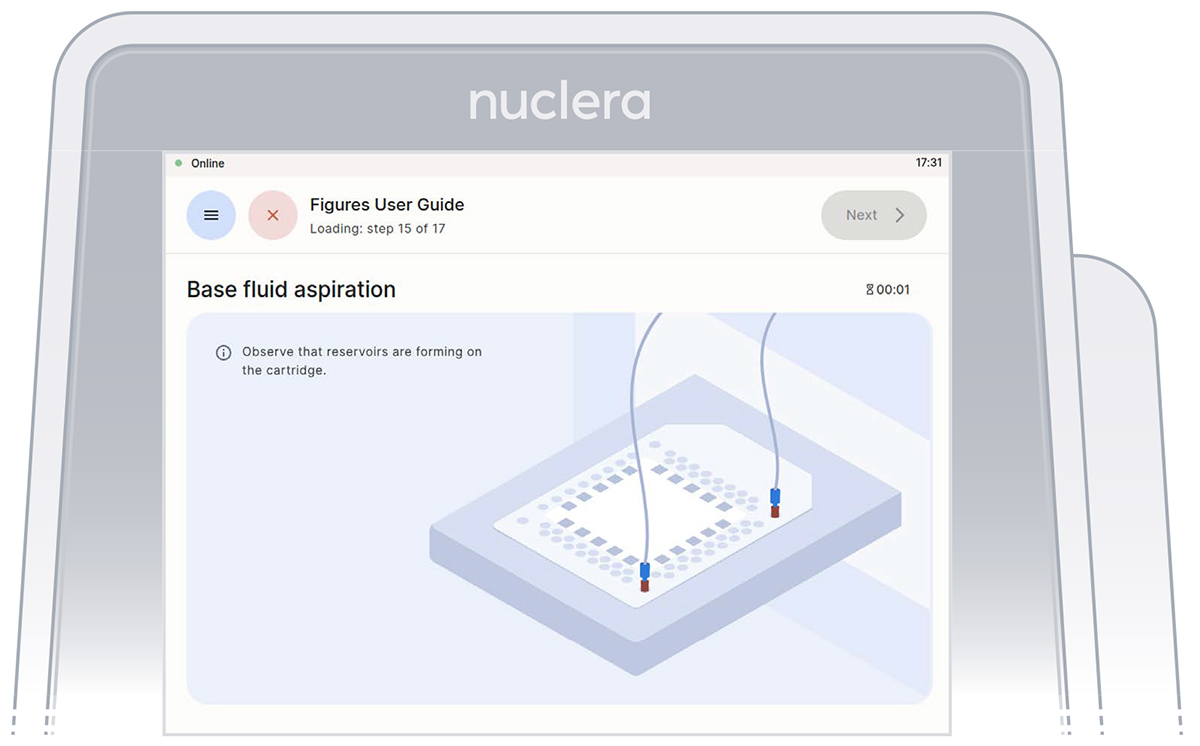
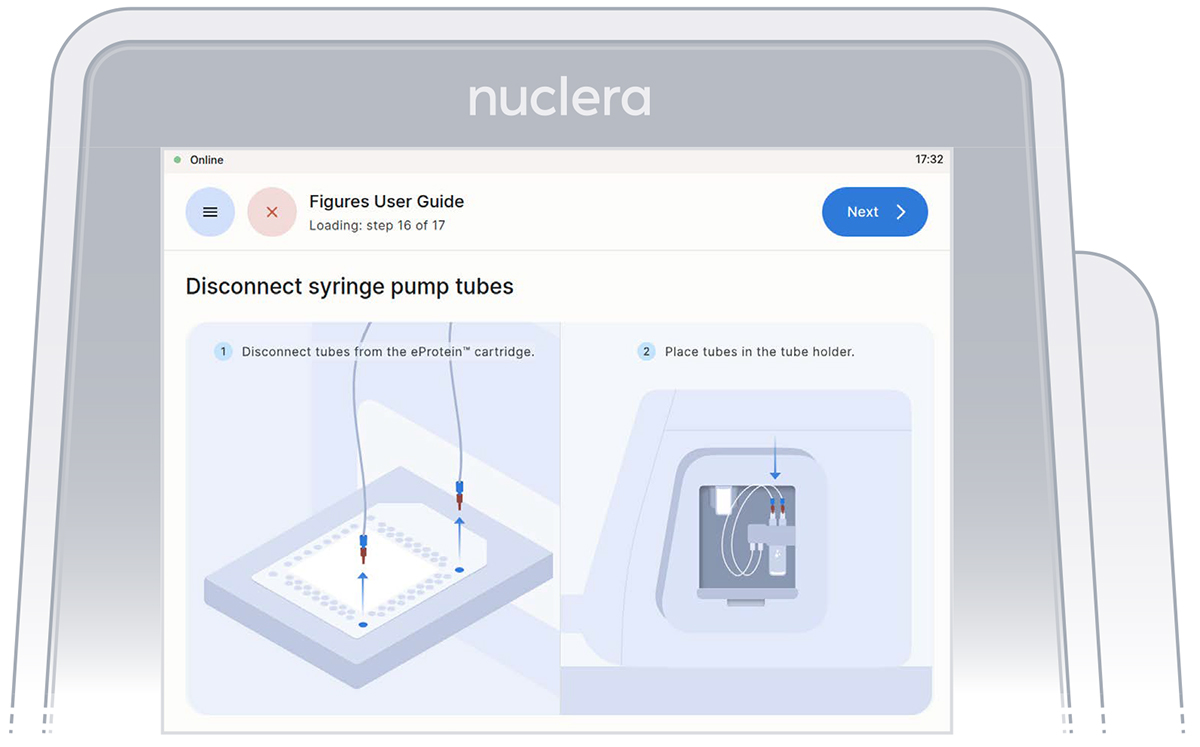
- Disconnect the tubes from the cartridge and place them in the tube holder on the right hand side of the instrument. Press the [Next] button on the screen, and the drawer will close. Quality controls will be performed, and the drawer will open.
- Inspect the reservoirs have formed correctly in the cartridge as shown on the screen. If so, Press the [Next] button.
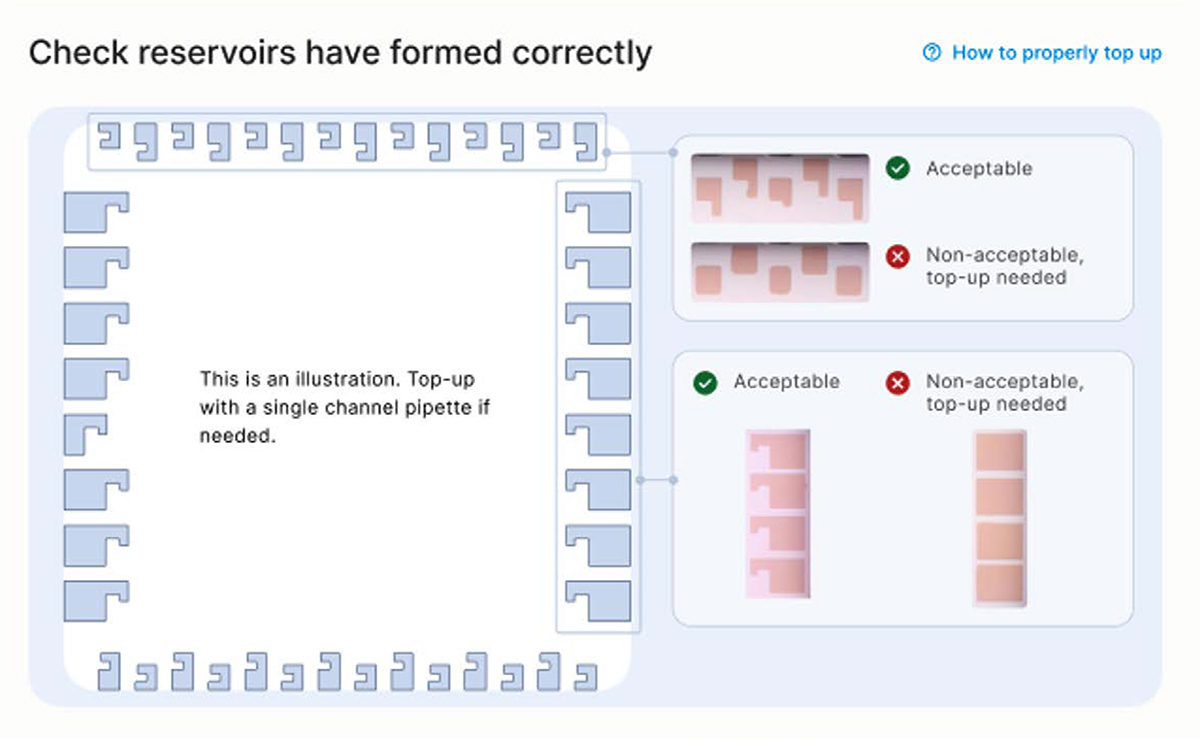
Note: Any presence of a marker on the reservoir is acceptable, as shown on the top right of figure above
If reservoir needs adjusting, follow the troubleshooting tips reported below, or alternatively, watch the [video](link to video page) in our knowledge base.
Loading - Troubleshooting tip 1:
If a reservoir is not properly formed, first fully engage a new empty pipette tip into the port and reach the bottom of the port. This action may trigger the correct formation of the reservoir.
Loading - Troubleshooting tip 2
- If the shape of a reservoir is still not correct, remove the empty tip from the port, replace with a new tip, then add a small volume of the corresponding reagent using a p20 pipette with a pipette tip. Do not depress the pipette past the first stop as this could introduce air bubbles inside the cartridge.
- Re-engage the tip until reaching the bottom to the port and dispense the reagent slowly until correction is complete (Figure 27).
- The recommended volumes for manual correction are:
- 1.5 µL for ports in rows A, B, C or H
- 3 µL for ports in columns 10 or 12

Figure 27: For manual correction of the reagent loading to correctly form the reservoirs on cartridge