eProtein Discovery™ System - Cloud Enabled - Soluble Protein Workflow
eProtein Discovery system
📄 Download Page as PDFGeneral information
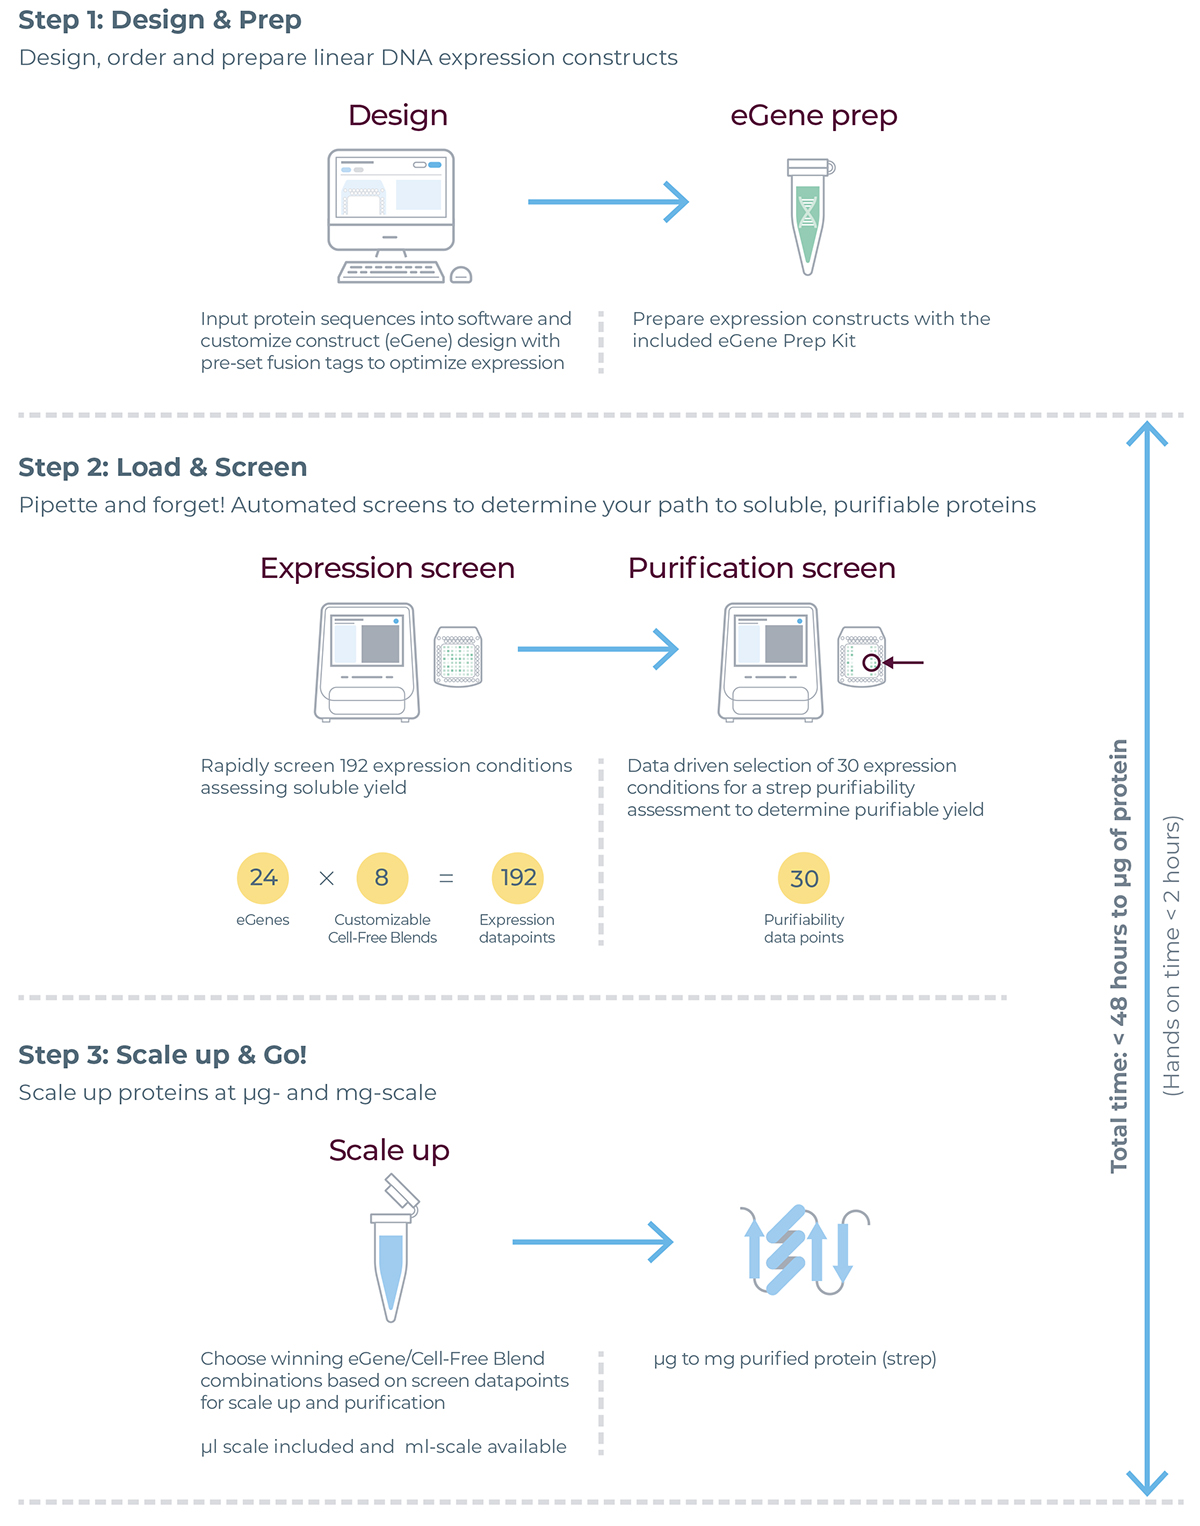
eProtein Discovery™ is the only end-to-end protein prototyping system that accelerates construct design, expression, solubility characterization and purification of target proteins in drug discovery programs. Accelerating the journey to your protein.
- Rapid protein prototyping enables progress by allowing scientists to gain awareness quickly about which proteins – and which variations of a protein – will work.
- Simultaneously screen multiple constructs and protein synthesis reagents for soluble expression, and then scale up to micrograms of recombinant protein off cartridge to test in your applications.
- Explore multiple DNA constructs, including solubility tags, polymorphisms and isoforms on the same cartridge to expand your range of accessible proteins.
Four system components. One complete protein solution.
Instrument: With protein prototyping, you can draw a straight line from theory to reality, allowing you to test hypotheses more efficiently and focus on promising targets. The eProtein Discovery™ instrument puts rapid protein prototyping on your benchtop. Designed for all levels of scientist, it streamlines your workflow and grants you the ability to identify optimal DNA constructs, test expression feasibility earlier, and pursue targets with confidence. Fail fast, succeed faster!
Software: eProtein Discovery™ software simplifies a complex multivariate experimental design. The software sets up and simultaneously tracks 192 different combinations of DNA sequences, flank pairs and expression reagent reactions performed on eProtein Discovery™ system. AI performs highly rigorous QA checks during an experiment to ensure data quality and consistency. Informative reports are then generated and exported that you can share with your team and beyond.
Cartridge: Powered by digital microfluidic technology, software controlled digital signals guide the movement of droplets on the eProtein Discovery™ Cartridge surface to enable splitting, dispensing and merging of biological reagents. Pipette DNA, cell free expression reagents and purification solutions on the Cartridge and the technology will orchestrate the rest. Gain precise control of your eGene™ constructs and reagents to screen and discover optimal expressing conditions within 24 hours, accelerating target selection. A simple set-up allows anyone to run the system with minimal training.
Reagents: The reagents within the eProtein Discovery™ system allow you to optimize protein obtainability by characterizing and purifying different combinations of DNA constructs and expression conditions. Our system will screen 192 different combinations in 24 hours for you to select the optimal conditions to scale up and get protein.
Our eProtein Discovery™ software will guide you in creating the panel of DNA constructs and reagents to power your experiment. Our complete reagent package includes design and ordering of DNA, simplifying your workflow.
eProtein Discovery workflow
eProtein Discovery Bundle
Equipment
| Description | Quantity | Storage Temperature | Product Code | |
|---|---|---|---|---|
| eProtein Discovery Instrument | 1 unit | Room Temperature | N1001 | 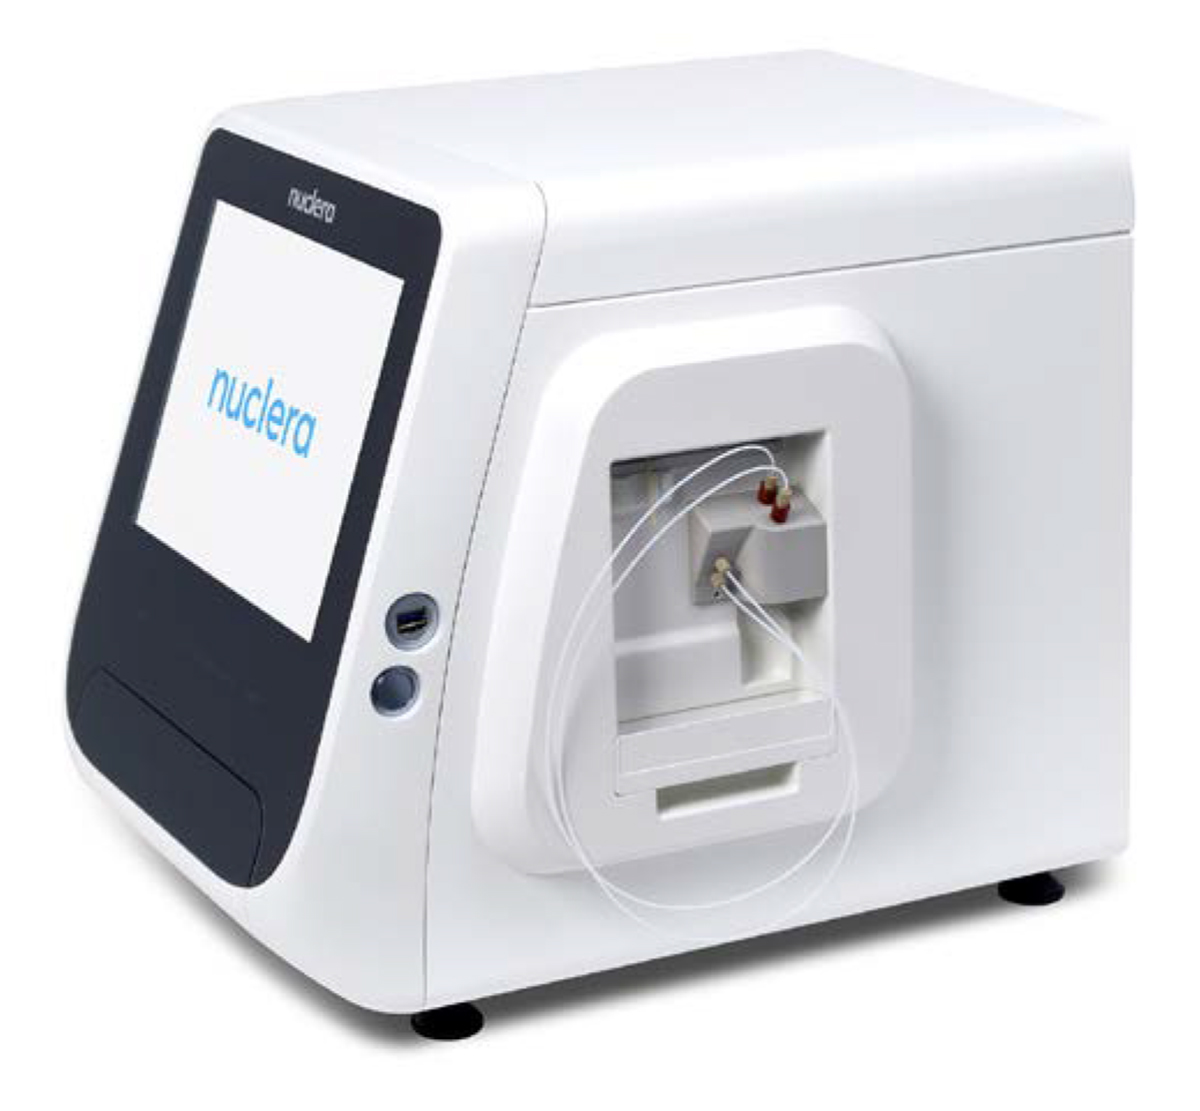 |
Cartridge Kit NC3006 - Consumables
| Description | Quantity | Storage Temperature | Product Code | |
|---|---|---|---|---|
| eProtein Discovery Cartridge | 1 unit | Room Temperature | NC3006 |  |
| eProtein Discovery Cartridge Cover | 1 unit | Room Temperature | NC3012 | |
| Base Fluid | 1 unit | Room Temperature | NC3007 | 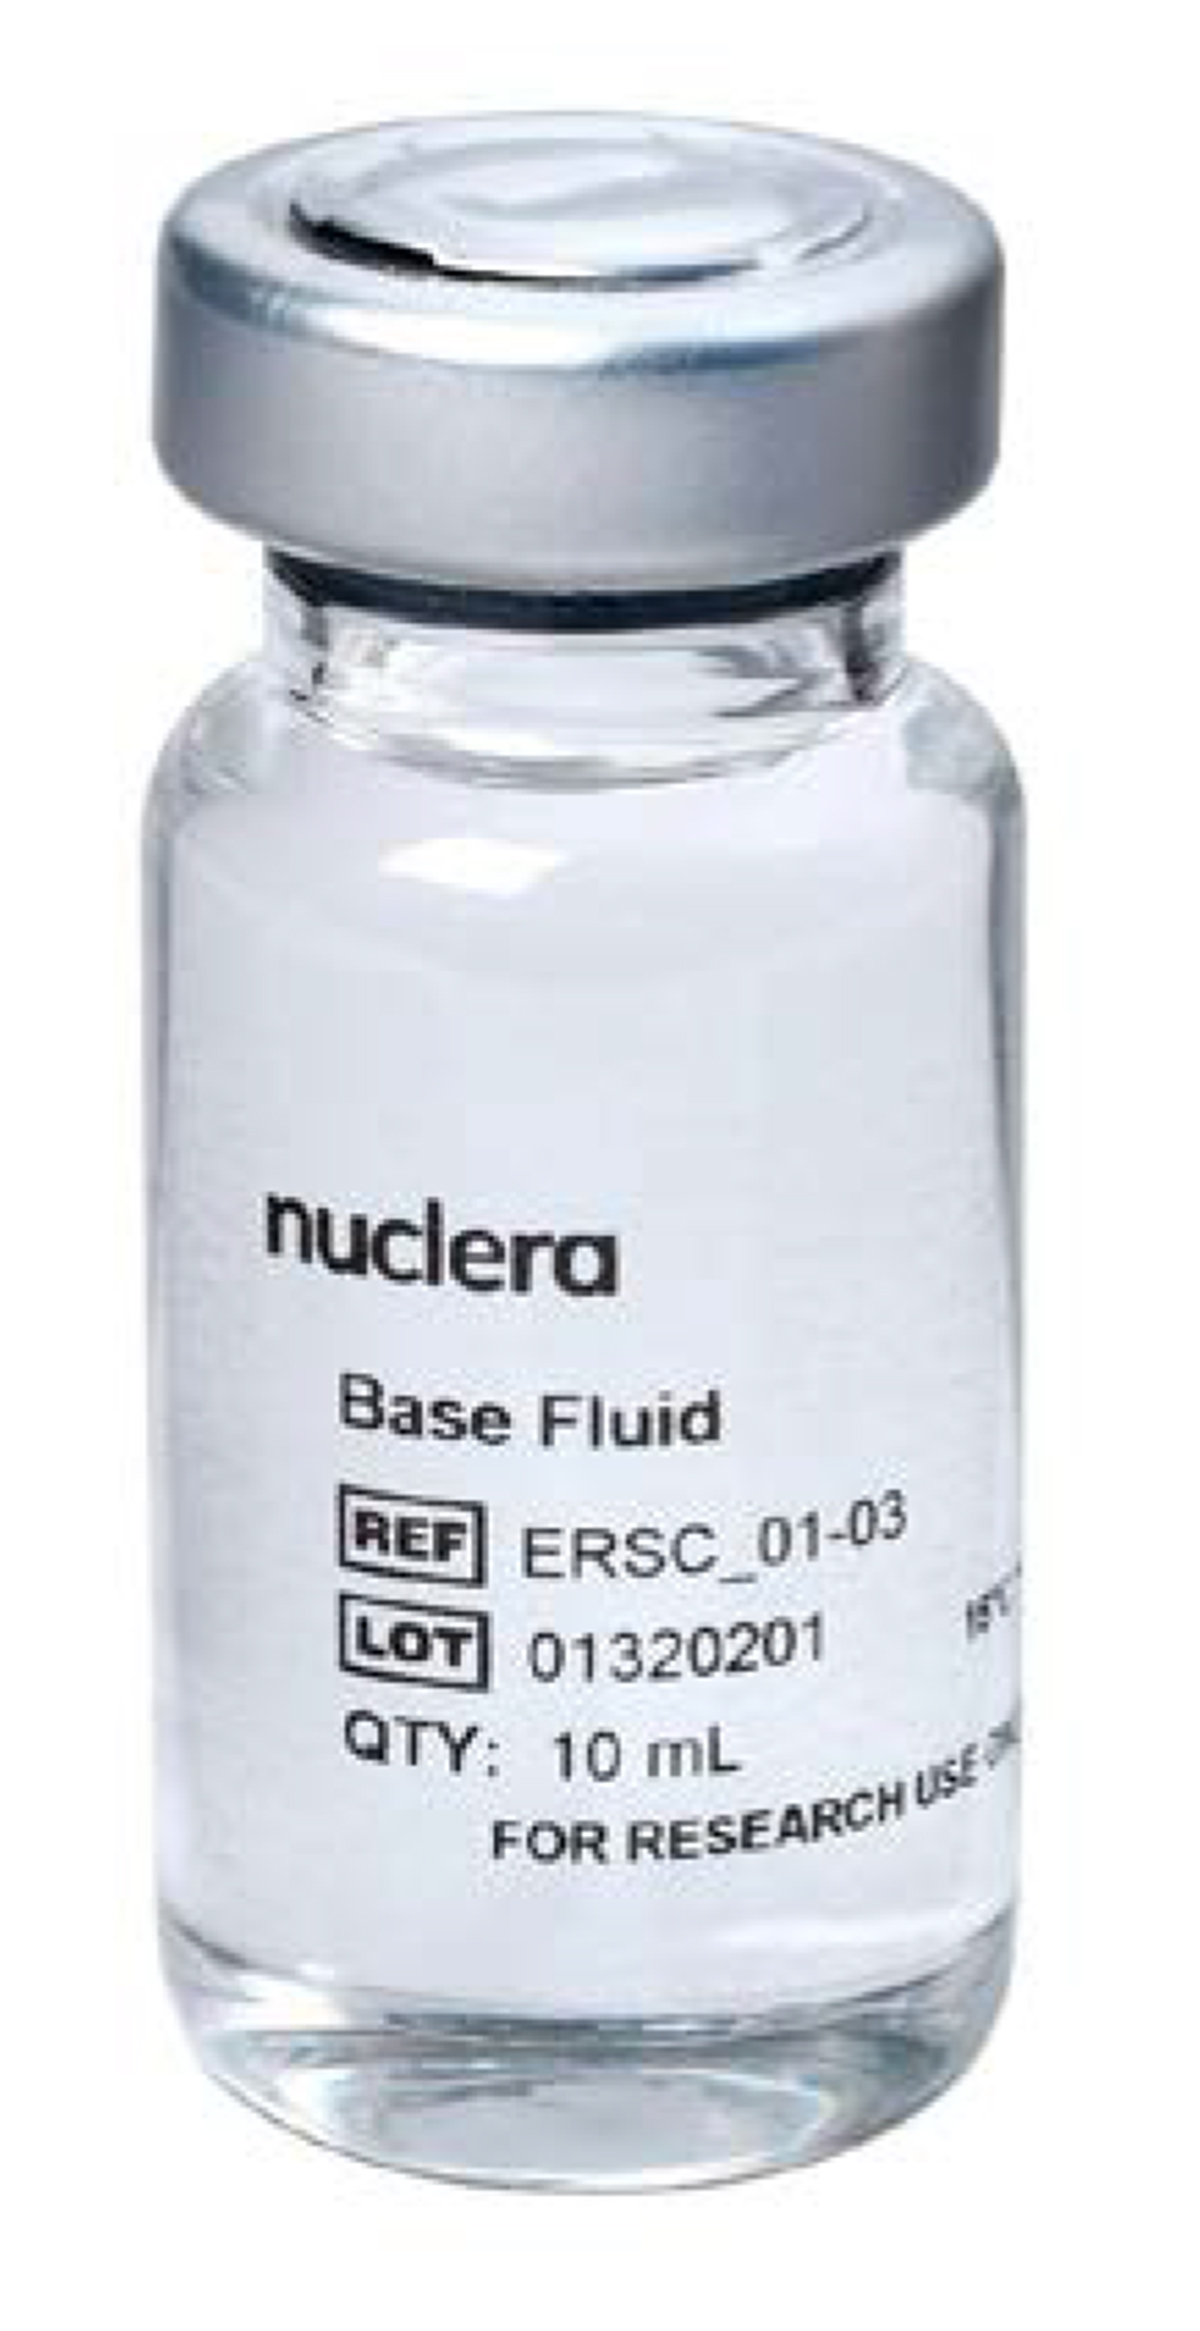 |
Cartridge Reagent Kit +4°C reagent - NC3010-2
| Description | Quantity | Storage Temperature | Product Code | |
|---|---|---|---|---|
| Strep Beads | 200 µL | +4°C | NC3010-2 | 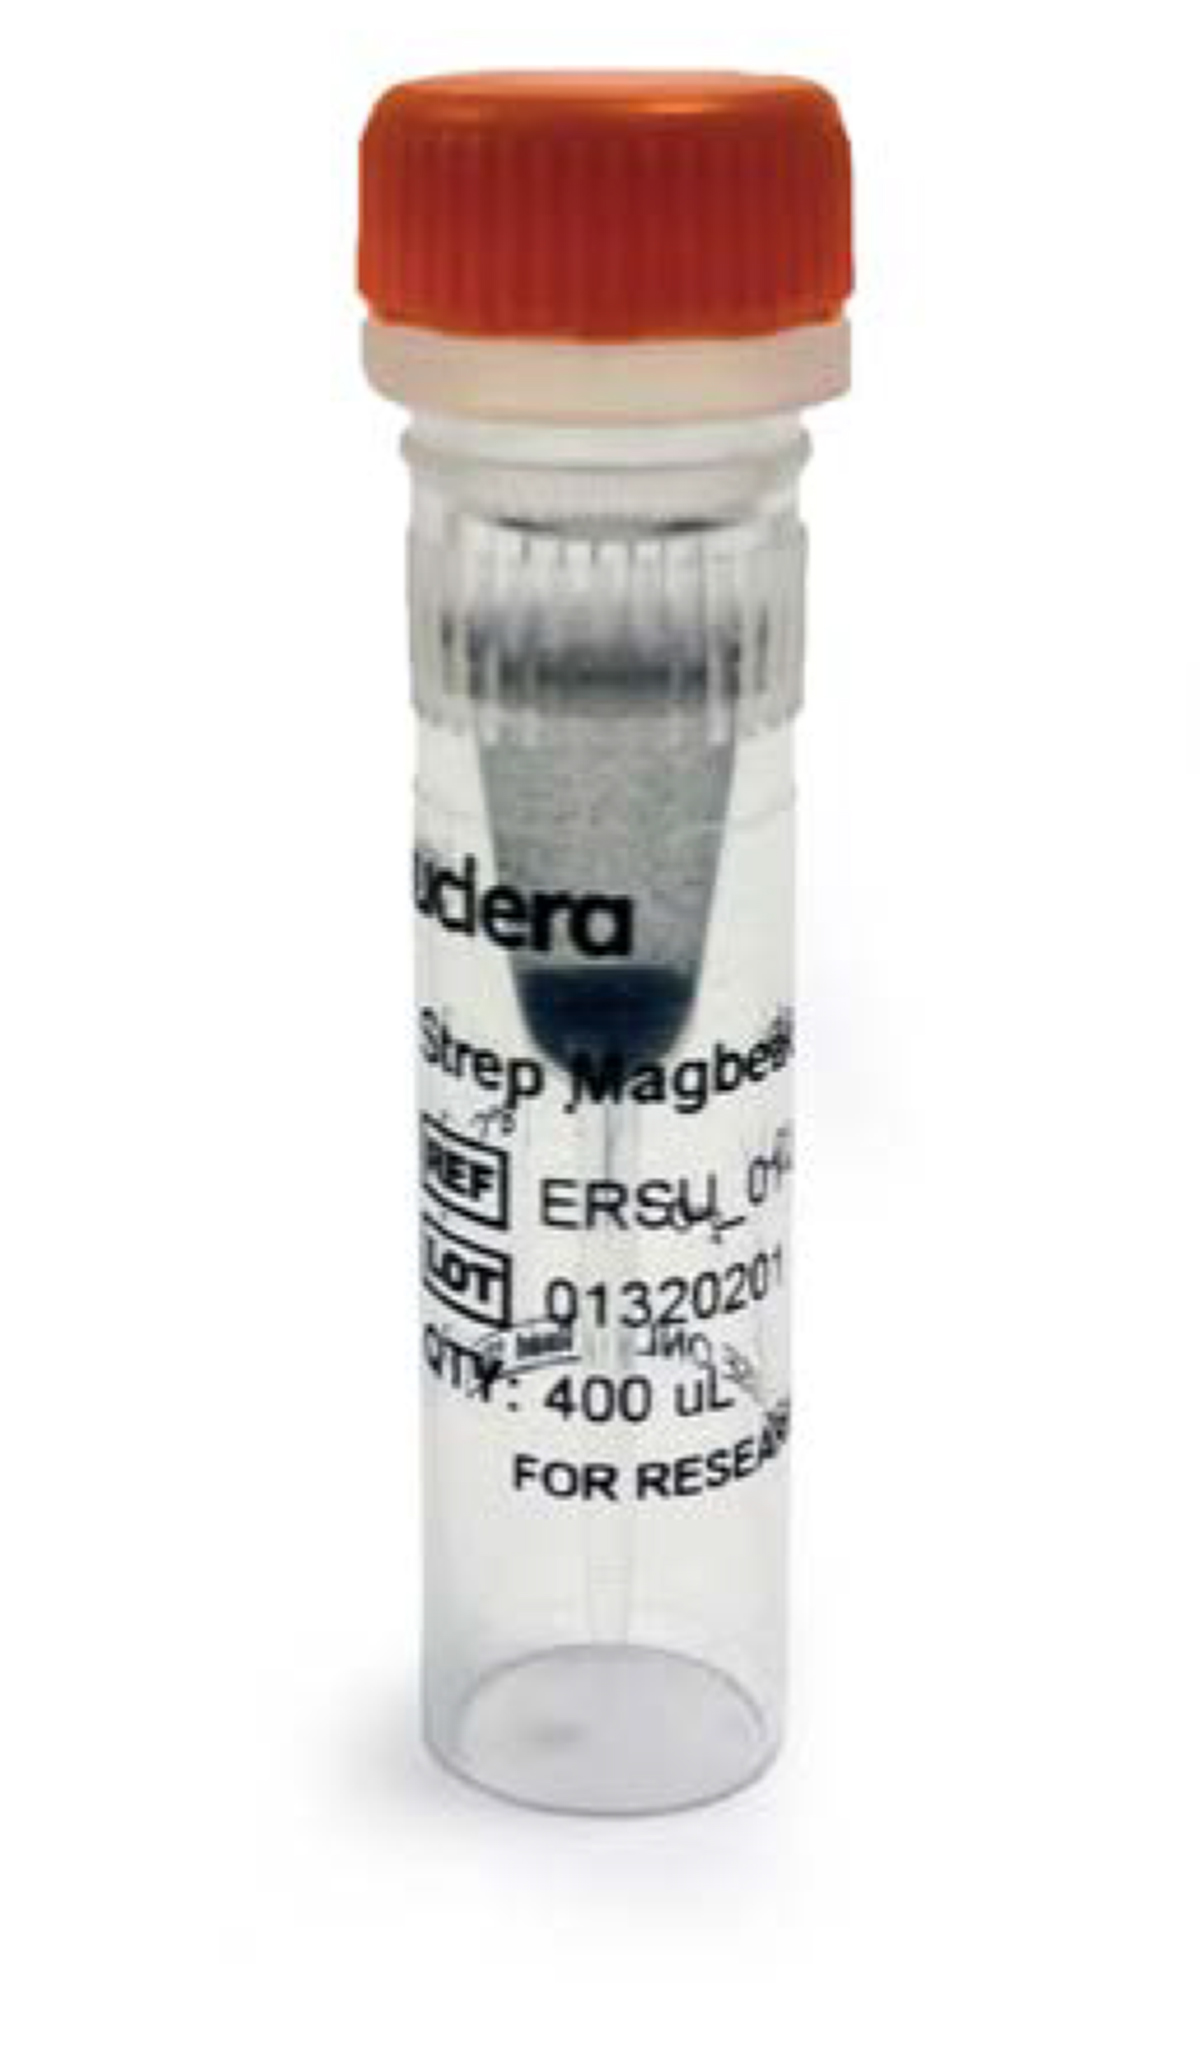 |
Cartridge Reagent Kit -80°C reagents - NC3010-1 (yellow stripe on label)
| Description | Quantity | Storage Temperature | Product Code | |
|---|---|---|---|---|
| Cell-Free Core Reagent | 160 µL | -80°C | SC3-01 | 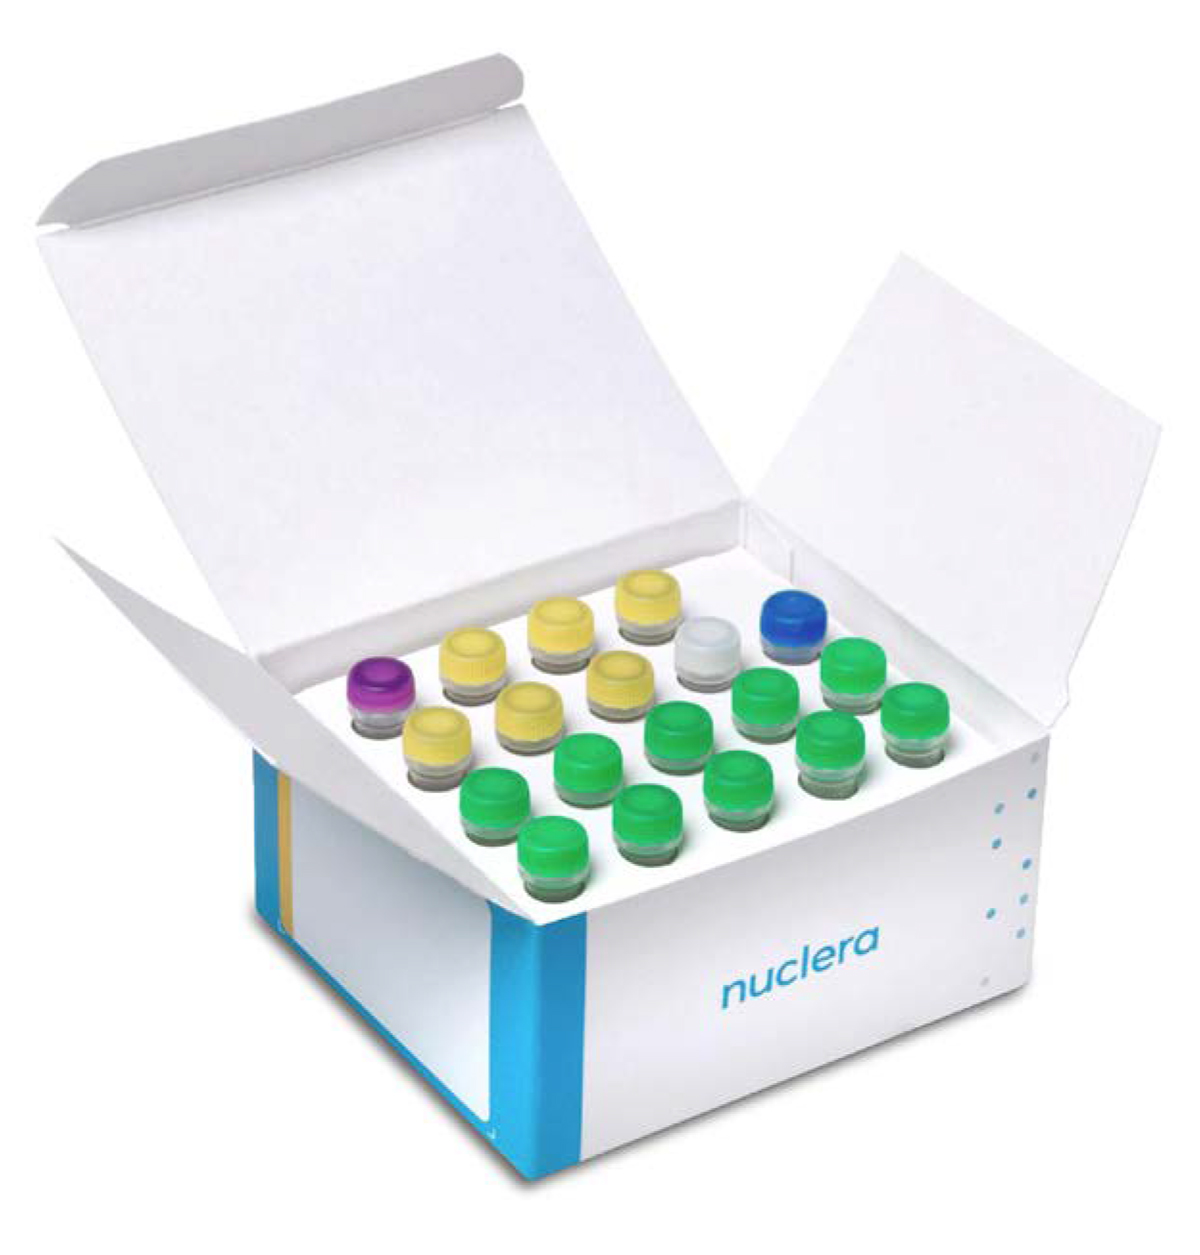 |
| Blank Buffer | 150 µL | -80°C | SC3-02 | |
| Detector Protein* | 75 µL | -80°C | SC3-03 | |
| Universal Control* | 20 µL | -80°C | SC3-04 | |
| Complementation Control* | 20 µL | -80°C | SC3-05 | |
| Expression Control* | 20 µL | -80°C | SC3-06 | |
| Full Workflow Control* | 20 µL | -80°C | SC3-07 | |
| Wash Buffer* | 800 µL | -80°C | SC3-08 | |
| Elution Buffer* | 50 µL | -80°C | SC3-09 | |
| AdditiveBuffer* | 50 µL | -80°C | SC3-10 | |
| PDI/GSSG Mix* | 50 µL | -80°C | SC3-11 | |
| TRxB1* | 50 µL | -80°C | SC3-12 | |
| DNAk Mix* | 50 µL | -80°C | SC3-13 | |
| Zinc Chloride | 50 µL | -80°C | SC3-14 | |
| Calcium Chloride | 50 µL | -80°C | SC3-15 | |
| Manganese Chloride | 50 µL | -80°C | SC3-16 | |
| Cofactor Mix* | 50 µL | -80°C | SC3-17 | |
| GSSG* | 50 µL | -80°C | SC3-18 | |
| 3C protease* | 50 µL | -80°C | SC3-19 |
* Single use reagent that cannot be freeze/thawed multiple times.
User supplied reagents
- 5 nM eGene constructs (DNA), stored at -80°C, generated using the Nuclera eGene Prep kit NC3008 or NC3009 User supplied equipment
- Magnetic particle separator (compatible with 1.5 mL microcentrifuge tubes)
- Vortexer
- Microcentrifuge
- 1.5 mL microcentrifuge tubes
- 2-20 µL 8-channel pipette
- 2-20 µL single-channel pipette
- 200 µL compatible tips
We recommend using a manual multichannel pipette. However, if you do not have a manual multichannel pipette and/or prefer to use an electronic pipette, the electronic pipette must be configured correctly for use with the eProtein Discovery System. Improper use of electronic pipette can result in the introduction of air bubbles during loading and can lead to a run failure. If using electronic pipette, the following settings must be enabled:
- Disable blowout/purge function
- Avoid high speed aspiration
- Avoid high speed dispensing
Please contact Technical Support (techsupport@nuclera.com) for any questions. Any run errors resulting from improper use of electronic pipettes are the responsibility of the user.
Protein Variant Creation
The purpose of this guide is to describe a guided approach for designing protein variants, mutants, and truncated sequences.
Support users in generating variants of their protein to test on the eProtein Discovery platform and increase their chances to get quickly soluble, functional protein to use downstream in their project.
Summary - A stepwise guided method for variant creation
▷ Step 1 - Identify Relevant UniProt ID Use sequence alignment (POI sequence) or direct UniProtID input to identify the starting protein sequence and/or several close protein family members - for example isoforms and splice variants. Annotate each starting sequence with all required metadata.
▷ Step 2 - Select Candidates Filter isoforms, align them and flag functional or structural domains of interest.
▷ Step 3 - Rule-based Sequence Editing I Apply simple rule based editing for each input Candidate. Depending on the domains present, each input Candidate sequence should generate several “virtual” constructs. Remove signal peptides and propeptides, it is also often beneficial to remove transmembrane domains (TMD).
▷ Step 4 - Rule Based Sequence Editing II - Terminal truncations Apply simple rule based editing for each input Candidate. Consider modifications around functional domains of interest, for example removing disordered or unnecessary domains. eProtein Discovery™ System User Guide 9
▷ Step 5 - Check for other known stable domains (NMR, X-Ray) Identify other important regions and create relevant variants.
▷ Step 6 - Compile final list of variant Candidates for a POI
Details - A stepwise guided method for variant creation
| Step | Title | Input | Output | Operations |
|---|---|---|---|---|
| 1 | Identify Relevant Uniprot ID | Sequence or Uniprot ID | Annotated Uniprot sequences |
|
| 2 | Select Initial Candidates | Annotated Uniprot sequences | Isoforms and important domains flagged |
|
| 3 | Combine starting list | Seqs from steps 1 and 2 | List of input Candidates | Combine lists 1 and 2 |
| 4 | Rule-based Sequence Editing I - identify domains of interest | List of input Candidates | List of Child Candidates 1 Edited sequences named appropriately - rules applied see operations. A Child Candidate is a sequence derived from an Initial Candidate by applying Rule-based Editing - Step 4 |
|
| 5 | Rule Based Sequence Editing II - truncations | List of input candidates (Step 3) + List of Child Candidates (step 4) |
| |
| 6 | Compile final Screening Candidates | List of input candidates (Step 3) + List of Child Candidates (step 4) + List of Child Candidates (step 5) |
|
Additive Selection Guide
Depending on the protein of interest, the presence of additives may be needed to optimize the expression.
The decision tree in Figure 2 illustrates the Additive options based on protein requirements.
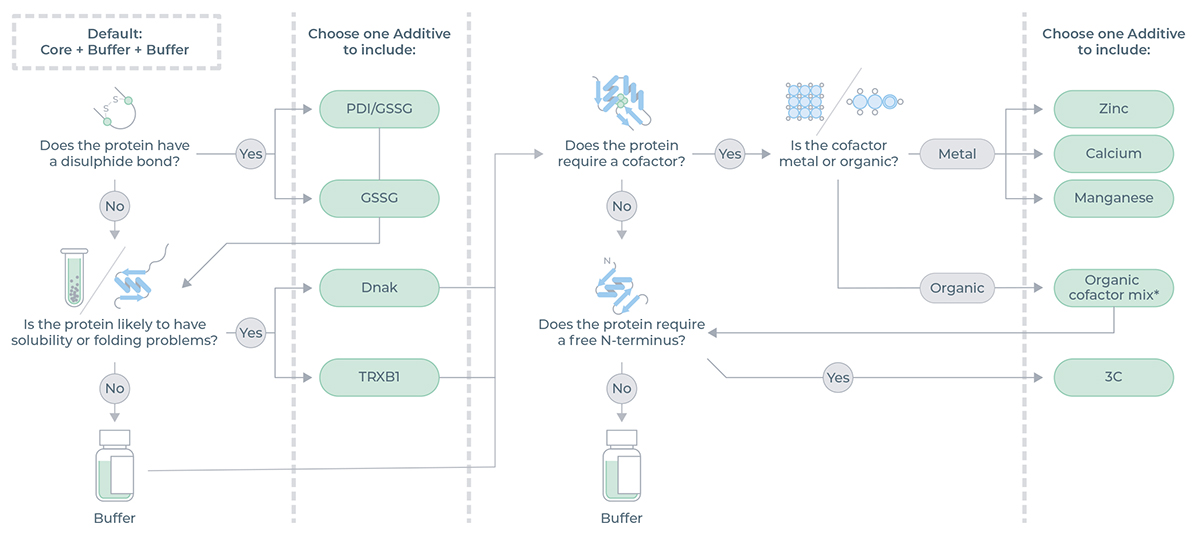
The additives supplied in the Cartridge Reagent Kit NC3010 and their descriptions are listed in Table 1.
| Additive | Additive Description | Additive Characteristics |
|---|---|---|
| Additive buffer | HEPES buffer pH 7.5 and surfactant | CFPS reaction buffer, dilution normalization |
| PDI + GSSG Mix | Protein disulfide isomerase and oxidized glutathione | Chaperone and redox modification to oxidizing environment to support disulfide bond formation |
| TrxB1 | Thioredoxin reductase | Protects proteins from oxidative aggregation and inactivation and acts as a reductase in redox regulation |
| DnaK Mix | Chaperone | DnaK mix Chaperone mix to support folding and prevent aggregation |
| Zinc chloride | Zinc chloride solution | Cofactor that can be required for folding, stability, or activity |
| Calcium chloride | Calcium chloride solution | Cofactor that can be required for compaction, folding, stabilization, or activity |
| Manganese chloride | Manganese chloride solution | Cofactor for metalloenzymes for structure and activity |
| Cofactor Mix | Mix of NAD, acetyl CoA, FAD, SAM, and PLP | Cofactors that assist in folding, stability and activity |
| GSSG | Oxidized glutathione | Redox modification to oxidizing environment |
| 3C protease | 3C protease solution | Protease to cleave off the N-terminal solubility tag at the specific aminoacid sequence (LEVLFQ/GP) |
eProtein Discovery Software
Intended Use
The eProtein Discovery Software, Nuclera’s cloud-based software, supports the user in the design and execution of combinatorial protein expression experiments on the eProtein Discovery platform.
Software Updates
▷ Automatic software updates are carried out when instrument is on and not in use with a message displayed on screen.
▷ If needed, automatic update settings and scheduling can be changed in the settings of the instrument (accessible from the side menu). It is recommended to check the time zone is correctly selected.
On our fully integrated eProtein Discovery system the user can record:
▷ Sequences of interest.
▷ Constructs compatible with the Nuclera technology.
▷ Recipes for constructs expression and scale-up.
▷ Record a specific eGene construct (DNA) containing the sequences of the proteins of interest and the selection of the eProtein expression conditions.
For the design of protein variants, mutants, and truncated sequences, it is recommended to follow the eProtein Discovery Guide for Protein Variant Creation.
More information about the eProtein Discovery TM cloud-enabled platform is available in the appendix section of the user guide.
Intended Target User Group
The eProtein Discovery Software is intended to be used by staff trained to run experiments on the eProtein Discovery Instrument.
How to access your service
Software Requirements:
Our cloud software works on the major browsers (other browsers may also work), without the need to download or install additional packages:
▷ Google Chrome
▷ Mozilla Firefox
▷ Microsoft Edge
For correct behavior in eProtein Discovery Cloud account, check the following:
▷ Enable cookies. Make sure cookies are enabled in the browser so all parts of our application work as expected.
▷ JavaScript must be enabled in the browser.
▷ Set the screen resolution Minimum screen resolution to 1024 x 768. A higher resolution is recommended.
▷ Check the web browser for add-ons. In some cases, browser add-ons, extensions, ad blockers, or plugins can interfere with our application’s functionality.
▷ Consider disabling these extras or try a browser without them.
Required Files and Other Information
Files and information needed for the analysis:
▷ A valid amino acid sequence copied as text.
▷ A valid DNA sequence copied as text.
Steps for Access
The following steps are required to access our service
- The first Administrator user is created by Nuclera.
- The administrator user will log in to the platform and create projects.
- The administrator user can invite other users and assign them to projects.
- Non-administrator users will add their details, create password and an instrument access pin at first log in.
- The admin users can give other users administrator privileges.
- The admin users can deactivate non-administrator users.
- After first login users can register proteins and create experiments in their projects
Steps 1-3 are required for first time login. Step 4 is self-service for all users. Steps 6-7 are part of everyday activity on the platform. Steps 2, 3, & 7 are described in detailed below.
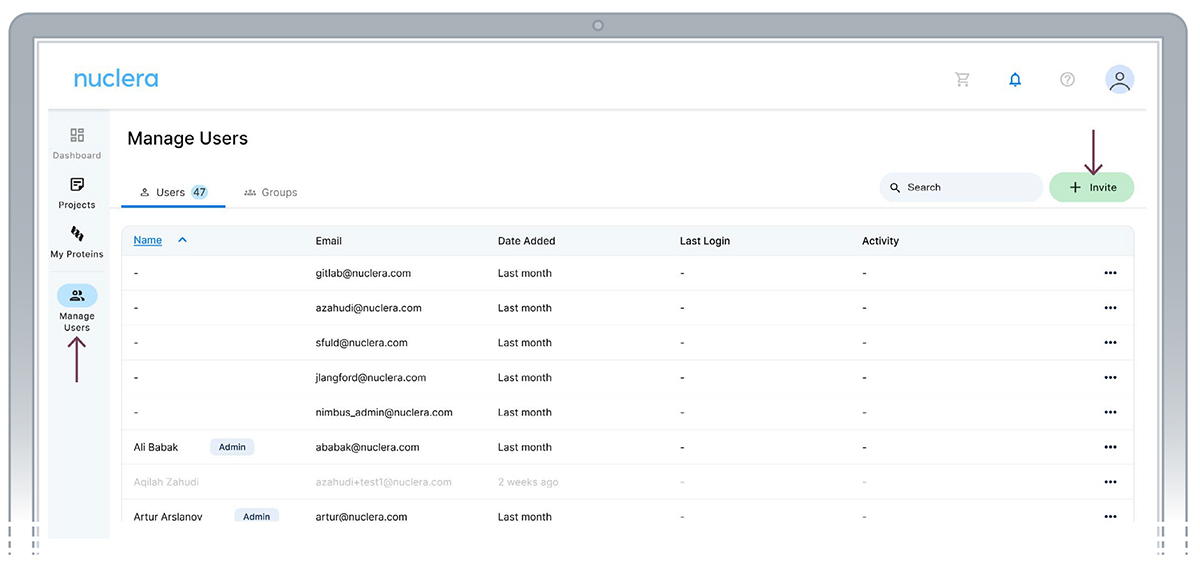
Add a new user - Administrator
- From the Manage Users page click the [Invite] button.
- Fill the email address of the invitee and click [Send].
- The invitee will receive an email with instructions.
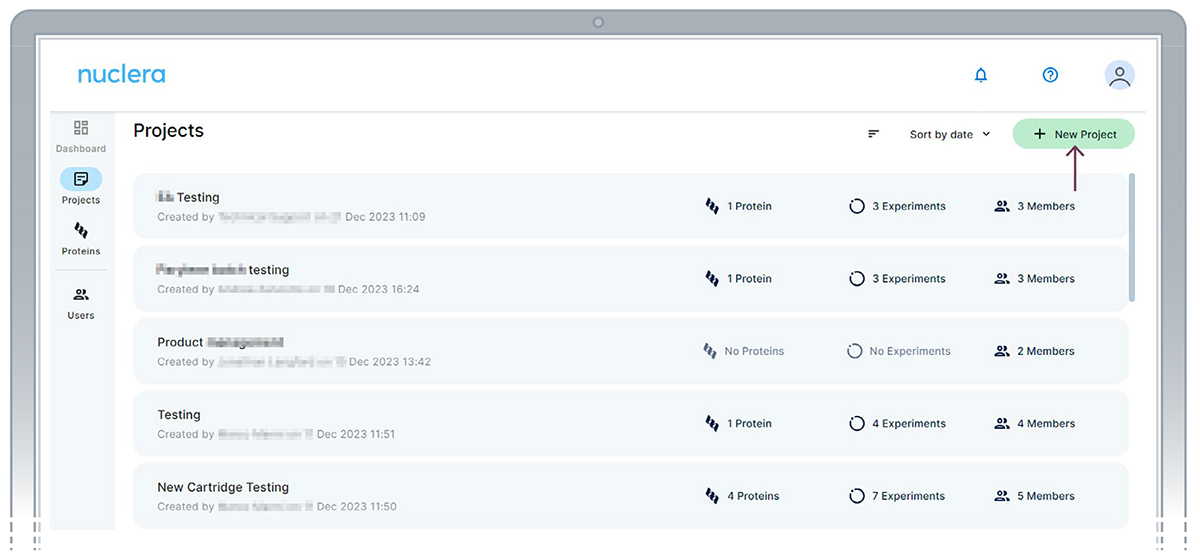
Set up a project - Administrator
In the eProtein Discovery Software portal, users can create a new project or select from an existing project.
To select an existing project, click on one of the existing projects listed on the screen. To create a new project, click on the [New Project] button located on the top right corner of the screen.
Register a protein sequence - Any user
Once a project is created, you can navigate through it.
- Select the [Proteins] tab and click the [+ New Protein] button.
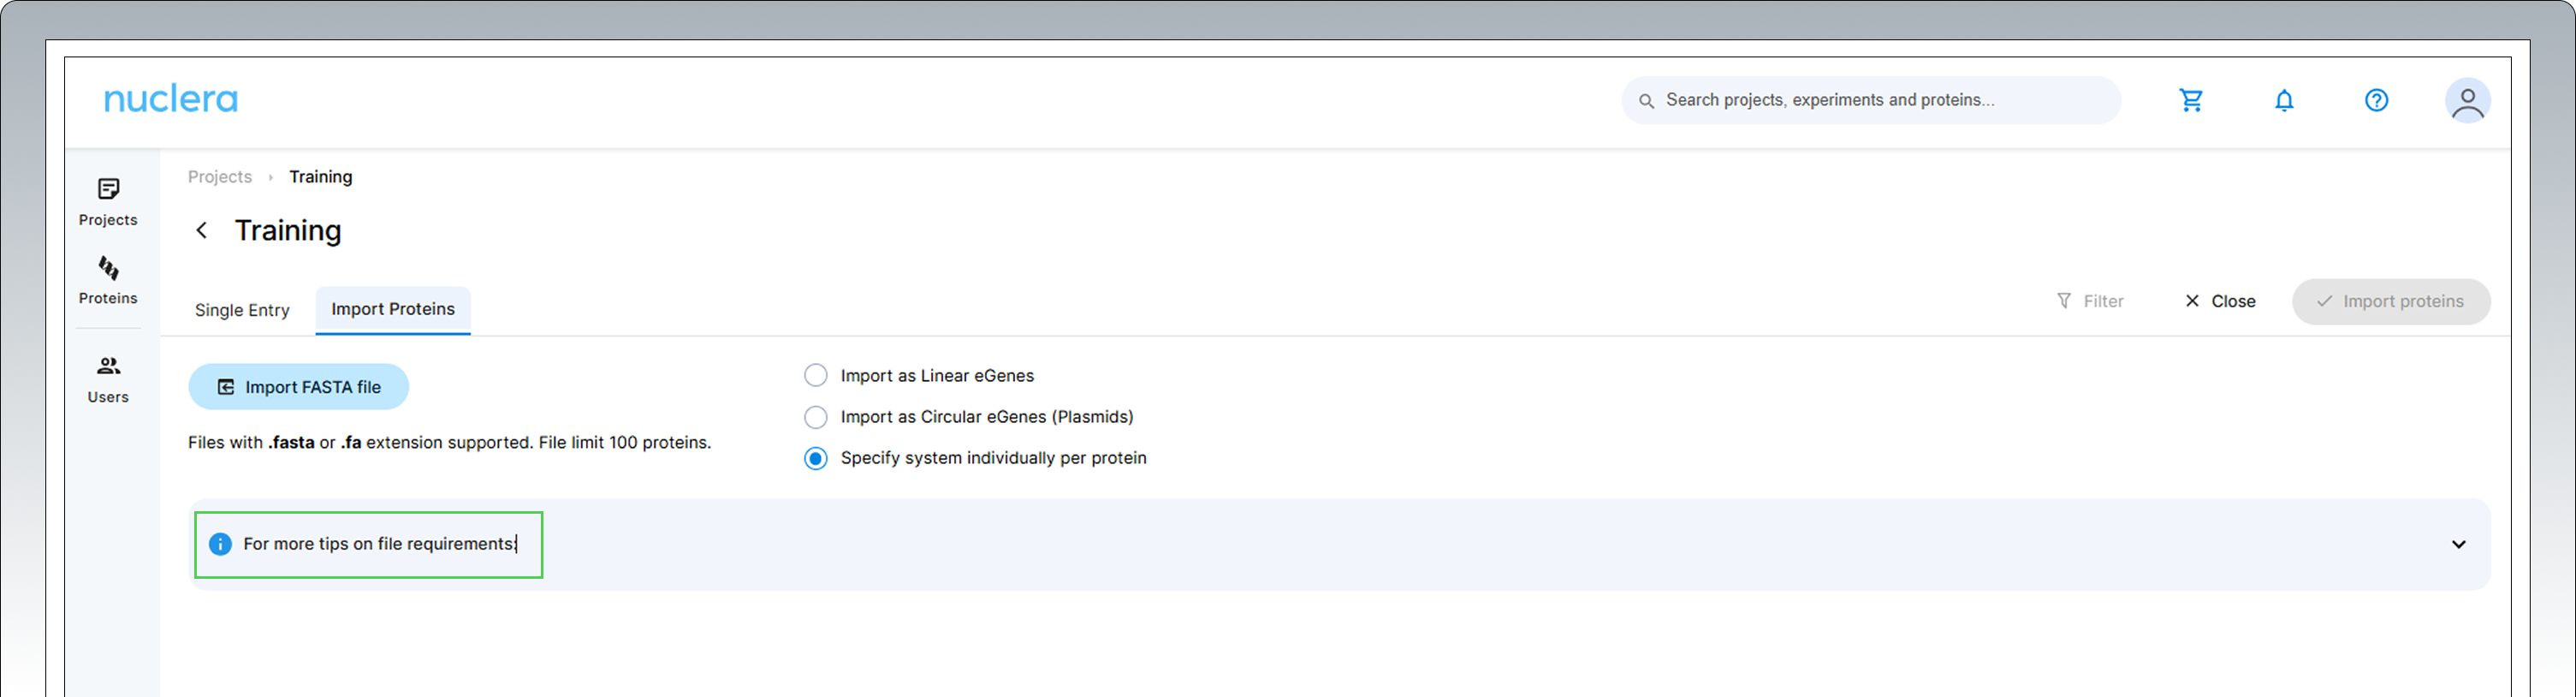
Bulk protein sequences can be imported from a FASTA file by clicking on the [+ Import Proteins] button. This feature is particularly beneficial for users looking to import 24 sequences or more at once.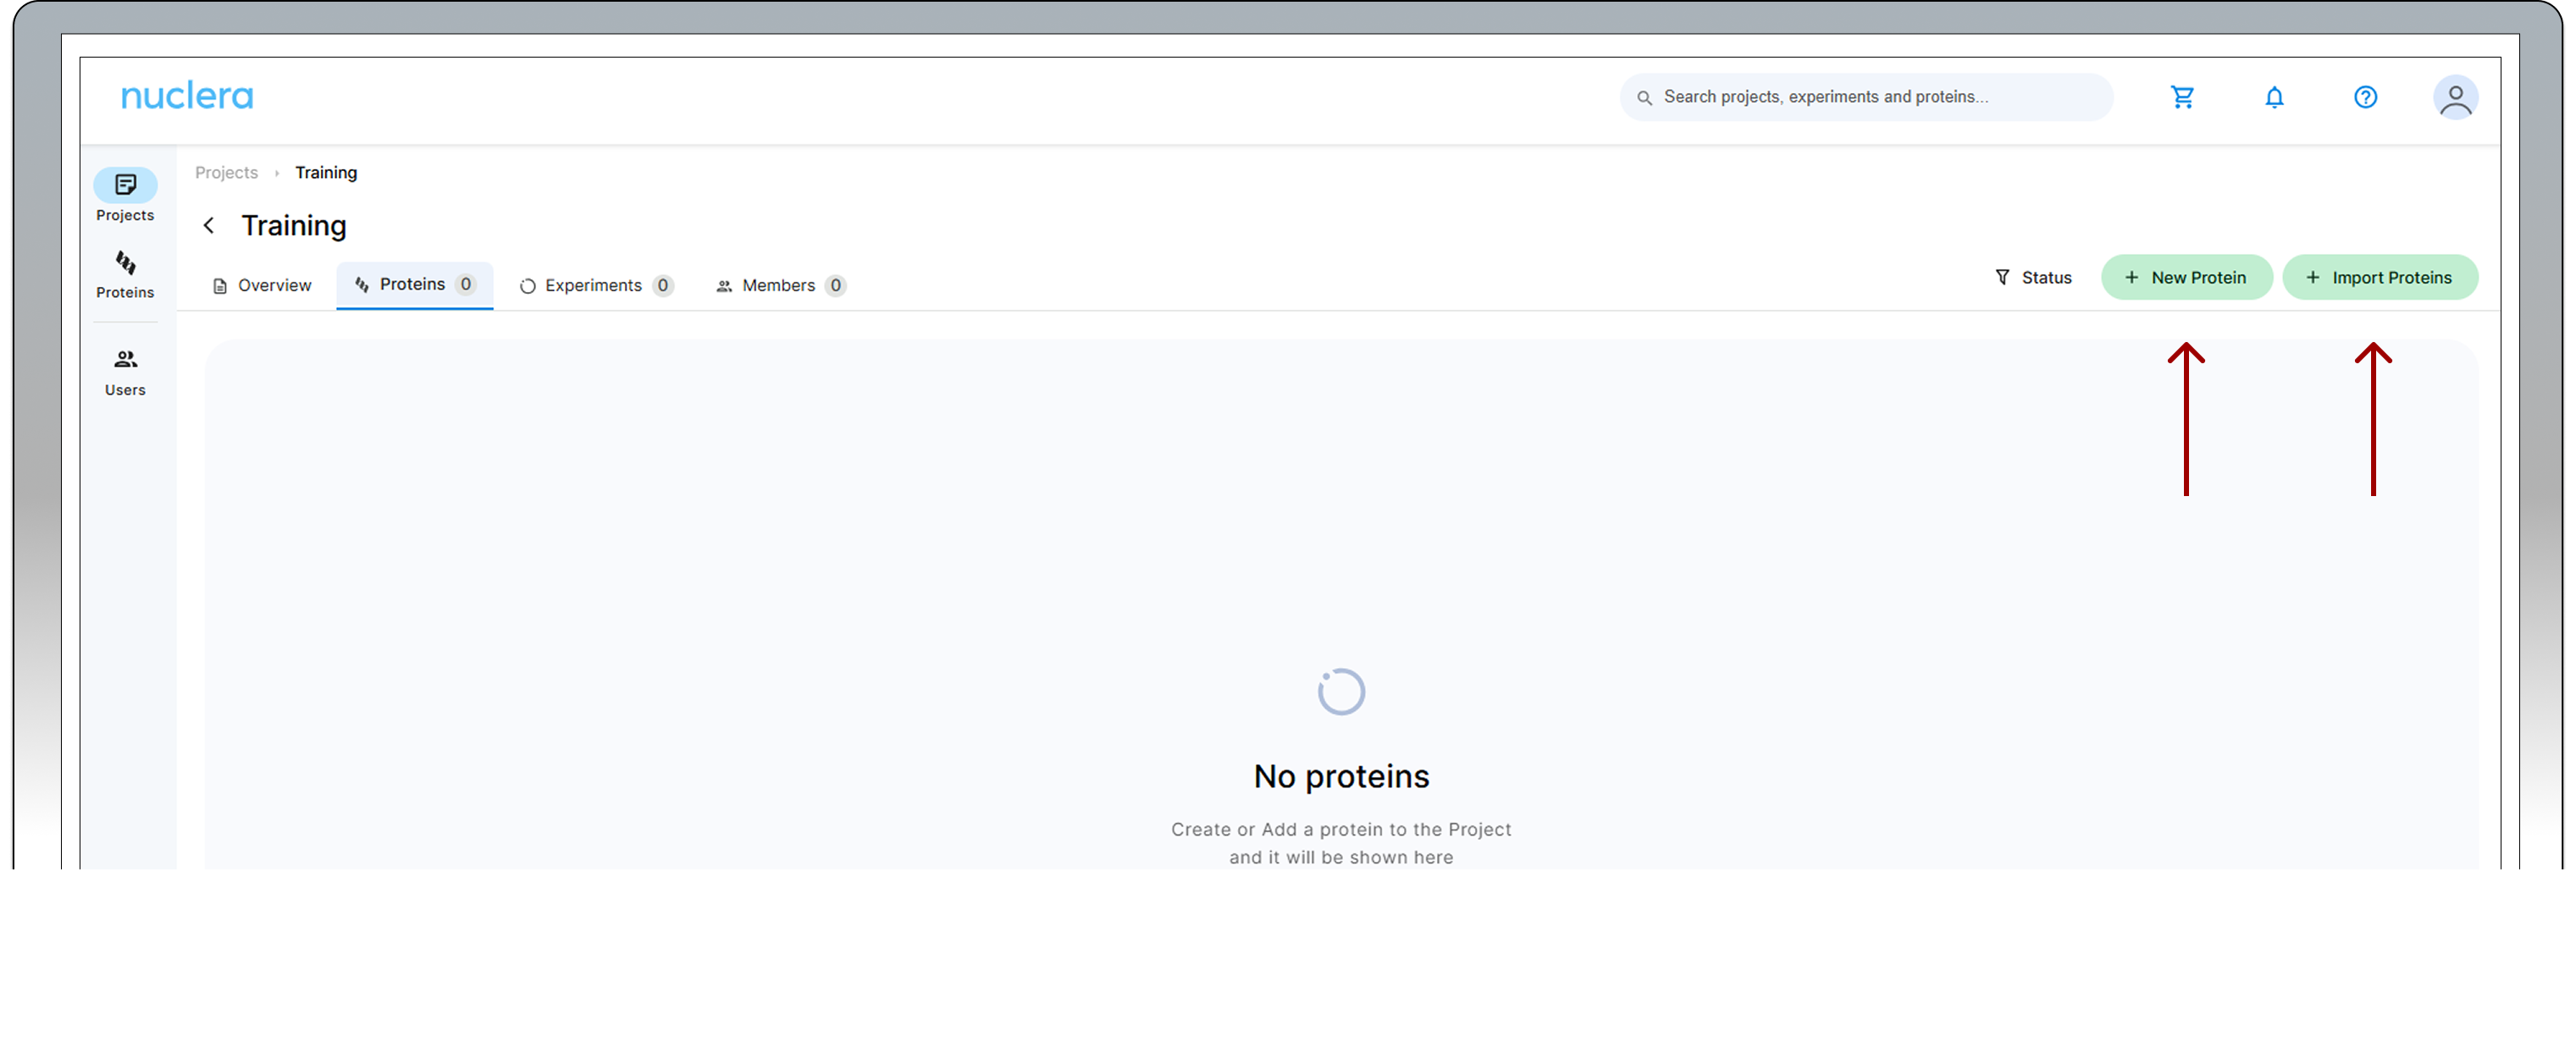
For more information about the "Import Proteins" feature, click on the i blue symbol
-
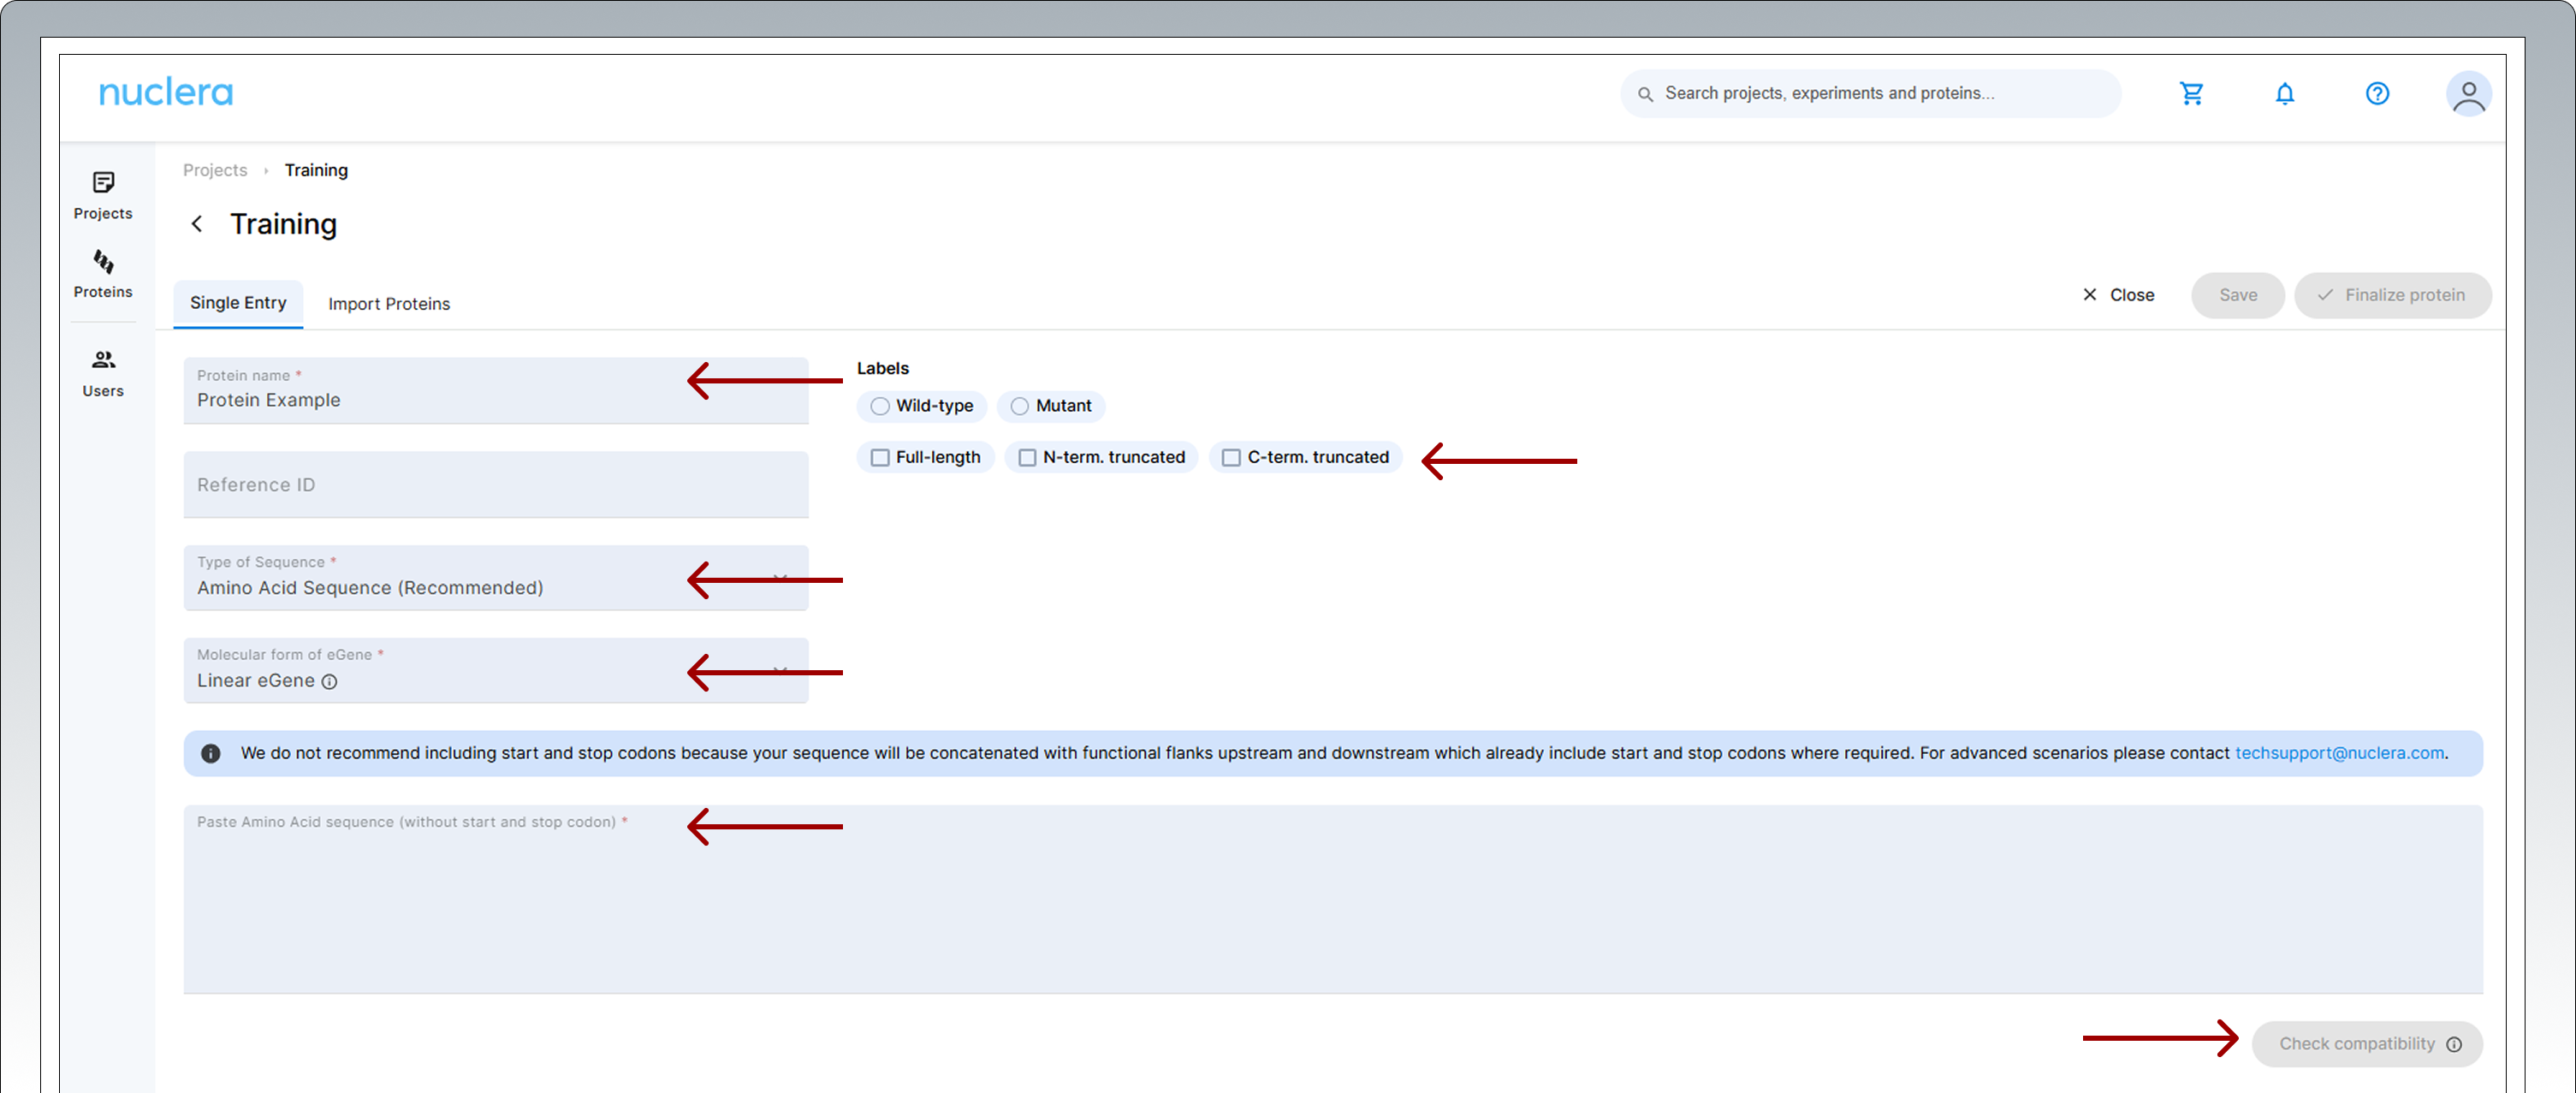
Add a name for your sequence and a reference ID (optional). Select the labels that apply to your protein and add any notes. Select the molecular form of the eGene constructs you want to use, Linear eGene or Circular eGene. Select type of sequence you are submitting, amino acid or DNA. Copy and paste the amino acid or a DNA sequence into the input box. Click on [Check Compatibility] and wait until all the tests have been performed.
-
If you have uploaded an amino acid sequence, the sequence will be codon optimized and converted to a compatible DNA sequence. For linear eGene construct format, adaptor sequences will also be added to the 5’ and 3’ end. These adaptor sequences will serve as primer annealing points during the PCR reaction to expand each construct with the appropriate fusion tags.
-
The software will perform DNA sequence compatibility checks to ensure that there are no conflicting sequences that can impact DNA synthesis.
-
Protein expression compatibility checks will also be performed in the background to detect transmembrane domains, disorder regions or the presence of start and stop codons. If any expression incompatibility is detected, a warning signal will be displayed. Users can still proceed at risk or return to modify the sequence.
-
If you are happy with the sequence, press the [Finalize protein] button located at the top right corner of the screen.
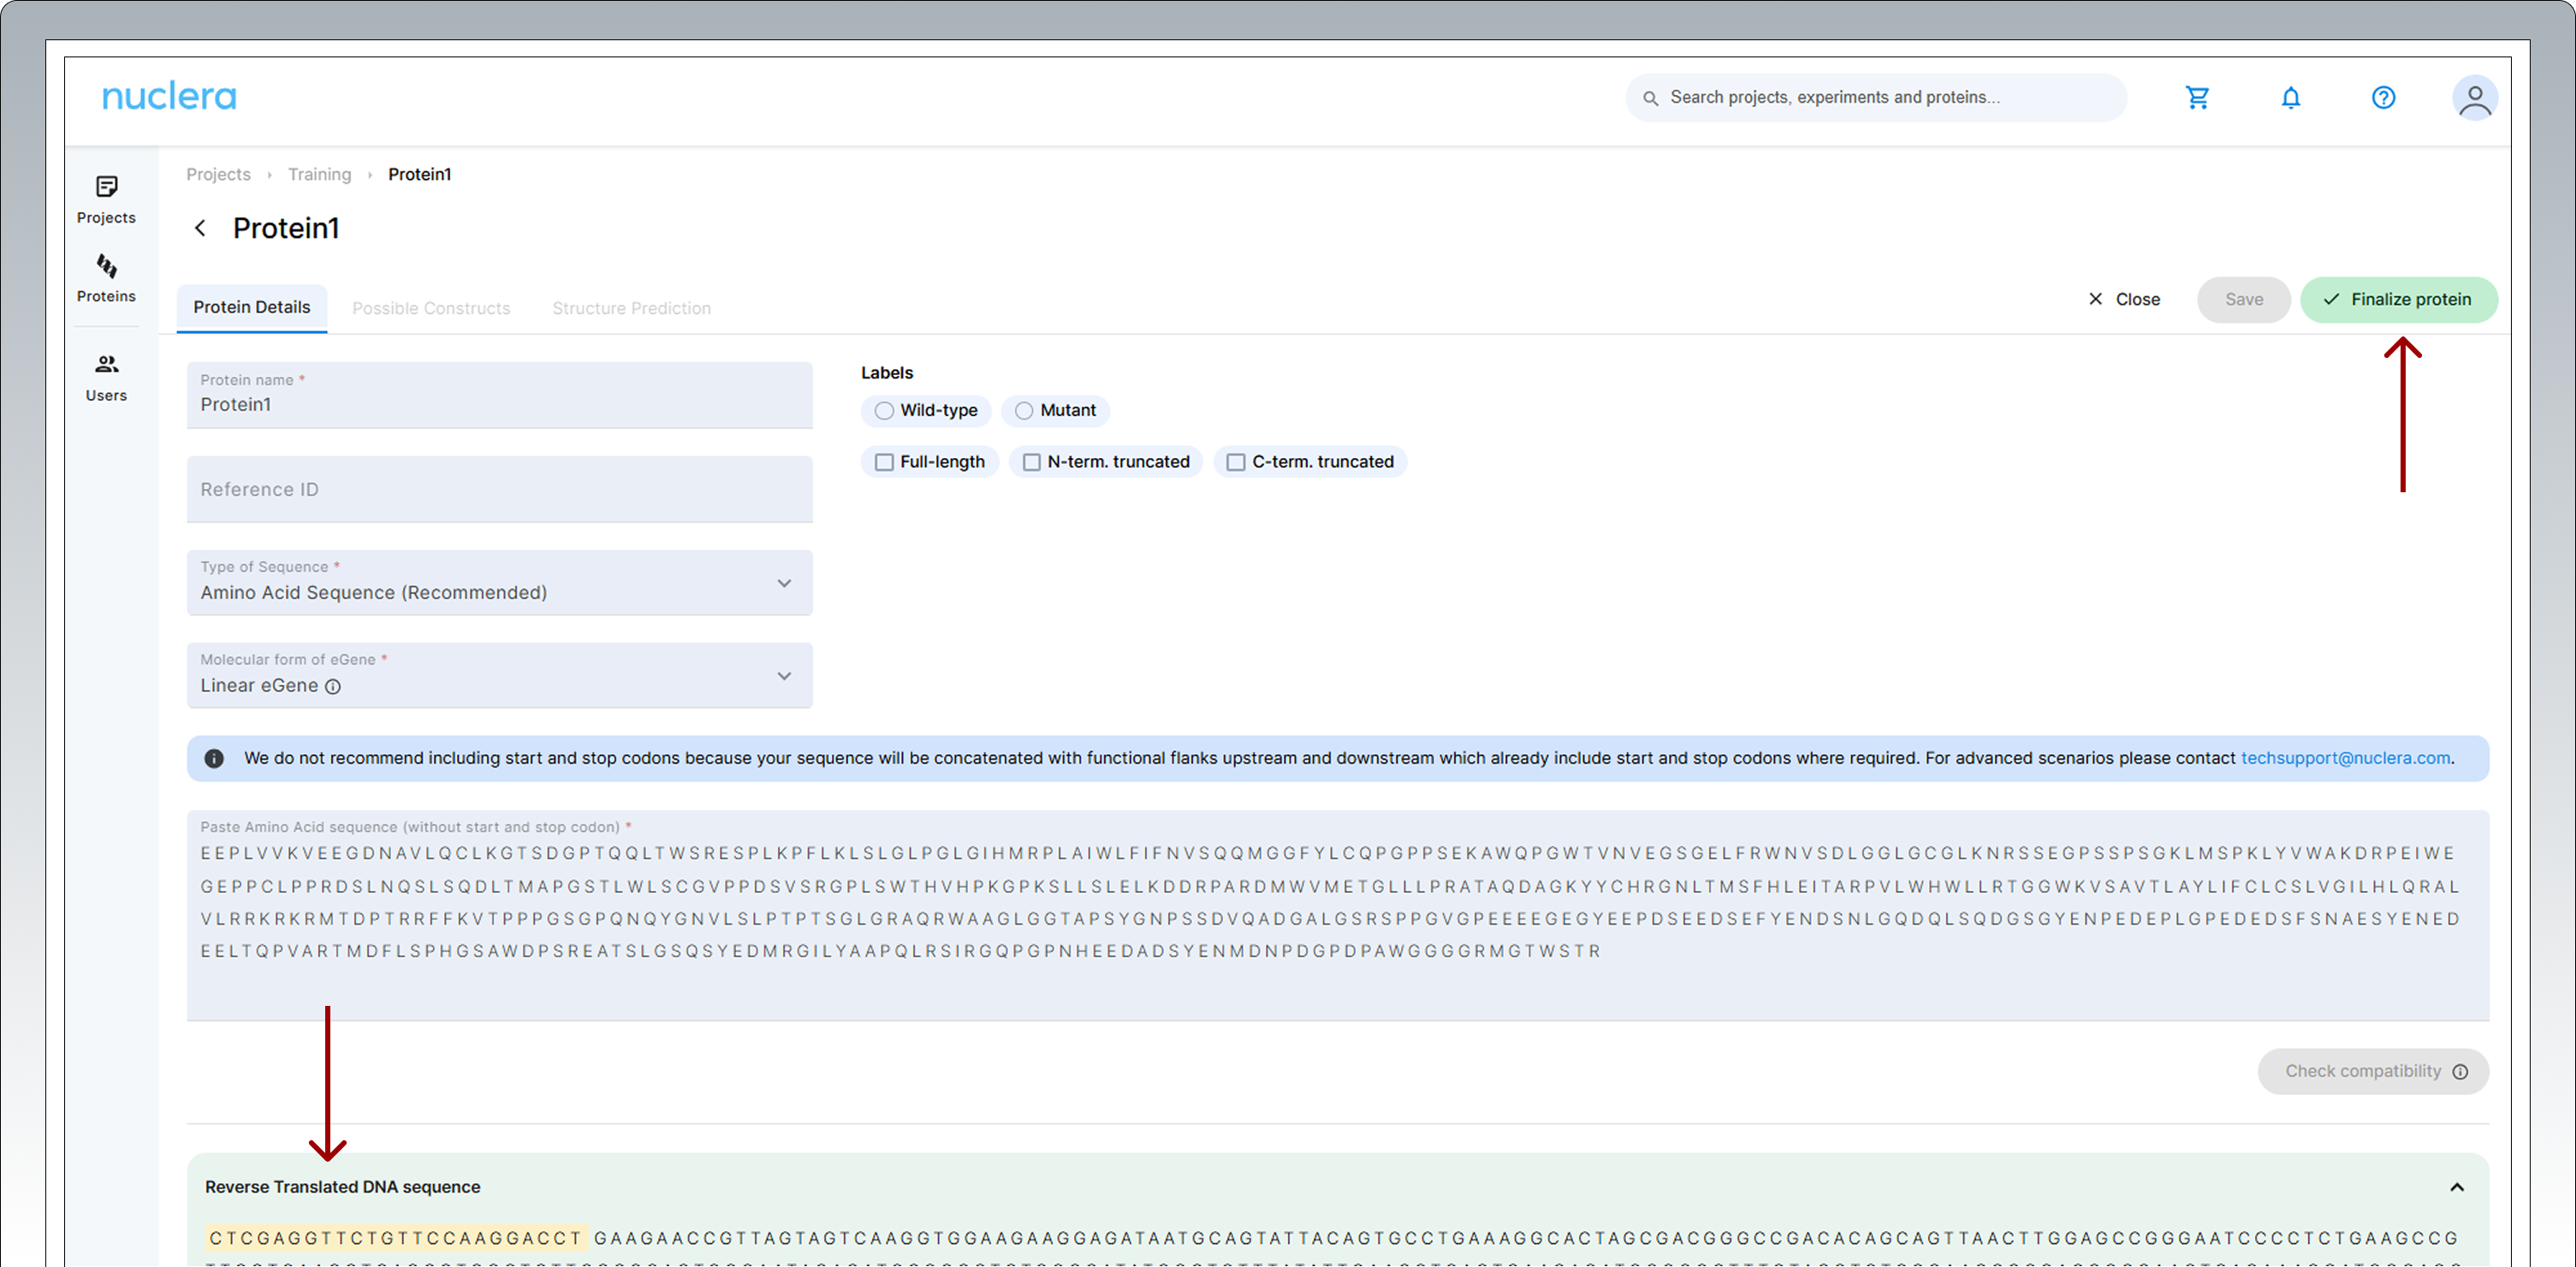
-
Once finalized, the protein or DNA sequence cannot be modified.
-
The translated DNA sequence can be copied and gene fragment ordered from Nuclera’s recommended DNA synthesis vendor.
How to order your Circular eGene™ constructs
Following the steps below, you can order your Circular eGene constructs directly from our list of approved vendors:
- GenScript®
- GeneArt®
- If this is your first time ordering from one of our approved vendors:
- Contact Nuclera Technical support at: techsupport@nuclera.com requesting to access selected vendor (GeneArt® or GenScript®) details to purchase Circular eGene.
- Download the appropriate Circular eGene constructs order form and fill it in with the required information and Circular eGene construct sequences you wish to purchase.
- Send the correct filled in form to the selected vendor once you have been contacted by the vendor directly. Note - You must contact Nuclera Technical support every time you wish to order from a new Nuclera-approved vendor you have not ordered from before.
- If you have already ordered Circular eGene construct sequences from the selected vendor:
- Download the Circular eGene construct order from GeneArt® or GenScript® and fill it in with the required information and Circular eGene construct sequences you wish to purchase.
- Send the filled in form to the selected vendor to request a quote.
Design an experiment - Any user
Expression Screen
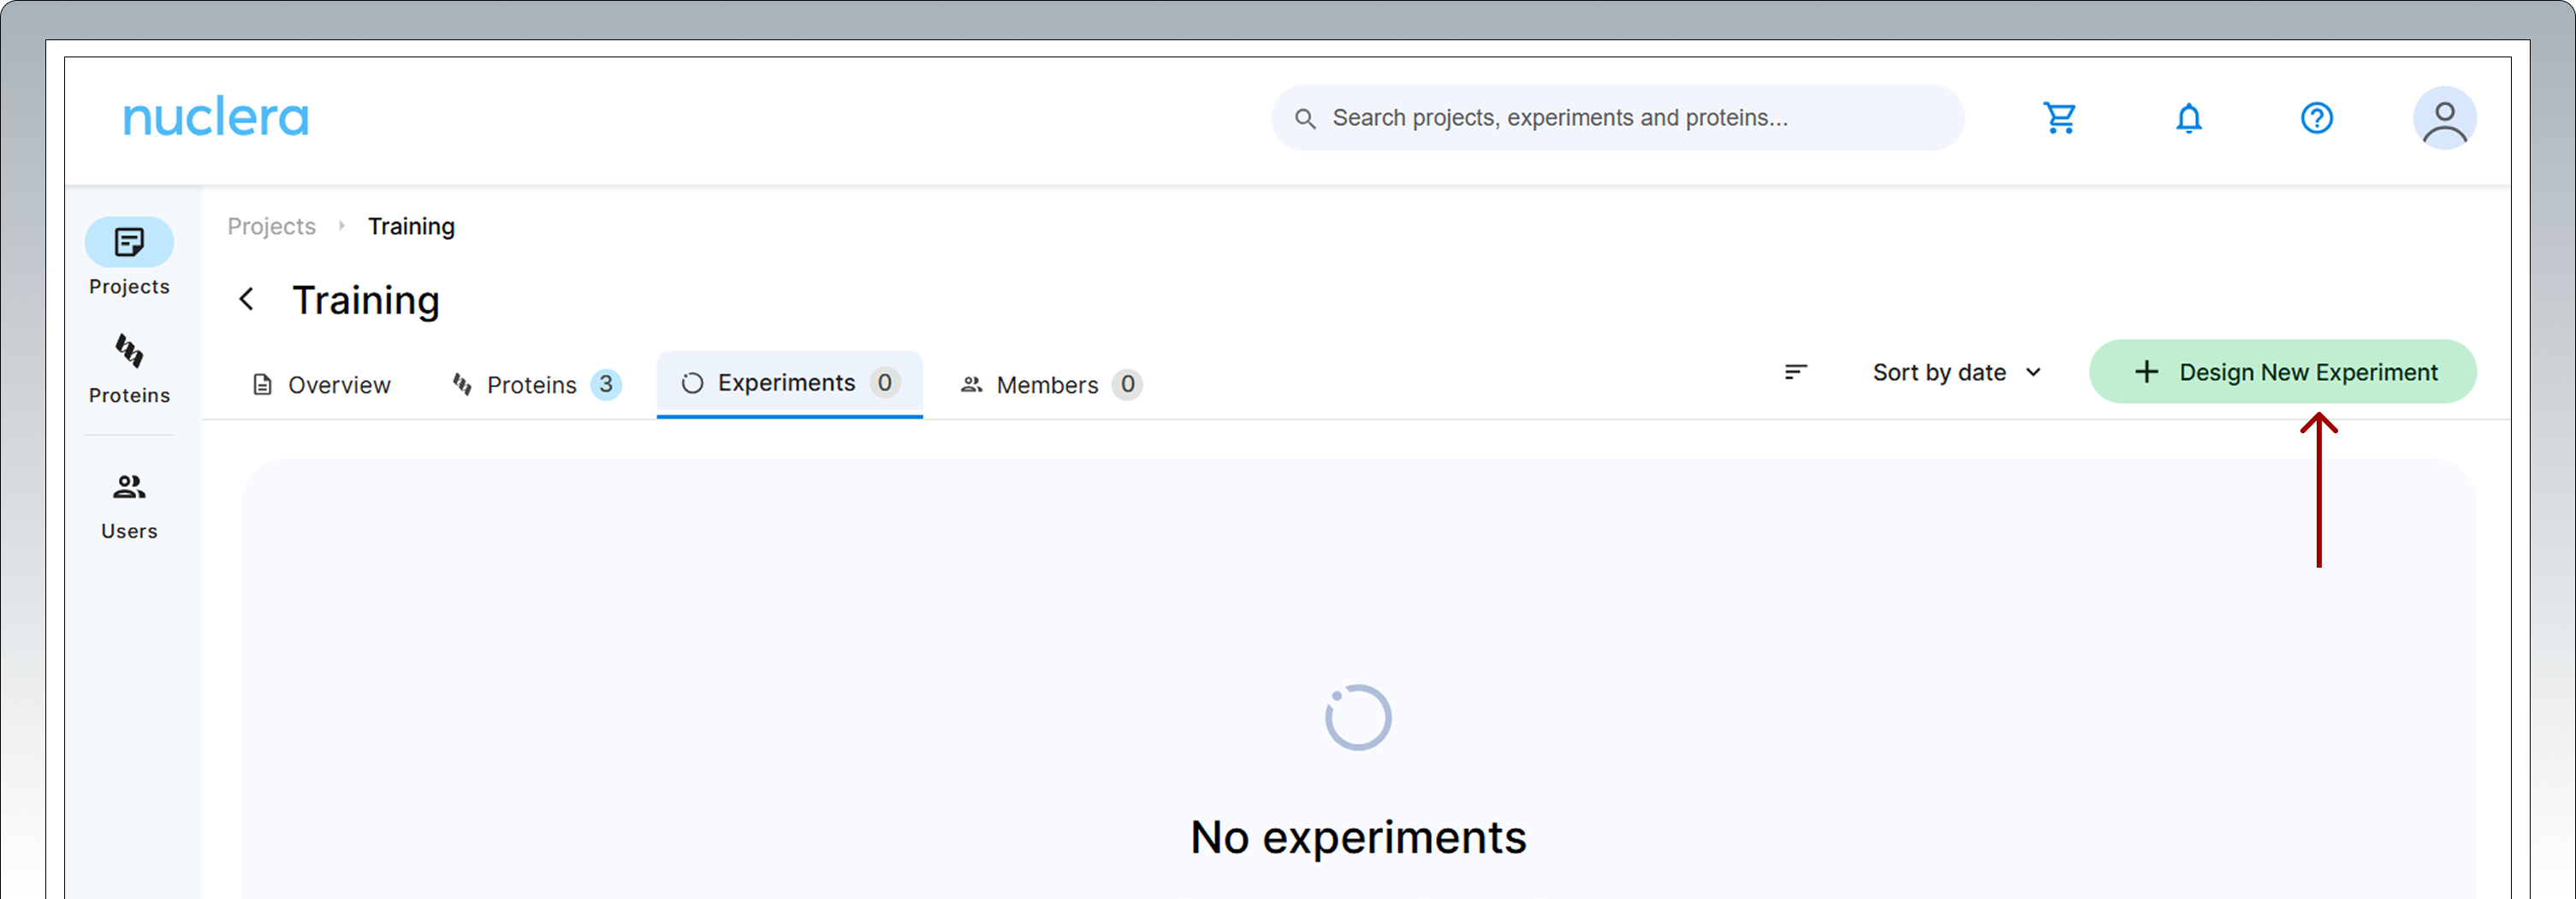
- After registering your protein(s), you can move forward to design your experiment.
- Select the Experiments tab and click on the [Design New Experiment] button.
 3. Enter the name of the new experiment, add a short text description and select the eProtein Discovery Screen Experiment workflow. Click the activated [Create Experiment] button
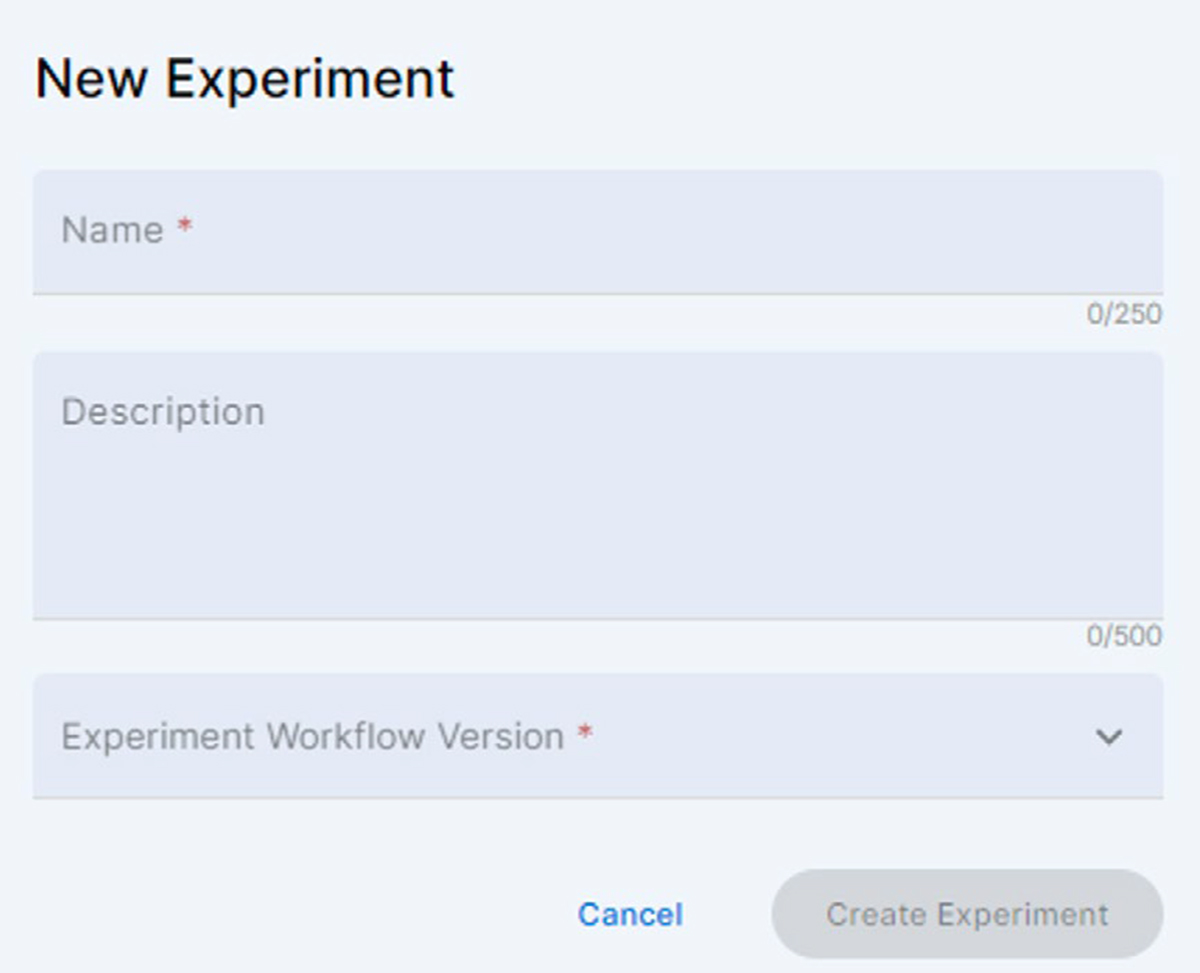
If the version of the Workflow is not compatible with the current version of the Instrument Software, a warning message is displayed, inviting the user to update the Instrument Software.
Note On the instrument, an incompatible experiment will appear with a warning sign inviting the user to update the Instrument software.
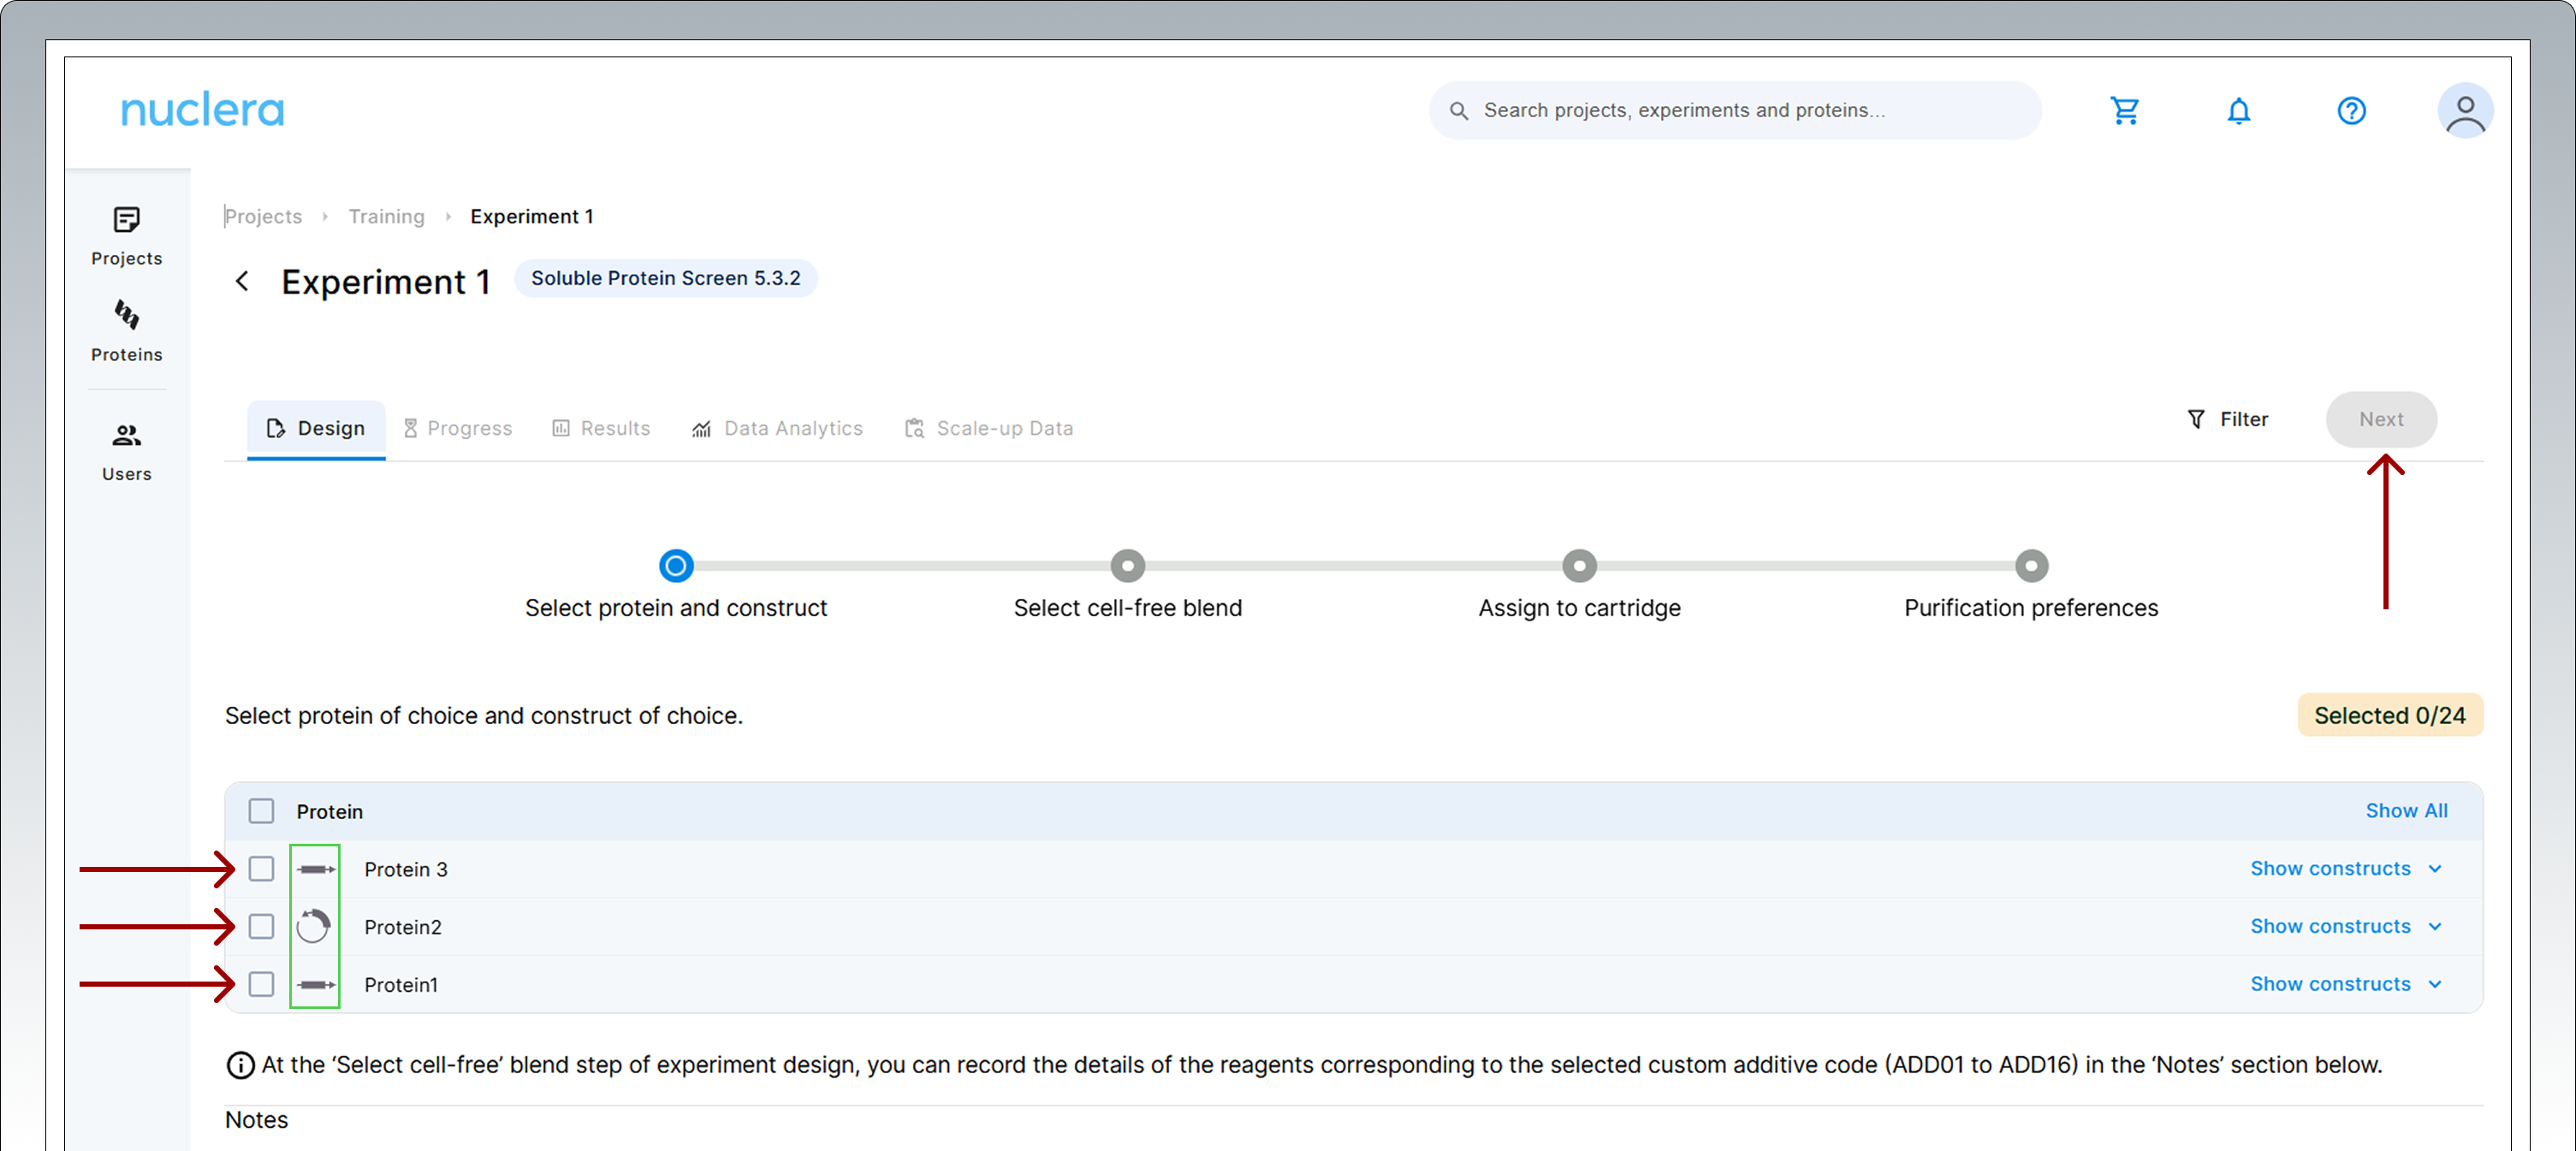
- Select 24 DNA constructs to assign to a cartridge. Once a desired number of constructs are selected, click on [Next]. The molecular form of your eGene constructs is shown next to the name of the protein chosen (green rectangle).
Note: You can load the same construct (duplicate) in two ports if required by your experimental design.
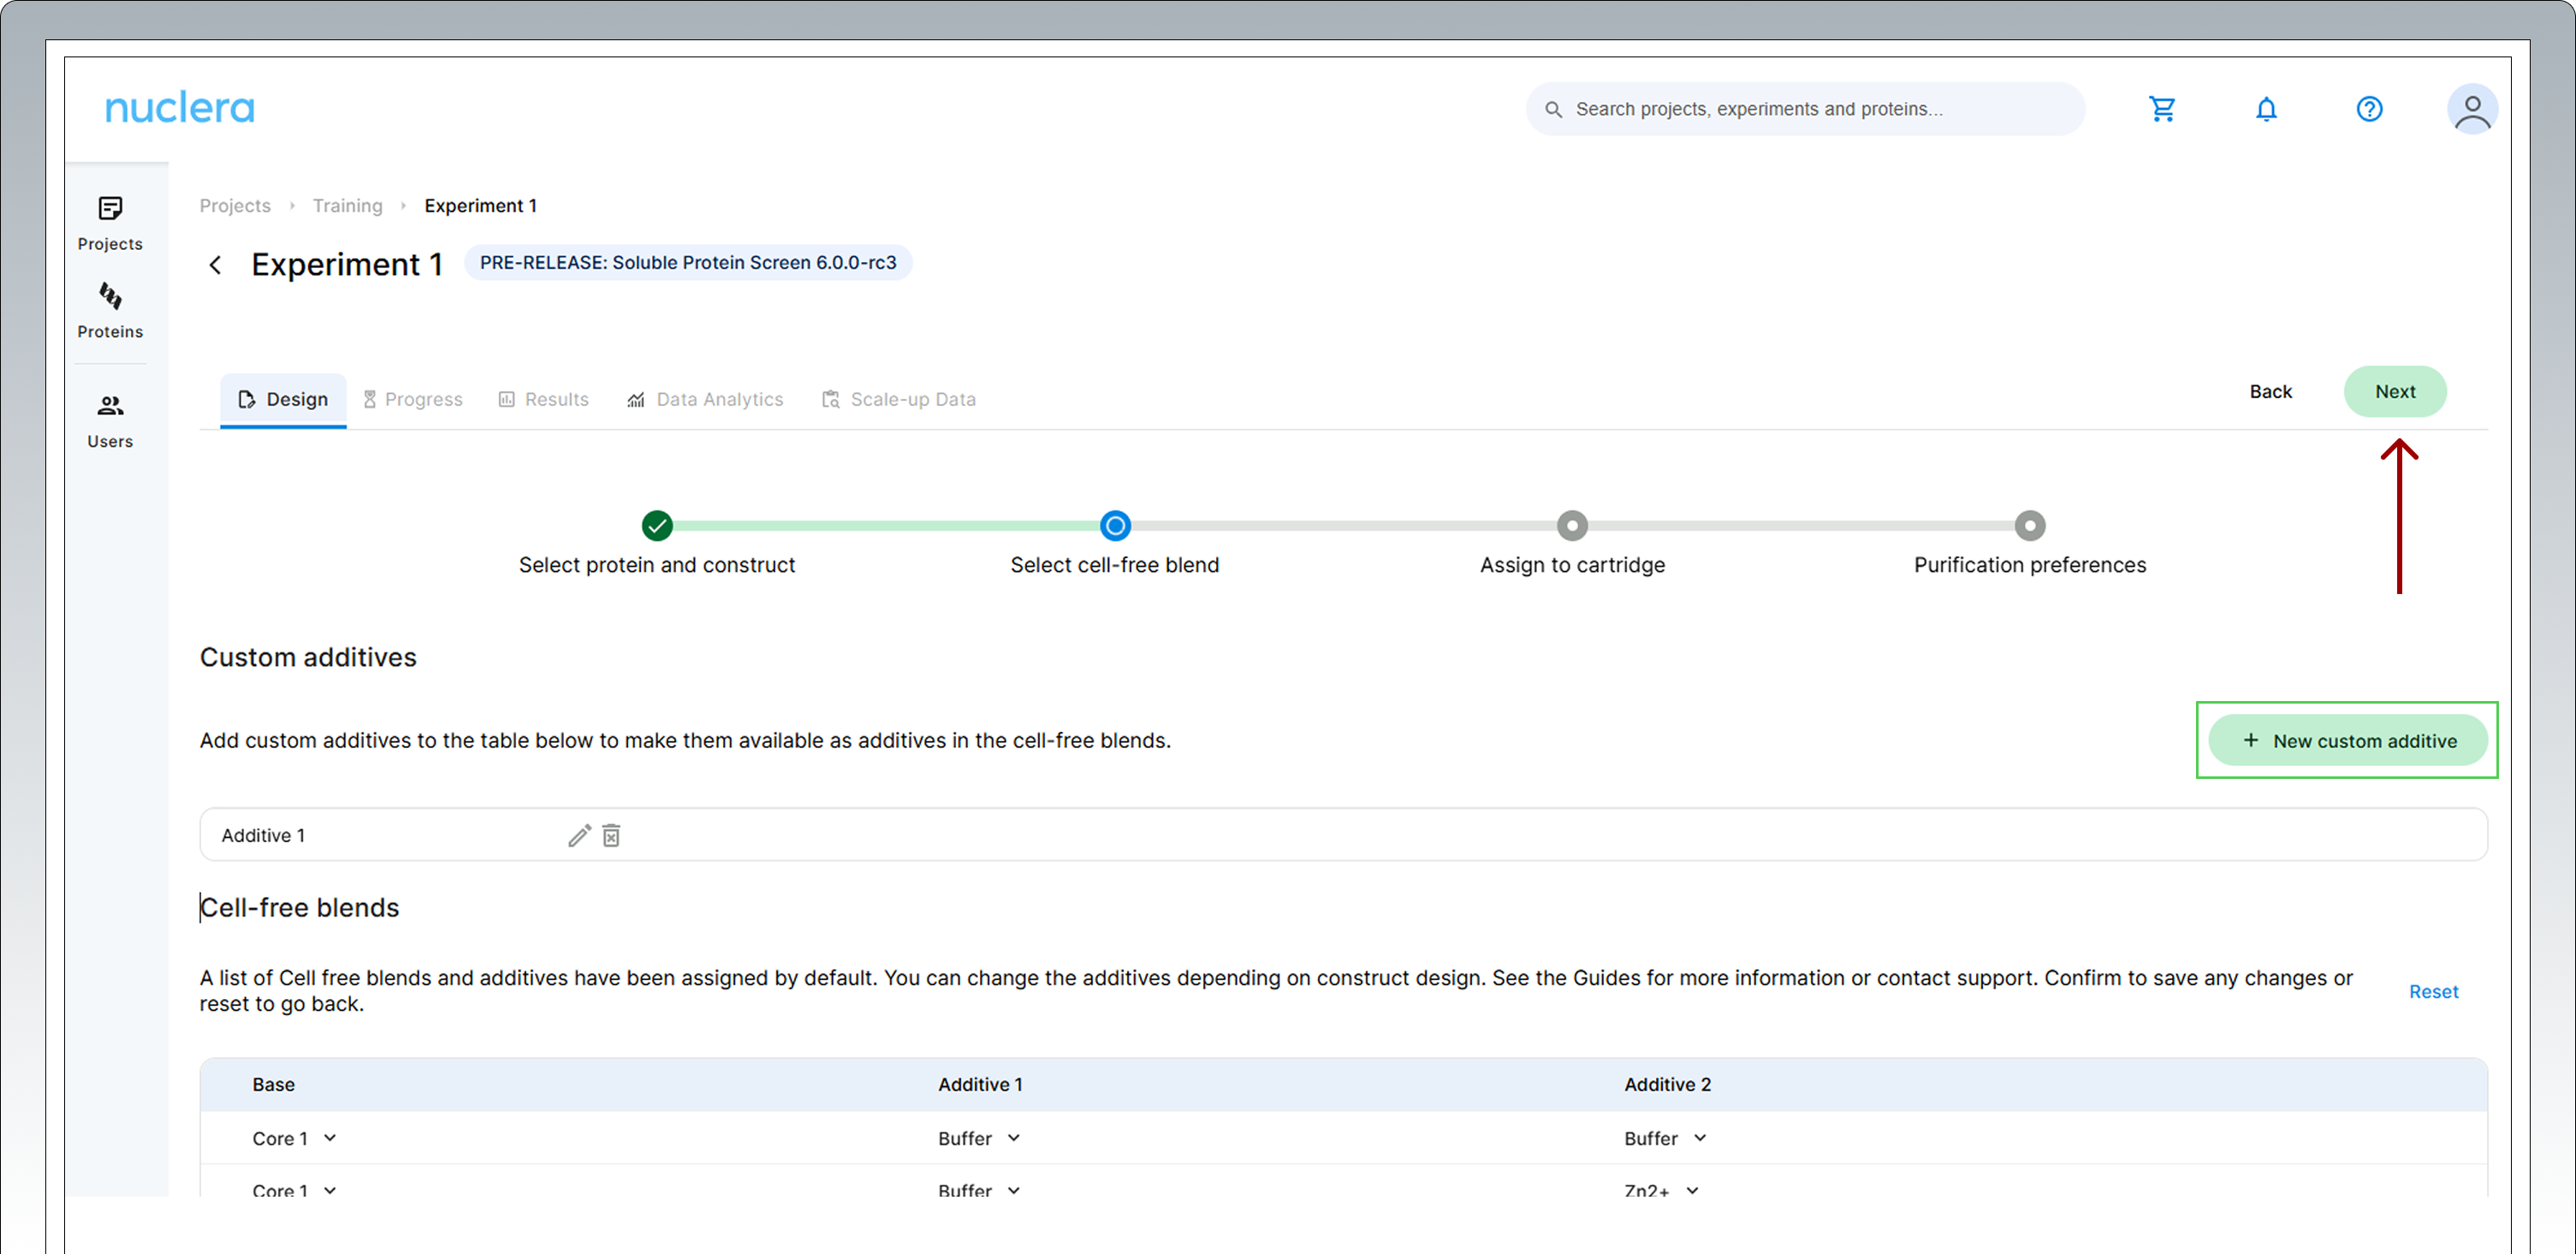
 5. Select expression conditions by adding two additives to the Cell-free Core Reagent – The “Additive selection guide” section of this document will help you to select additives. If you are undecided on the additive combinations to use, go with the default list of high performing Cell-free Blends pre-selected on the screen. Click [Next] to proceed.
The eProtein Discovery™ system also provides the flexibility to incorporate custom additives into expression and purification workflows, enabling users to tailor conditions for unique protein targets. To ensure optimal performance and minimize risks, please consult the Compatibility List at https://info.nuclera.com/manual-custom-additives-chemical-compatibility-list.html, which provides detailed guidelines on compatible additives and their maximum allowed concentration. This resource serves as a valuable reference to help you achieve optimal results when working with custom additives. Refer to this before experimenting with custom additives or contact Technical Support if you require more guidance. Custom Additives can be shown in the experiment design by clicking on the [New custom additive] box. Up to 20 characters can be used for the definition of the custom additive.
An additive can be selected twice to enhance a specific condition.
-
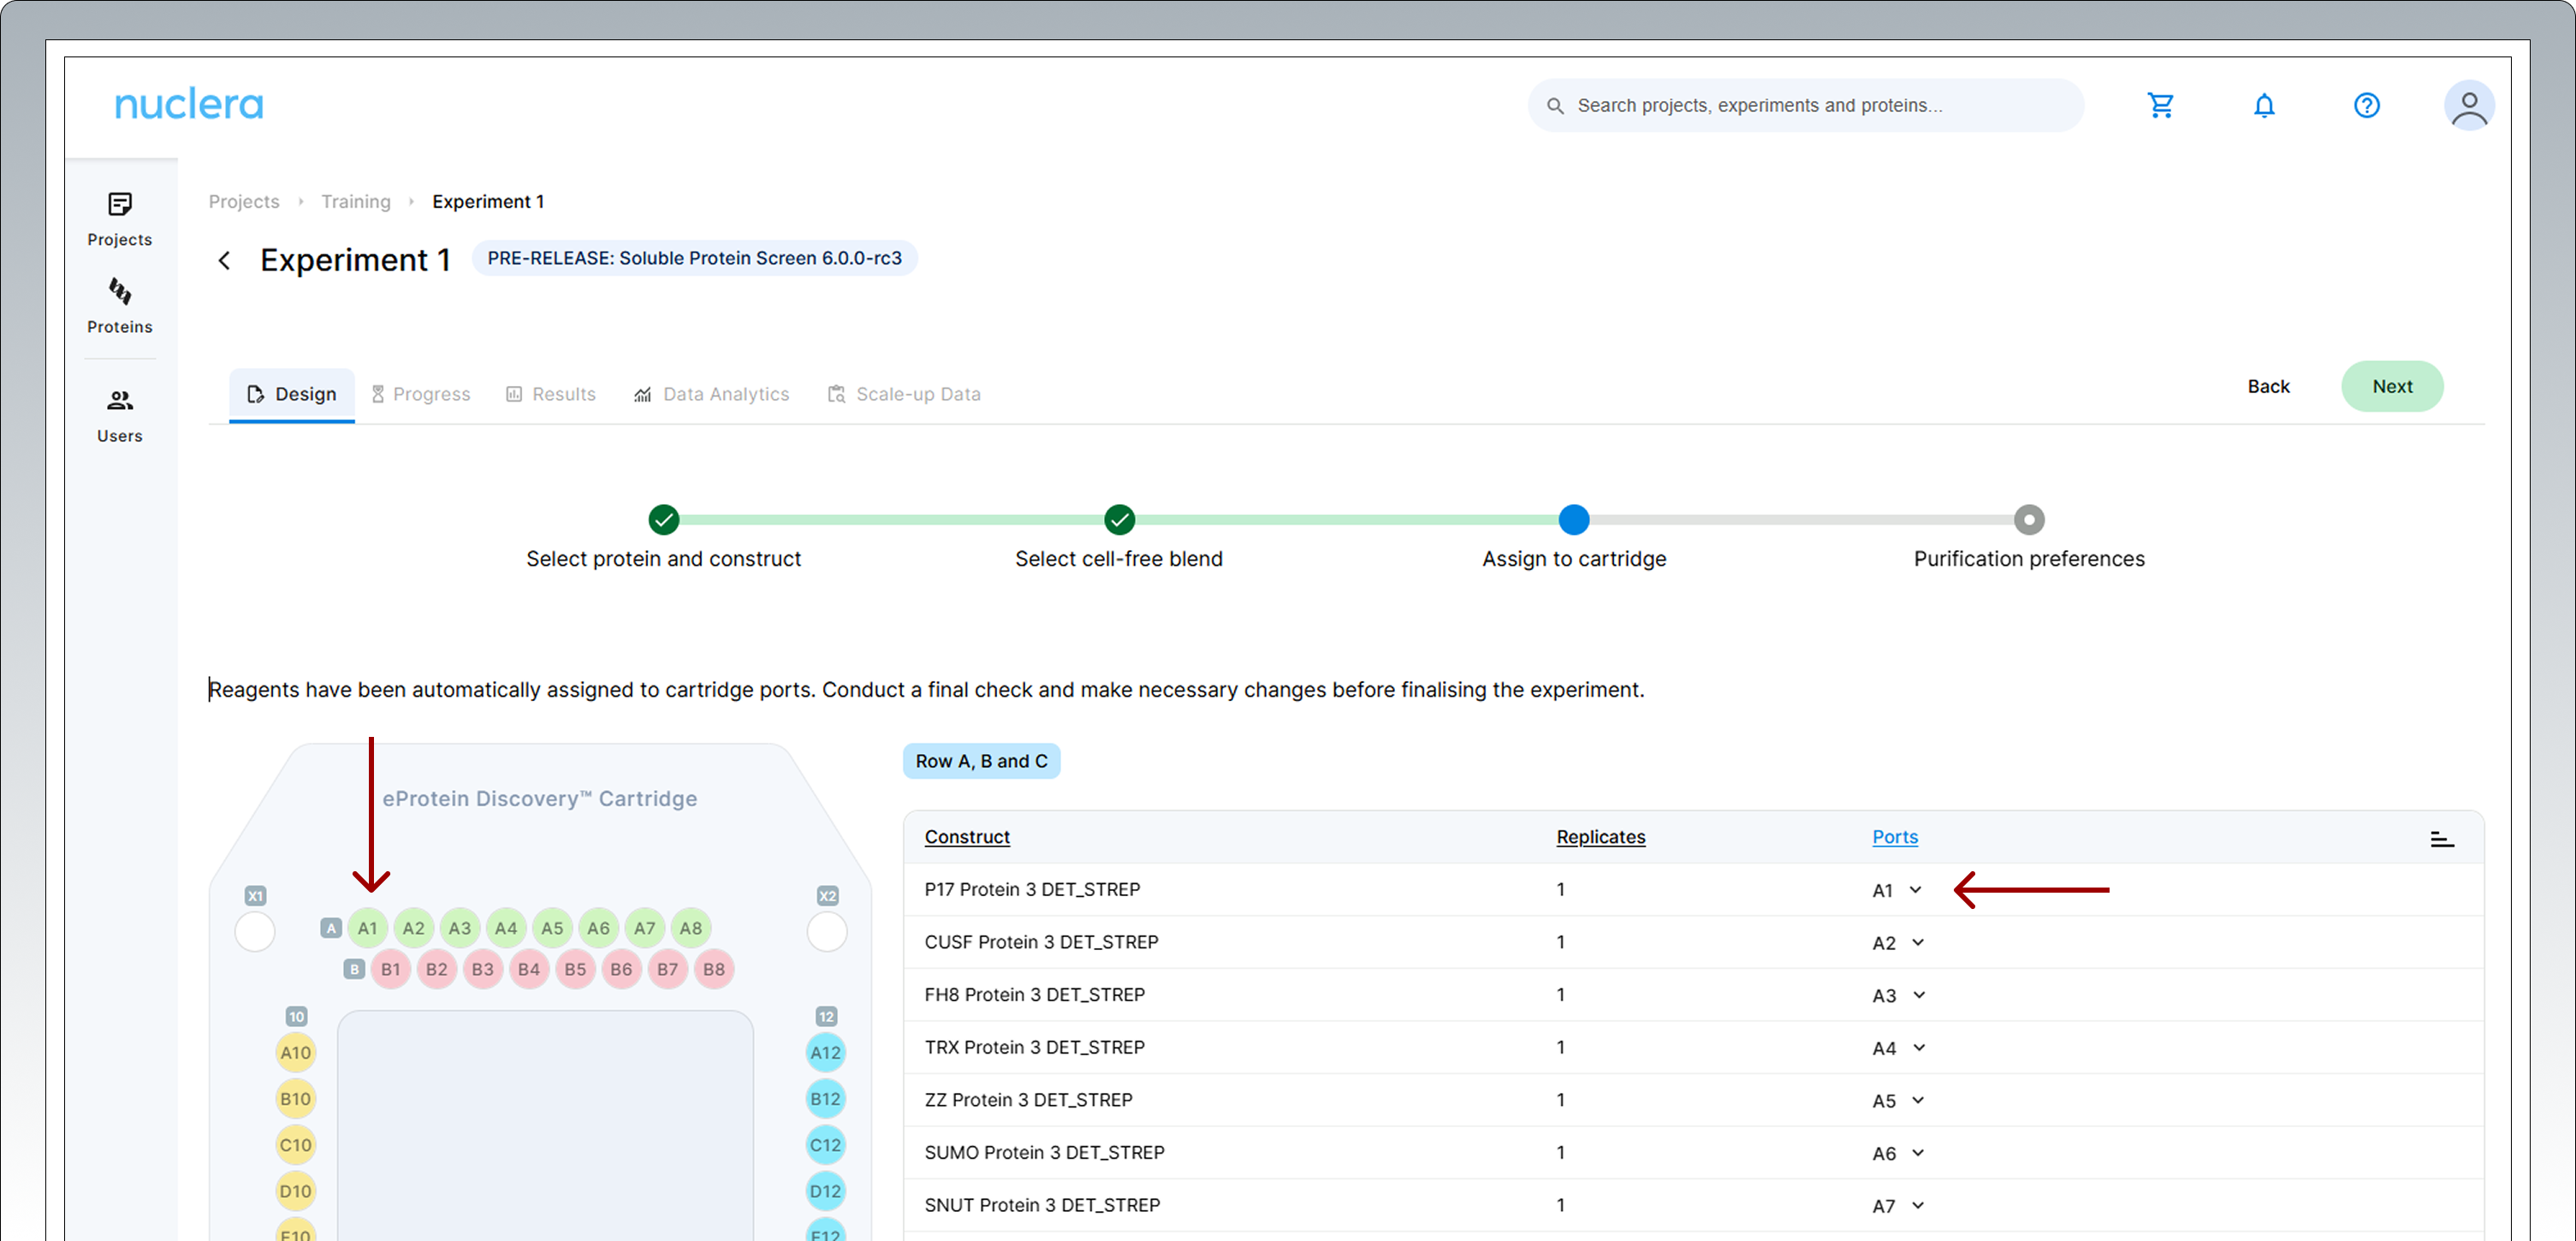
All samples and reagents are now assigned to a specific port on the cartridge.
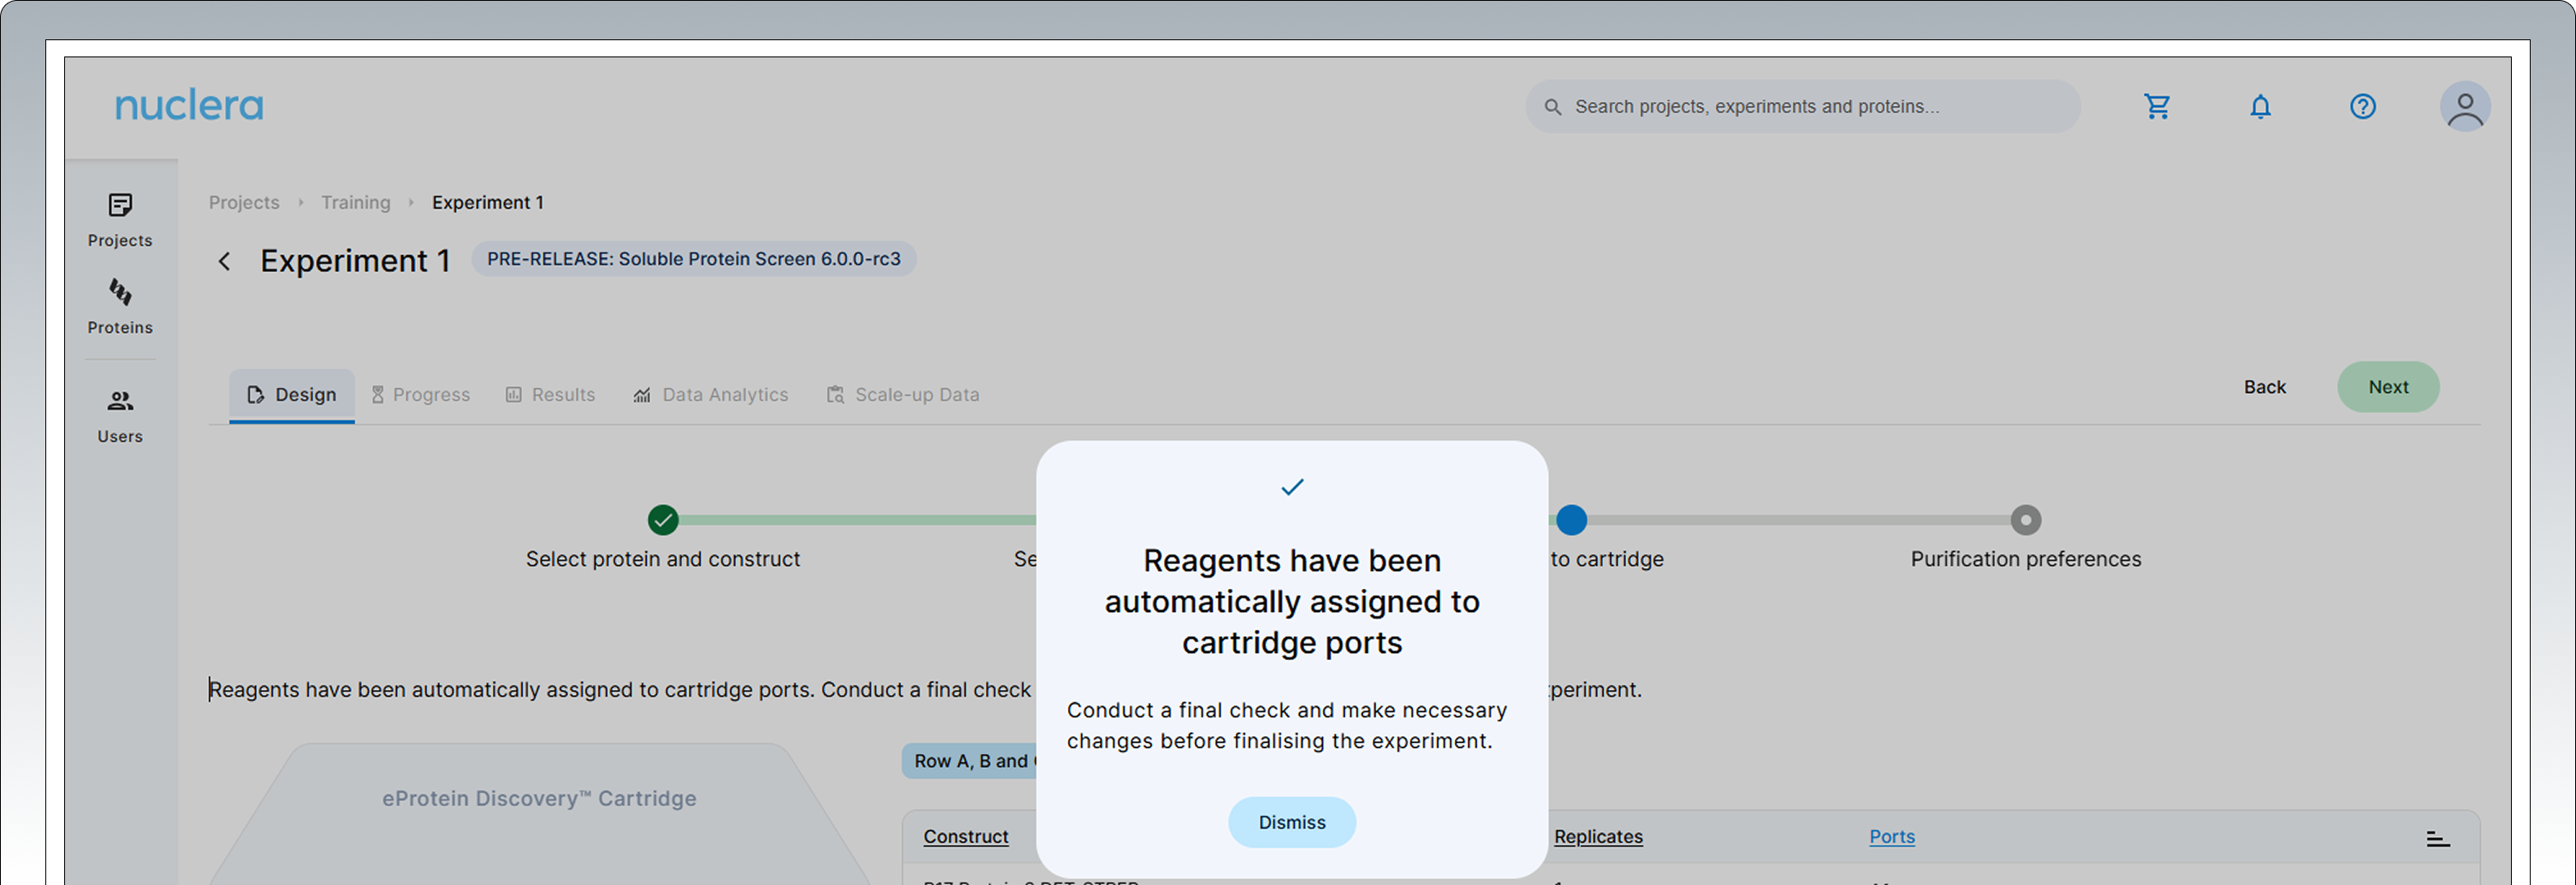
-
Review & Correct sample allocation – In the final step you have the opportunity to inspect and potentially change port location for DNA samples and Cell-free Blends. Drag & drop in the interactive cartridge map or use the port menu available to every sample. Press the [Next] button to proceed.
Purification Screen
In the following step you can modify the parameters the instrument will use to select the best expression conditions for purification. The default variables are pre-selected and are suitable for the majority of experiments.
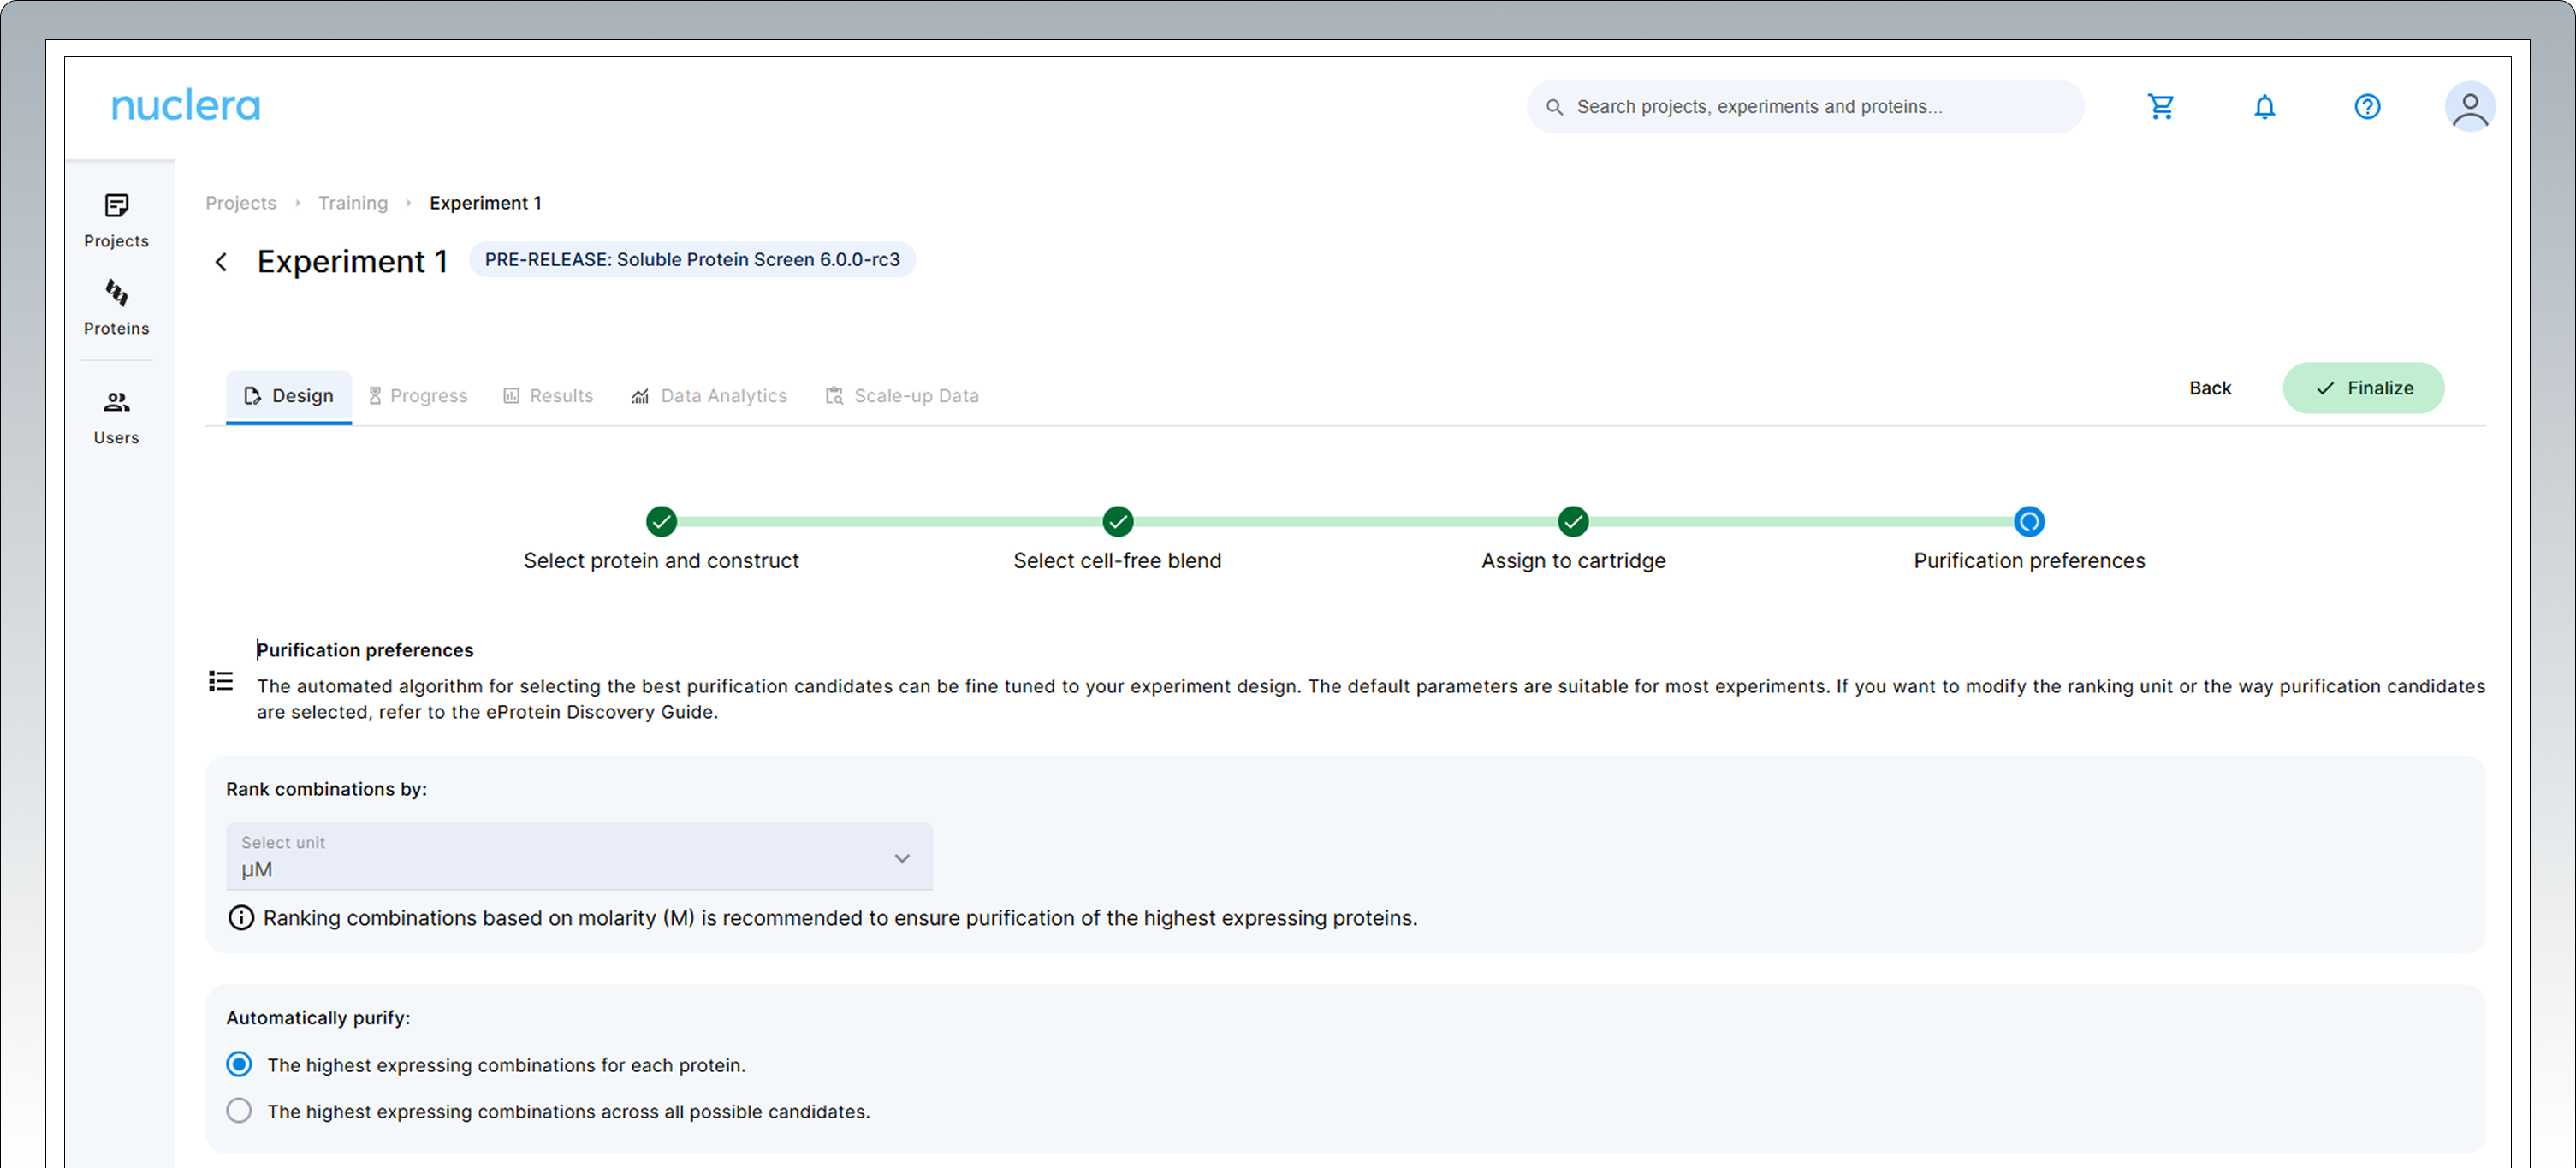
The default algorithm works as follows:
▷ In total, 30 expression conditions are selected for the purification screen.
▷ The selection can be done using either molar concentration (µM), recommended, or mass
concentration (mg/mL) depending on the purification preferences.
▷ If you are expressing 3 POI on the cartridge (3 Proteins-of-interest against a 8 fusion tags panel), the instrument will automatically select the 10 highest expressing combinations from each construct so all the constructs are represented in the purification screen (3x10).
▷ If you are expressing 6 POI (6 POI x4 tags) the instrument will select the 5 highest expressing combinations from each protein (6x5).
As a user you can alter the behavior of the instrument and select the best expression experiment across all 192 different conditions.
The ranking can be performed using different units, μM or mg/mL.
In that scenario you might end up with some of your protein constructs NOT represented in the purification.
- Press the [Next] button to proceed. Confirm the statements presented by ticking the boxes. If you cannot confirm these four statements we recommend you keep the experiment in draft status (choose [Cancel]).
- Press the [Finalize] button to proceed. Your experiment is now available on the instrument.
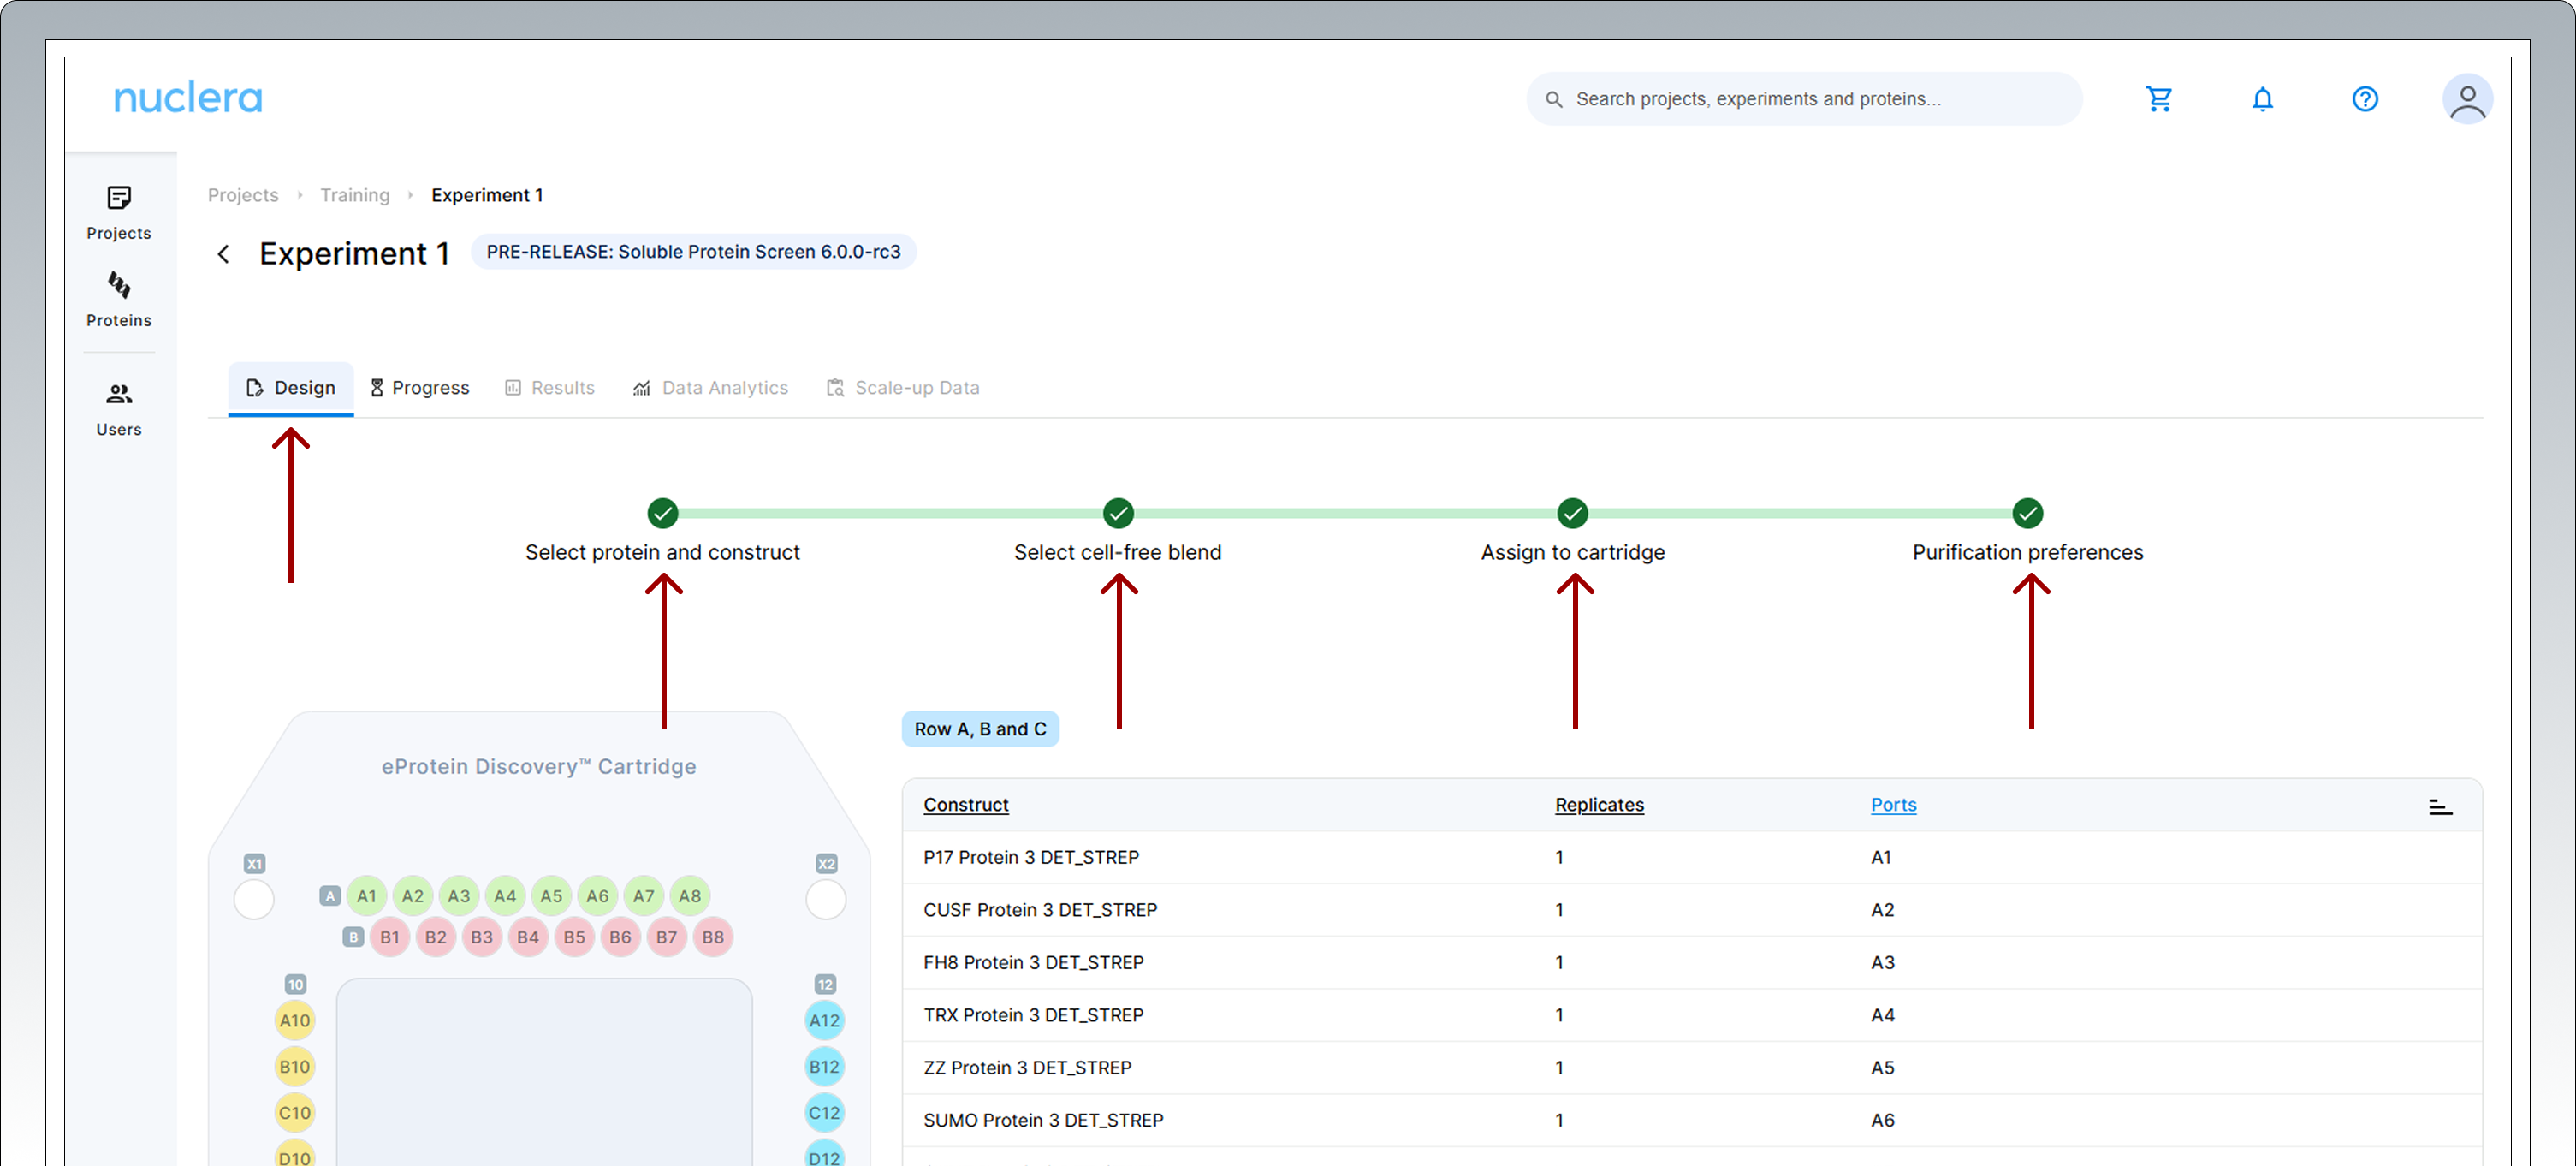
Note: Once finalized, the experimental design cannot be changed. - A summary of your experiment is now available. You can toggle and review the various aspects of your experiments by selecting the Design tab and clicking any of the [four green circles] in the design page.
Preparation of the eProtein Discovery reagents
The preparation of the reagents takes about 1 hour.
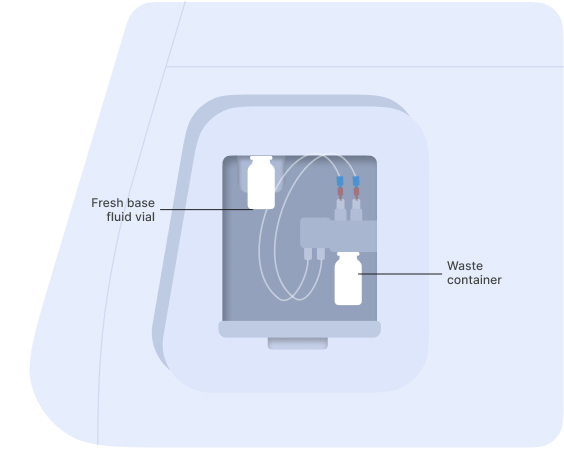
Connect the vial of base fluid to the pump module
▷ In anticipation of starting a new experiment, take a fresh vial of base fluid, open it, and connect it to the left holder on the eProtein Discovery instrument pump module (Figures 3 and 4).
It is important to equilibrate the base fluid with the lab atmosphere prior to use. This is to prevent outgassing of the base fluid during the run, as air bubbles can interfere with the droplet movement. We recommend attaching the base fluid to the instrument the day before you will perform the run. An acceptable alternative is to incubate the uncapped base fluid at 30°C / 86°F for 1 hour.
▷ Connect the waste container, empty, to the right holder of the pump module (Figures 3 and 4).
[1]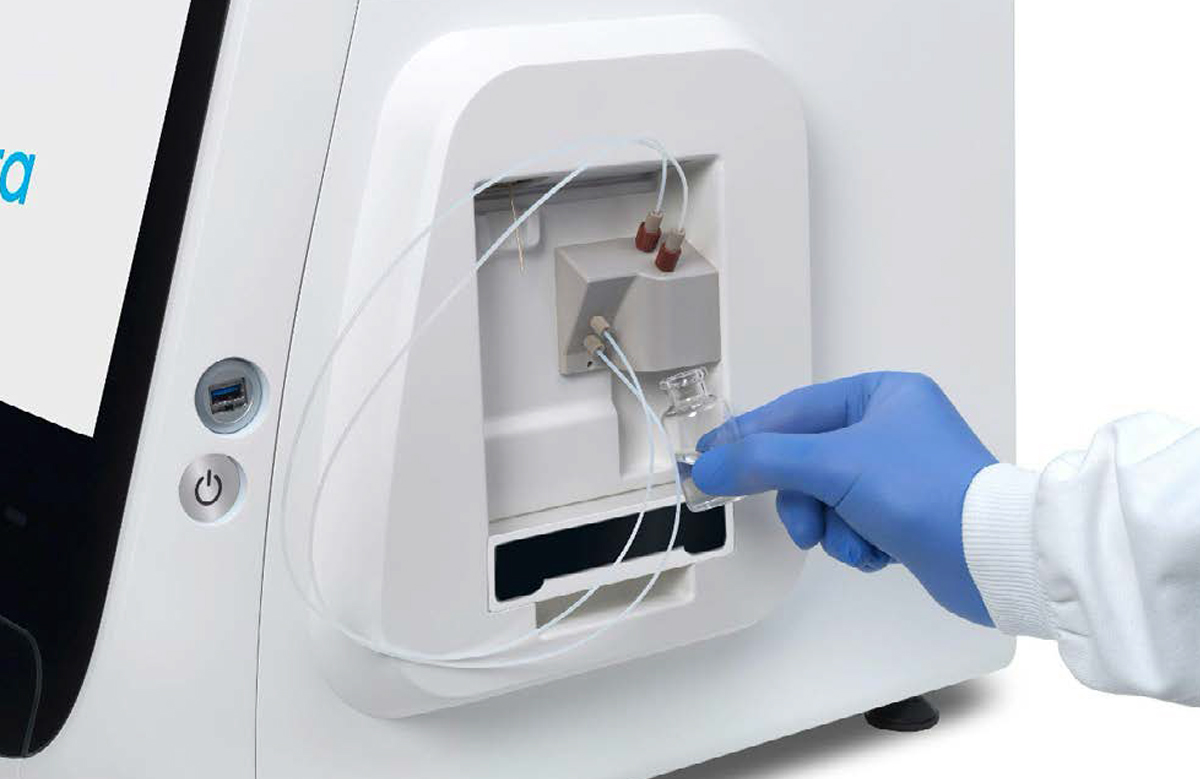 [2]
[2]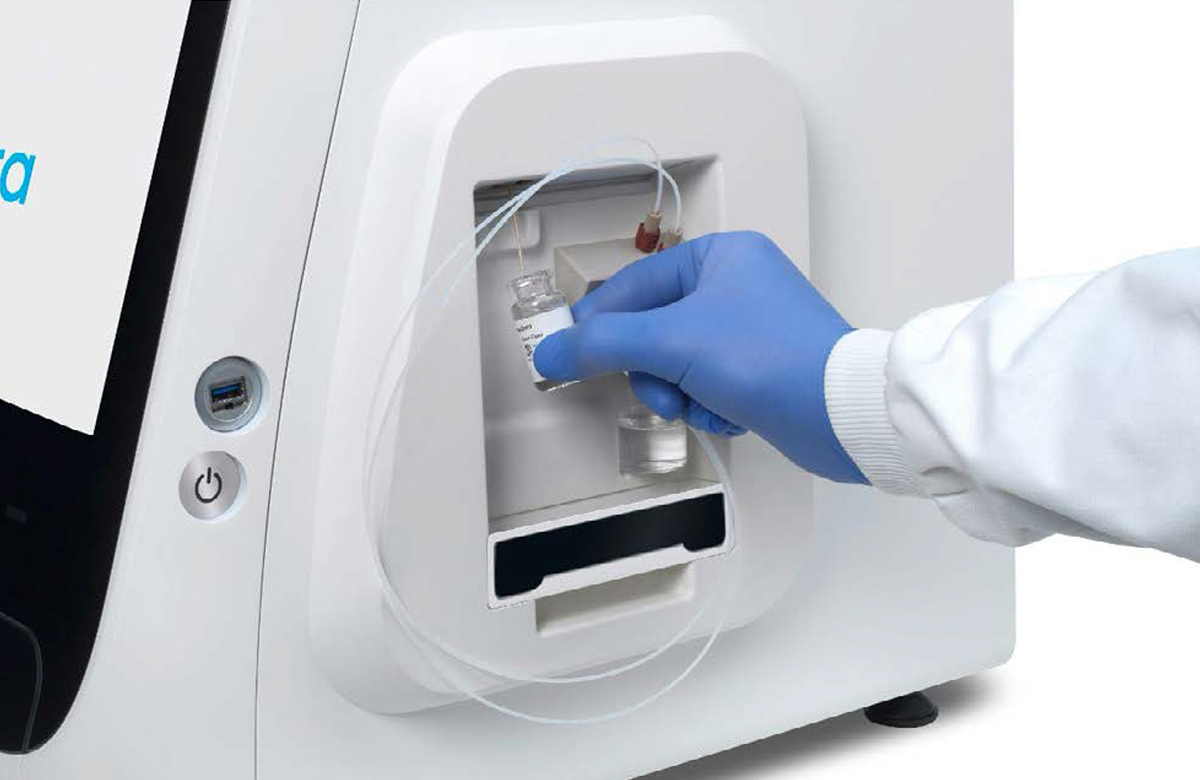
Prepare the transfer plate
After connecting the base fluid to the holder on the instrument, take all the reagents out of the freezer.
The eProtein Discovery reagents need to be prepared and loaded onto a 96 well transfer plate following the layout and volumes in Figure 5 and Table 2.
Note: It is critical to follow this layout exactly because it determines how the reagents are dispensed in the eProtein Discovery cartridge.
It is critical not to leave any port empty. If a eGene construct is missing it must be substituted with 5 µL eGene Elution Buffer supplied in the eGene Prep kit, not with water.
Tip: Empty ports can be used for duplicates.
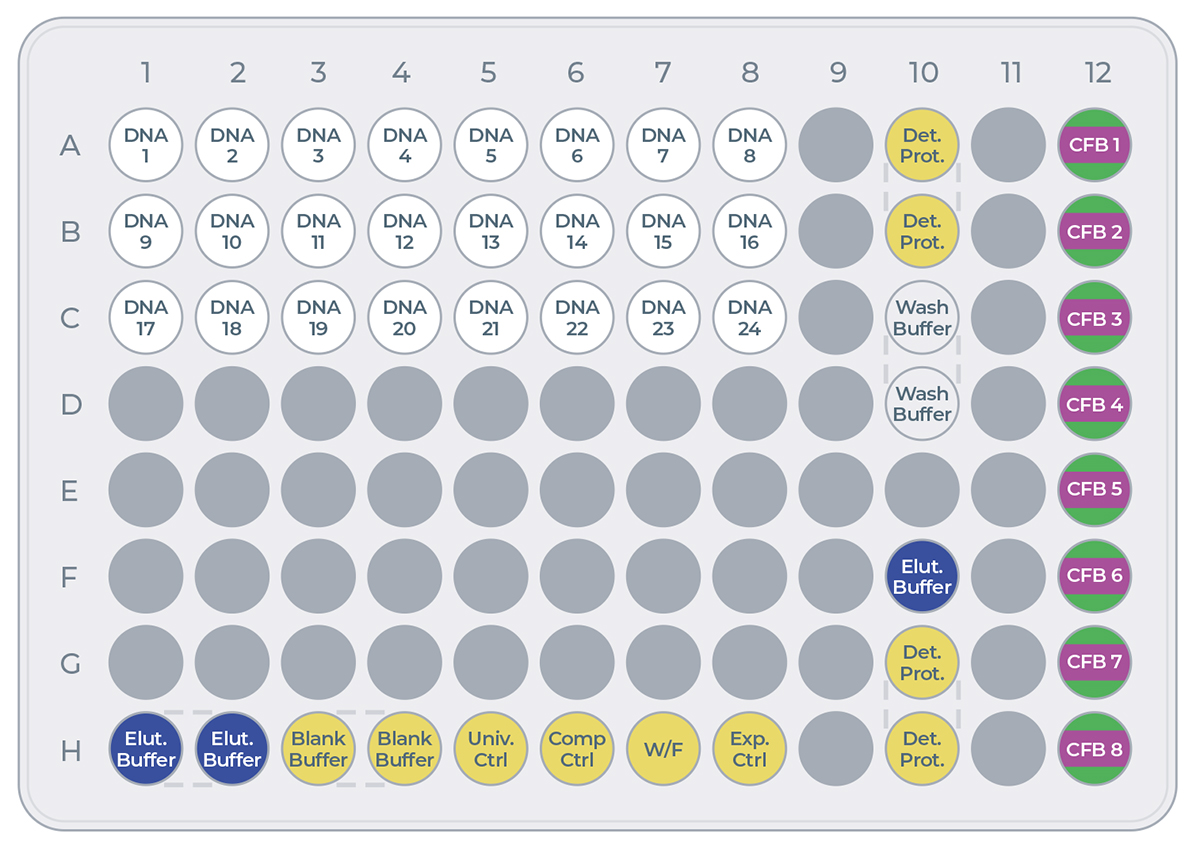
| Reagent | Volume (µL) |
|---|---|
| eGene construct | 5 |
| Controls: Blank Buffer, Universal Control (Univ. Ctrl), Complementation control (Comp. Ctrl), Full Workflow Control (W/F), Expression Control (Exp Ctrl) | 10 |
| Cell-free Blend (CFB): Cell-free Core Reagent + Additive 1 + Additive 2 | 20 (16+2+2) |
| Wash Buffer (Wash Buffer) | 16 |
| Elution Buffer (Elut. Buffer) | 10 µL in H1 & H2, 16 µL in F10 |
| Detector Protein (Det. Prot.) | 16 |
1.Take the Strep Beads from the fridge and the Cartridge Kit reagents (box with the yellow stripe on the label) from the -80°C freezer.
2.Place an empty 96-well transfer plate on ice.
The transfer plate should be kept on ice until the transfer of reagents to the Cartridge.
Ensure you prepare the Cell-free Blends last.
3. eGene constructs (DNA)
Take the vials or the plates with the eGene constructs made in advance using the eGene Prep Kit out of the freezer and thaw on the benchtop at room temperature. This takes approximately 15 minutes.
Note: the vials or the plates can be centrifuged for a few seconds to ensure all the liquid is at the bottom of the wells.
Load 5 µL of each eGene construct onto the transfer plate into wells:
▷ A1 to A8
▷ B1 to B8
▷ C1 to C8
Note: It is critical to load the eGene constructs onto the transfer plate in the exact order that they have been finalized in the experiment planned in the eProtein Discovery software.
4. eProtein Discovery purification reagents
Thaw the Wash Buffer and the Elution Buffer on the benchtop at room temperature. Once thawed, vortex for 2 seconds and centrifuge for 2 seconds using a microcentrifuge to mix and collect all the reagents.
▷ Load 16 µL of Wash Buffer into wells C10 and D10.
▷ Load 16 µL of Elution Buffer into well F10
▷ Load 10 µL of ELution Buffer into wells H1 and H2
5. eProtein Discovery controls
From the kit kept at -80°C, take the controls out and thaw them on ice.
▷ Load 10 µL of Blank Buffer into wells H3 and H4.
▷ Load 10 µL of Universal control into well H5.
▷ Load 10 µL of Complementation Control into well H6.
▷ Load 10 µL of Full W/F Control into well H7.
▷ Load 10 µL of Expression Control into well H8
6. Strep Purification Beads Strep Purification Beads are provided in 200 µL aliquots of 5% v/v suspension – To prepare the Strep Beads:
- Take the vial of Strep Beads from the fridge and give it a quick spin for 2 seconds in a microcentrifuge to pellet the beads.
- Resuspend the beads by gently pipetting up and down 10 times with a p200 pipette set on 90 µL.
- Transfer 90µL of the resuspended beads into a 1.5 mL tube. Discard the rest only after the experiment starts, in case more volume is required.
- Place the tube with Strep Beads on a magnetic particle separator and capture for 1 min.
- Remove all the supernatant with a p200 pipette and discard the liquid.
- Remove the tube with Strep Beads from the magnetic particle separator. Resuspend the beads in 100 µL Wash Buffer by slowly pipetting up and down 10 times.
- Repeat steps 4 to 6 twice more for a total of three washes.
- After the third wash, spin down the tube and place it back on a magnetic particle separator and capture for 1 min.
- Remove all the supernatant with a p200 pipette and discard the liquid.
- Spin down the tube, place it back on a magnetic particle separator and remove the residual buffer with a p20 pipette.
- With a p20 pipette, resuspend the beads in 10.5 µL Wash Buffer by gently pipetting up and down 10 times to create a 15 µL 30% Strep Beads working
- Keep the beads in the tube on the bench, not on ice.
Note: The beads should NOT be loaded onto the transfer plate.
7. Detector Protein
The Detector Protein is supplied as ready to use. Spin down the tube for 2 seconds to collect the full volume at the bottom. Load 16 µL of Detector Protein into wells A10, B10, G10, and H10 of the transfer plate.
8. Preparation of the Cell-free Blends
For each expression screening experiment, up to eight 20 μL Cell-free Blends can be made by adding 16 μL of Cell-free Core Reagent, 2 μL of a first additive, and 2 μL of a second additive.
Note: The total volume of blend should always be 20 µL final
Note: the same additive can be used as first and second additive, for example 2 x 2 µL of Additive Buffer. The list of Additives is in Table 1.
- Thaw on ice Cell-free Core Reagents and Additives
- Once thawed, vortex for 2 seconds the Cell-free Core reagents and Additives to ensure they are well mixed.
- Centrifuge for 2 seconds the Cell-free Core reagents and Additives using a microcentrifuge to return any droplets to the bulk aliquot.
- Add 16 µL of Cell-free Core reagent to wells A12-H12.
- Add 2 µL of your first selected additive to wells A12-H12.
- Add 2 µL of your second selected additive to wells A12-H12.
Note: It is critical to load the Cell-free Blends onto the transfer plate in the exact order that they have been finalized in the experiment planned in the eProtein Discovery software.
Set up the experiment on the instrument
Log in and select the experiment
- Press the [Power Switch] to activate the Instrument power-up, initialization and self-test sequence.
- Log into the instrument software by selecting the user and entering PIN (Figure 6a and 6b).
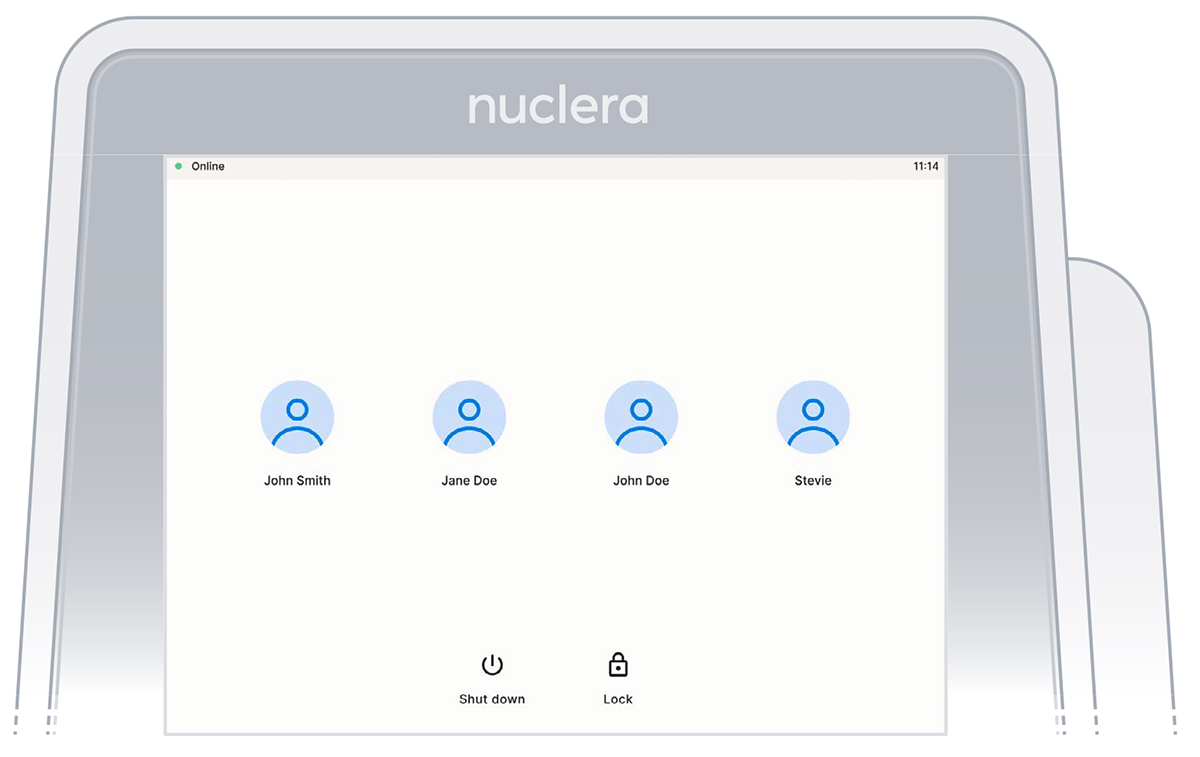 Figure 6a: User accounts on the instrument software
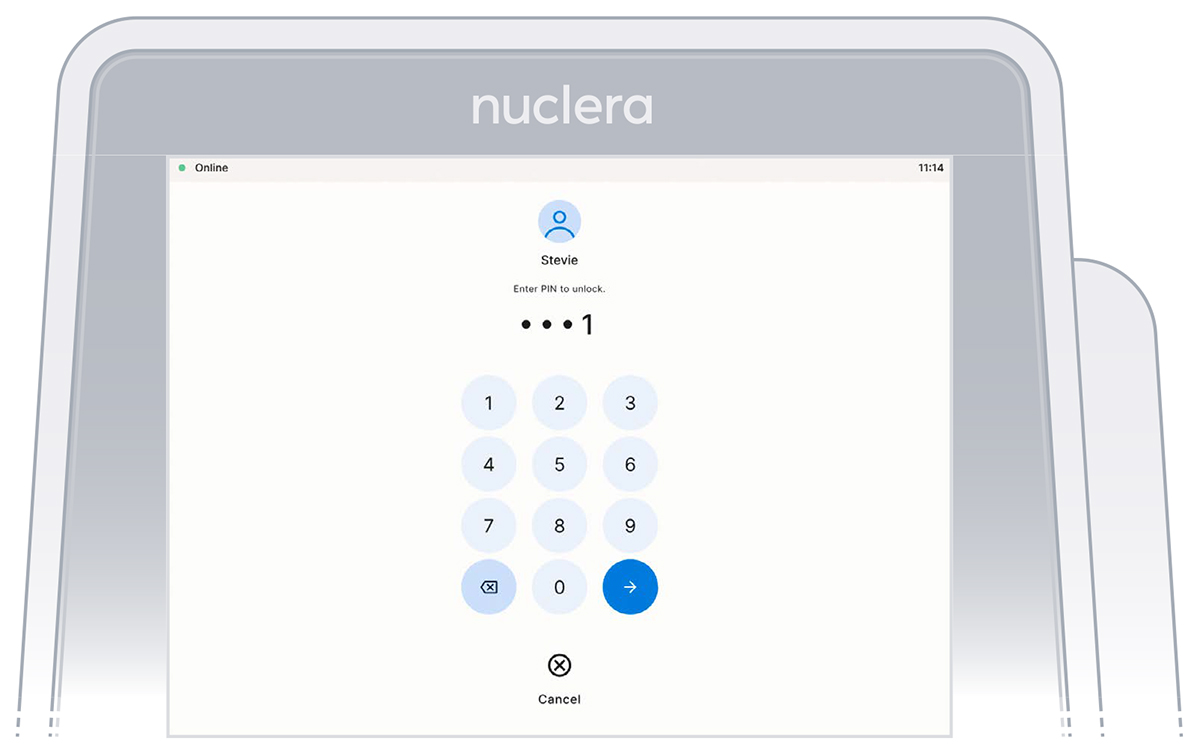 Figure 6b: PIN Interface
- On the instrument software, select the experiment initially set up on eProtein Discovery software (Figure 7).
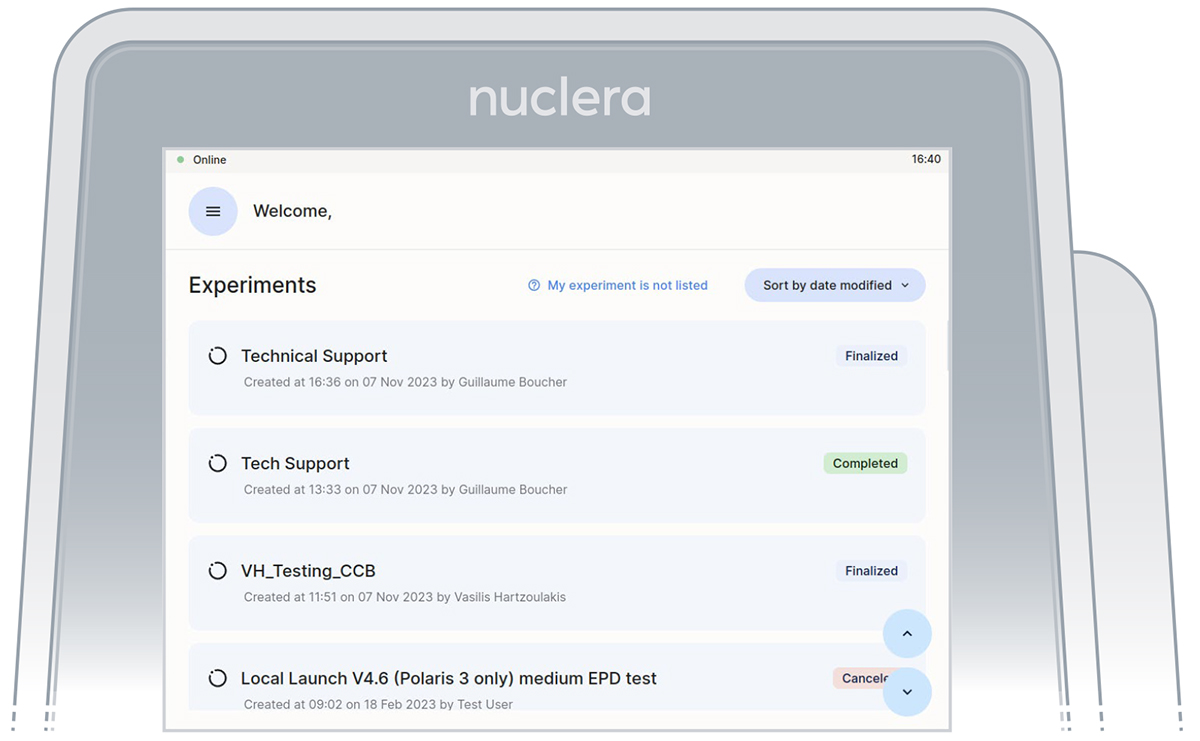 Figure 7: Instrument software welcome page with the list of finalized experiments
- Read the Before you proceed section and press the [Next] button (Figure 8).
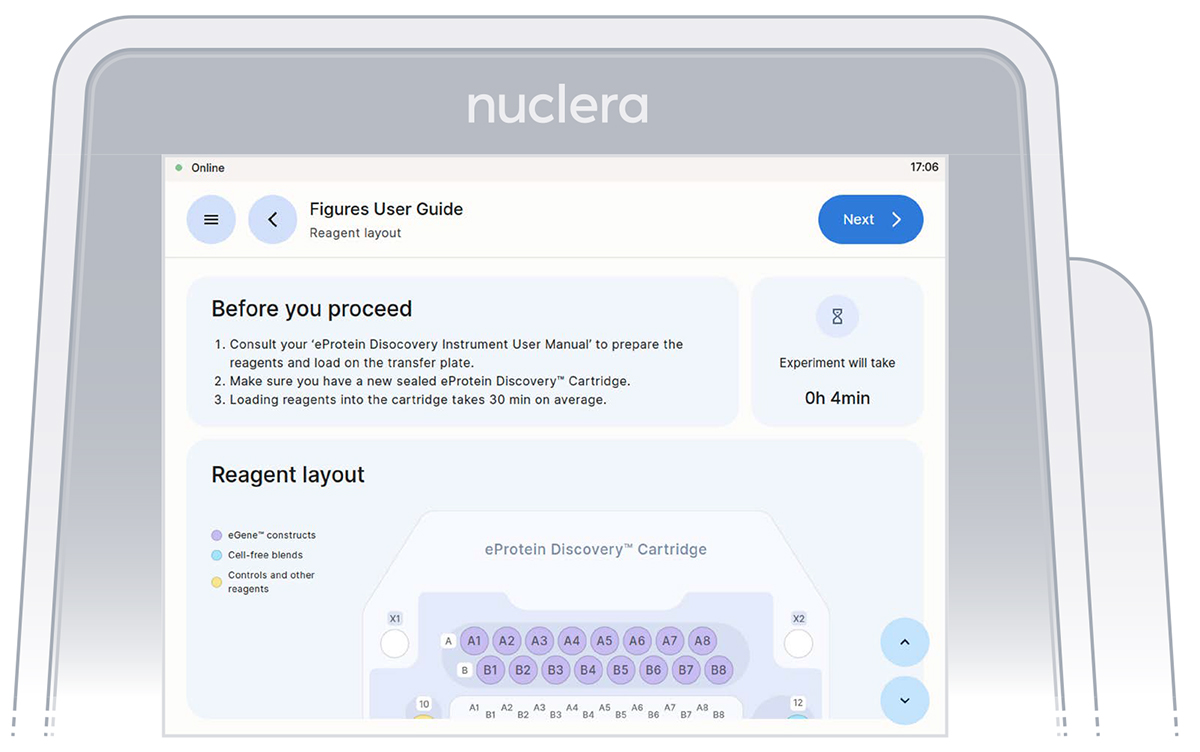 Figure 8: Instrument software welcome page with the list of finalized experiments
- Get the transfer plate containing the reagents and cartridge ready.
- Go through and tick the checklist, and press the [Next] button (Figure 9). The drawer will open.
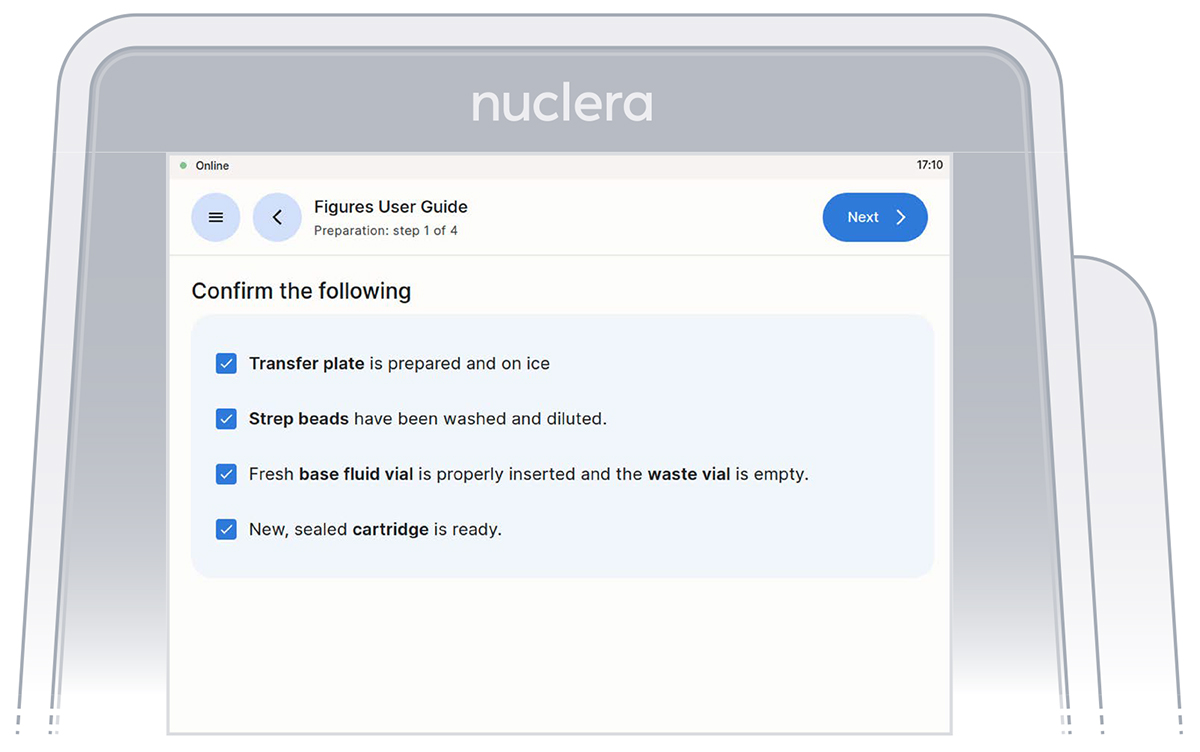 Figure 9: Loading of the cartridge on the eProtein Discovery instrument.
- Unpack and load a cartridge as shown on the screen of the eProtein Discovery instrument, place the cover on the cartridge, avoid touching the electrical connectors, and press the [Next] button (Figure 10).
 Figure 10: Checklist screen before the experiment starts.
Note: keep the cartridge packaging to dispose of the cartridge after use.
- Keep cover on the cartridge. Markings on the cover will guide you through the loading process.
Set up the pump on the instrument
Follow the on-screen instructions to complete the experiment.
▷ These instructions will guide you in operating the eProtein Discovery instrument and completing an experiment on the instrument.
▷ The instructions must be followed in the order shown on the screen.
▷ You can navigate forward and back through the steps using the buttons at the top.
▷ You can scroll up and down using the arrows at the bottom right of the screen when shown or with your fingers.
Note: once you start the experiment, the back button on the instrument will be disabled.
- On the right hand side of the instrument, ensure the tubings for the integrated pump are placed in the tubing holder, and press the [Next] button (Figure 11).
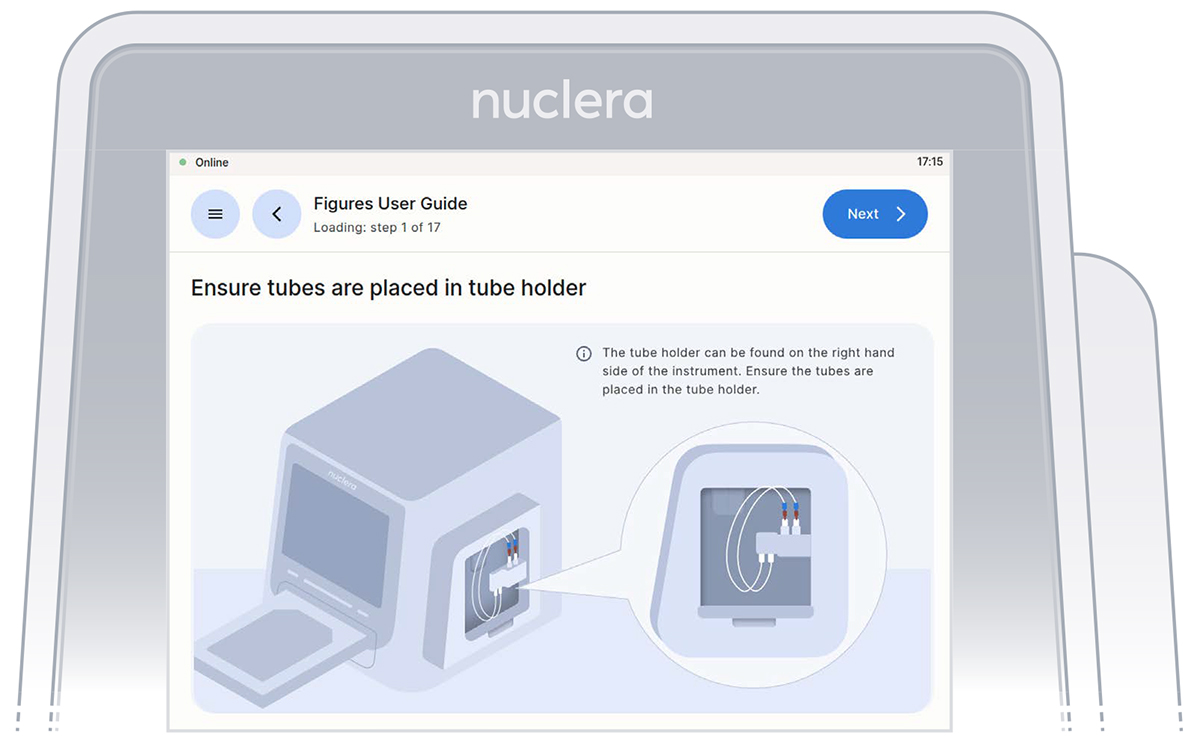 Figure 11: Verification screen that the tubings for the integrated pump are placed in the tubing holder.
- Ensure the vial of base fluid and the waste container have been connected to the pump located on the right hand side of the instrument. Press the [Next] button (Figures 12).
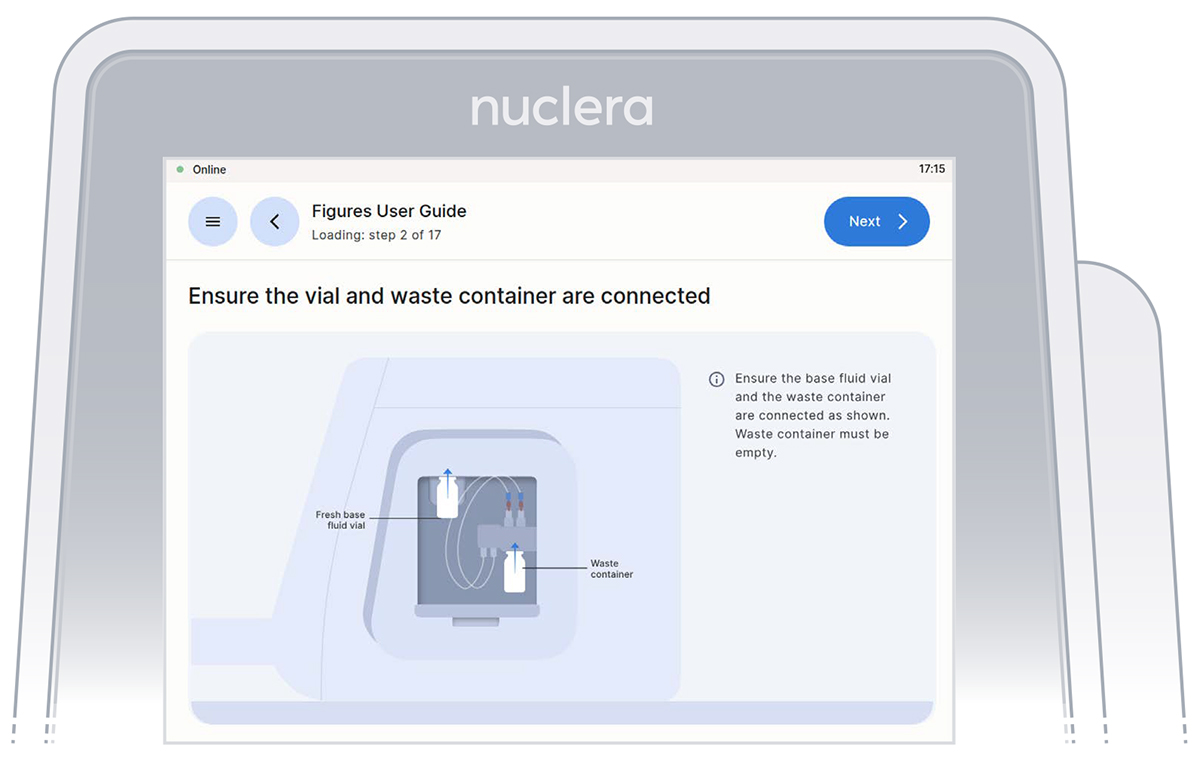 Figure 12: Vial of base fluid and the waste container connected to the pump as shown on the screen
Filling the cartridge with base fluid
- With the tubes and containers in place, ensure that some of the base fluid has dripped into the waste container (Figure 13).
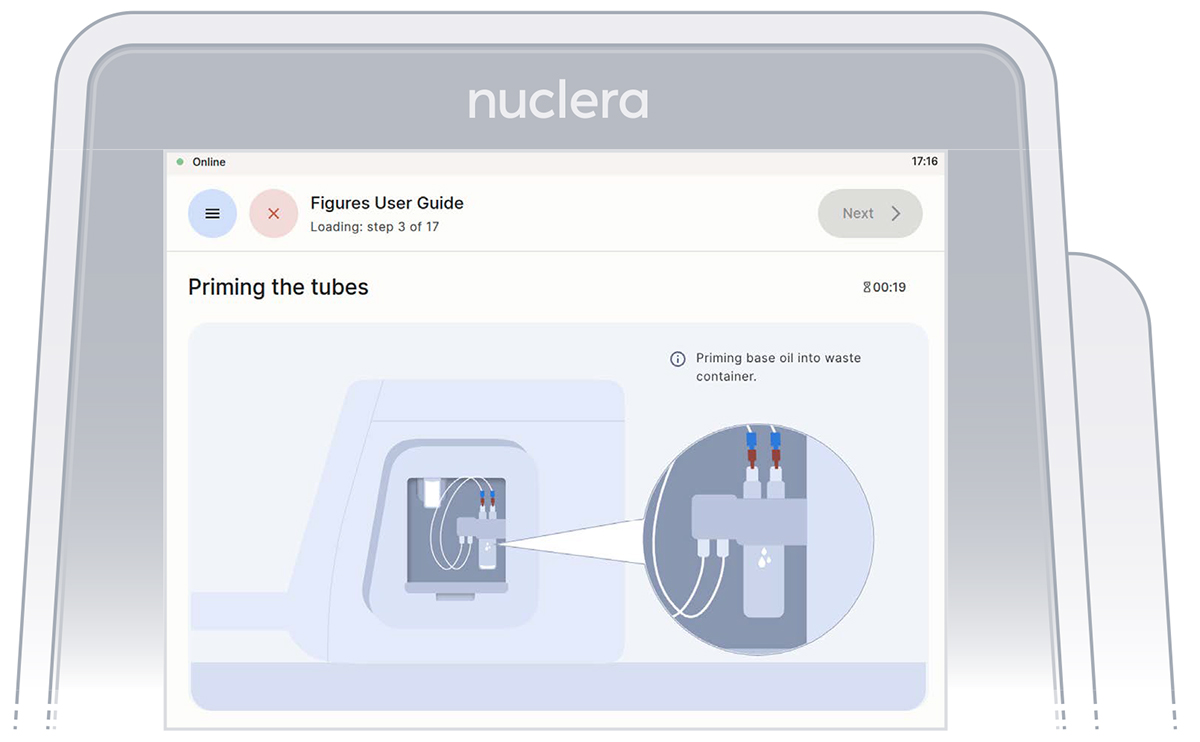 Figure 13: Priming the pump tubes with base fluid
- Remove the tube connectors from the holder, connect them tightly to the corner ports X2 and X3 of the cartridge, and press the [Next] button (Figure 14). Either connector can be interchangeably inserted into corner port X2 or X3.
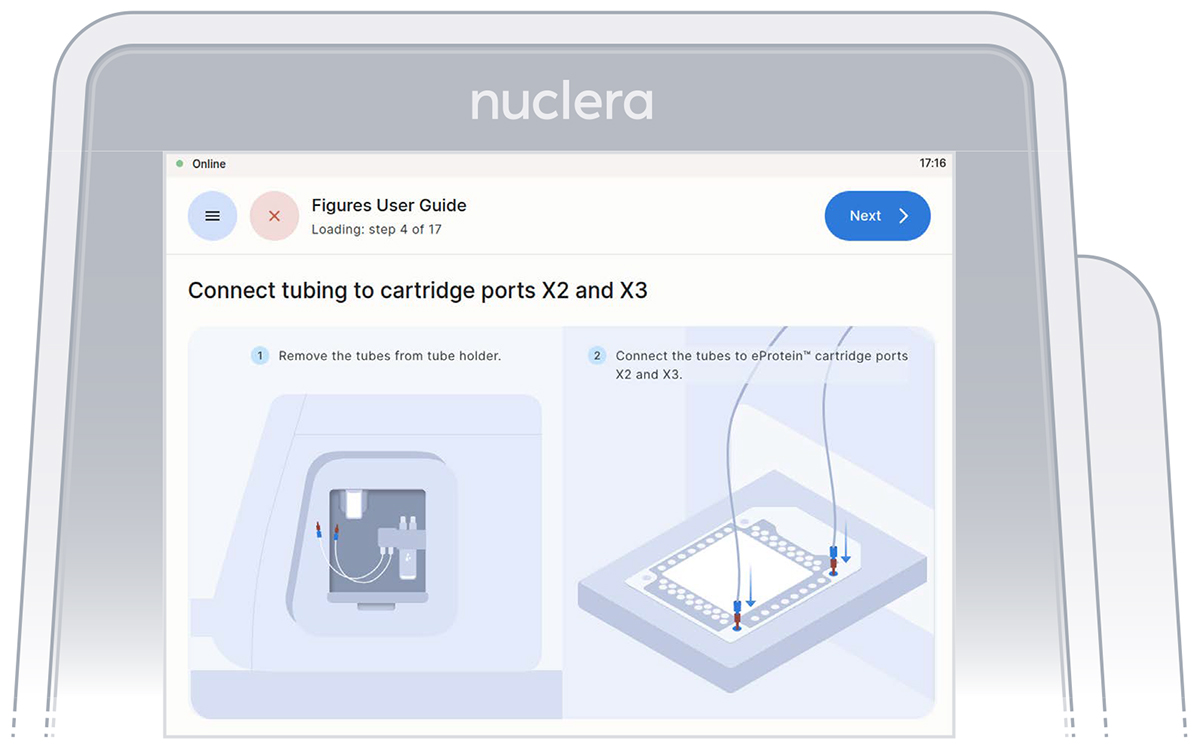 Figure 14: Inspection that all the ports on the cartridge are filled with base fluid
- Inspect the cartridge for air bubbles that may have been introduced during the priming with base fluid.
If any air bubbles persist after base fluid priming, use a single-channel p200 pipette to aspirate the air bubbles from the nearest port and reinject slowly the base fluid that was aspirated into a corner port (X1 or X4). Press the [Next] button (Figure 15).
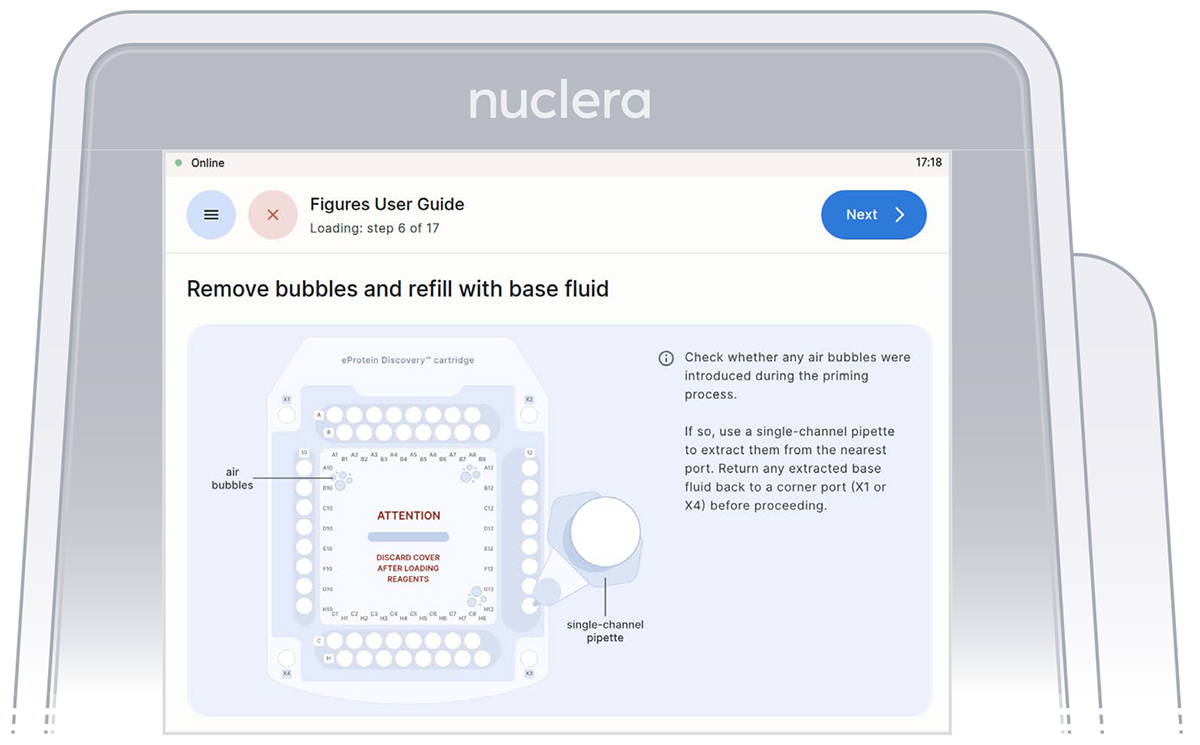 Figure 15: Connection of the pump tubes to the cartridge
- Inspect the ports on the cartridge after the priming with base fluid is complete. Ensure all the ports are filled and press the [Next] button (Figure 16).
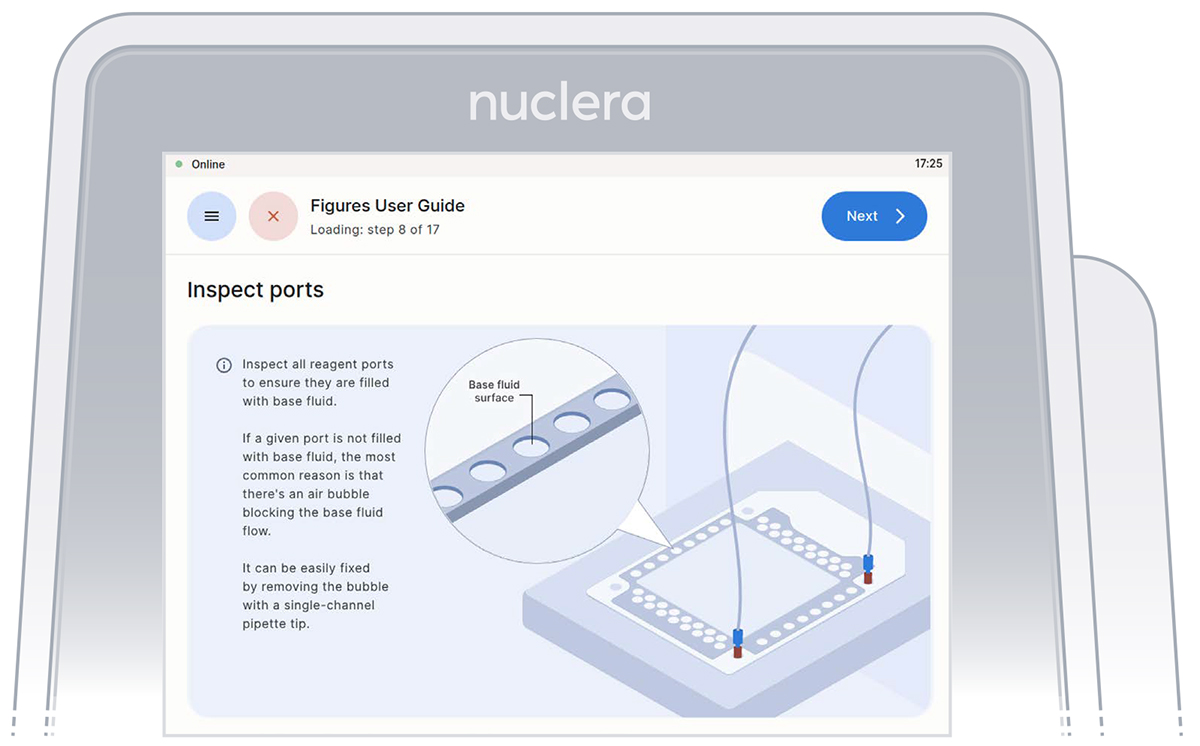 Figure 16:Inspection that all the ports on the cartridge are filled with base fluid
Load the reagents on the cartridge
Tips for a perfect loading:
▷ Follow the on-screen instructions that will guide you in loading the reagents.
▷ The loading of the reagents should be done using an 8-channel pipette.
▷ To facilitate the pipetting of the reagents, the transfer plate can be moved from the ice bucket to the bench.
▷ Check the plate for the presence of air bubbles. Air bubbles can be removed by spinning the plate in a swing rotor centrifuge for about 10 seconds.
▷ After aspirating the reagents, make sure that all pipette tips are filled evenly, and contain no air bubbles.
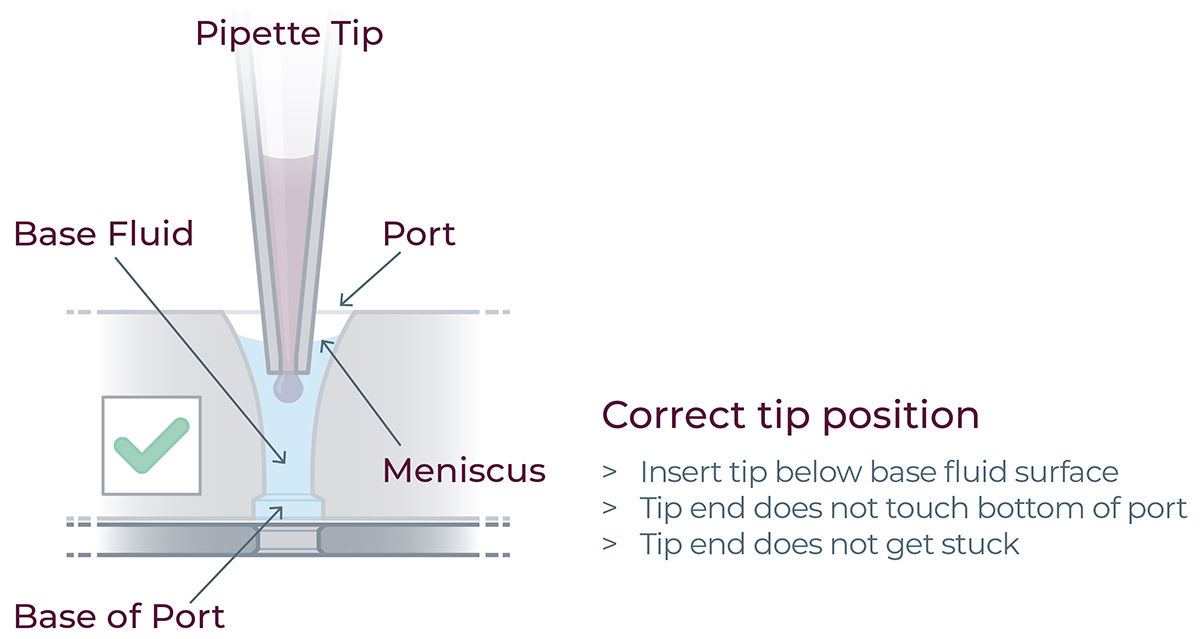
▷ When loading the reagents into the ports, ensure the tips are immersed just below the surface of the base fluid, and dispense slowly until the first stop of the pipette is reached.
▷ Do not pass the first stop as it would release air bubbles (Figure 17).
▷ Do not engage the pipette tips fully into the ports, the tip ends should not touch the bottom of the ports while dispensing the reagents (Figure 17).
Load eGene constructs - rows A, B and C
It is critical not to leave any port empty. If a eGene construct is missing it must be substituted with 5 µL eGene Elution Buffer supplied in the eGene Prep kit, not with water.
Tip: Empty ports can be used for duplicates.
▷ Load 8x fresh pipette tips and aspirate 3 μL of the eGene constructs from the transfer plate wells A1-A8 into ports A1-A8 of the cartridge (Figure 18).
▷ Load 8x fresh pipette tips and aspirate 3 μL of the eGene constructs from the transfer plate wells B1-B8 into ports B1-B8 of the cartridge (Figure 18).
▷ Load 8x fresh pipette tips and aspirate 3 μL of the eGene constructs from the transfer plate wells C1-C8 into ports C1-C8 of the cartridge (Figure 18).
▷ Ensure the tip is immersed in the base fluid and dispense slowly until the first stop of the pipette is reached. Do not engage the pipette tips fully into the ports.
▷ Eject the pipette tips into a waste container.
▷ Press the [Next] button on the screen.
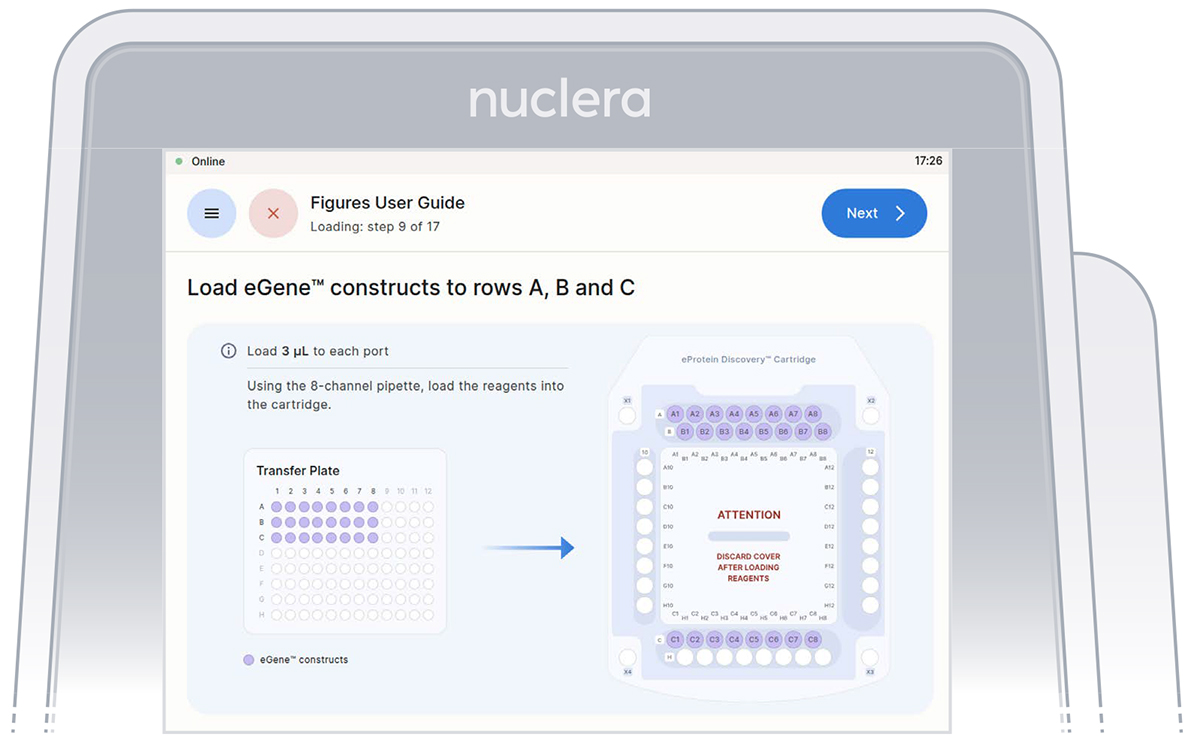 Figure 18: Loading of the eGene constructs onto row A, B and C of the cartridge
Load reagents - row H, column 12 and column 10
1. Reagents - row H:
▷ Load 8x fresh p20 pipette tips and aspirate 3 µL of the reagents from the transfer plate wells H1-H8 into ports H1-H8 of the cartridge (Figure 19).
▷ Ensure the tip is immersed in the base fluid and dispense slowly until the first stop of the pipette is reached. Do not engage the pipette tips fully into the ports.
▷ Eject the pipette tips into a waste container.
▷ Press the [Next] button on the screen.
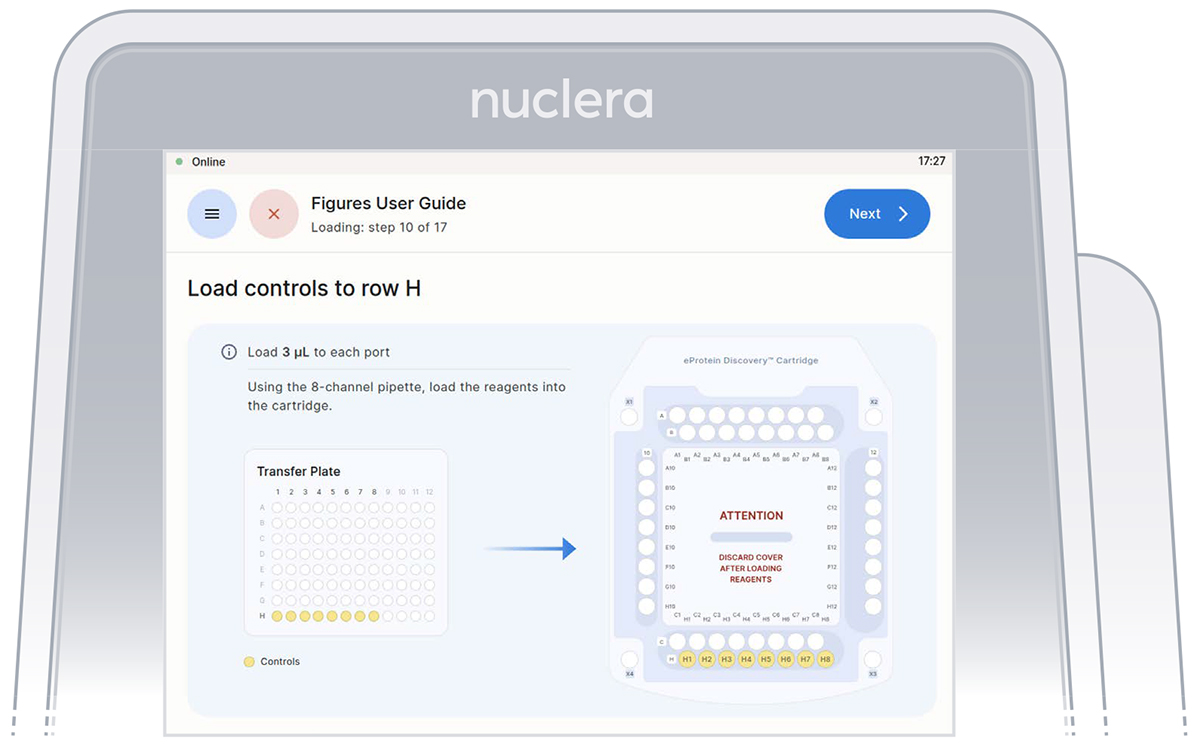 Figure 19: Loading of the reagents onto row H of the cartridge
2. Reagents - column 12:
▷ Load 8x fresh p20 pipette tips and mix the Cell-free Blends in the transfer plate by gently pipetting up and down 12 times.
Be careful not to introduce air bubbles in the ports.
Aspirate 12 µL of the Cell-free Blends from the transfer plate wells
A12-H12 into ports A12-H12 of the cartridge (Figure 20).
▷ Ensure the tip is immersed in the base fluid and dispense slowly until the first stop of the pipette is reached. Do not engage the pipette tips fully into the ports.
▷ Eject the pipette tips into a waste container.
▷ Press the [Next] button on the screen.
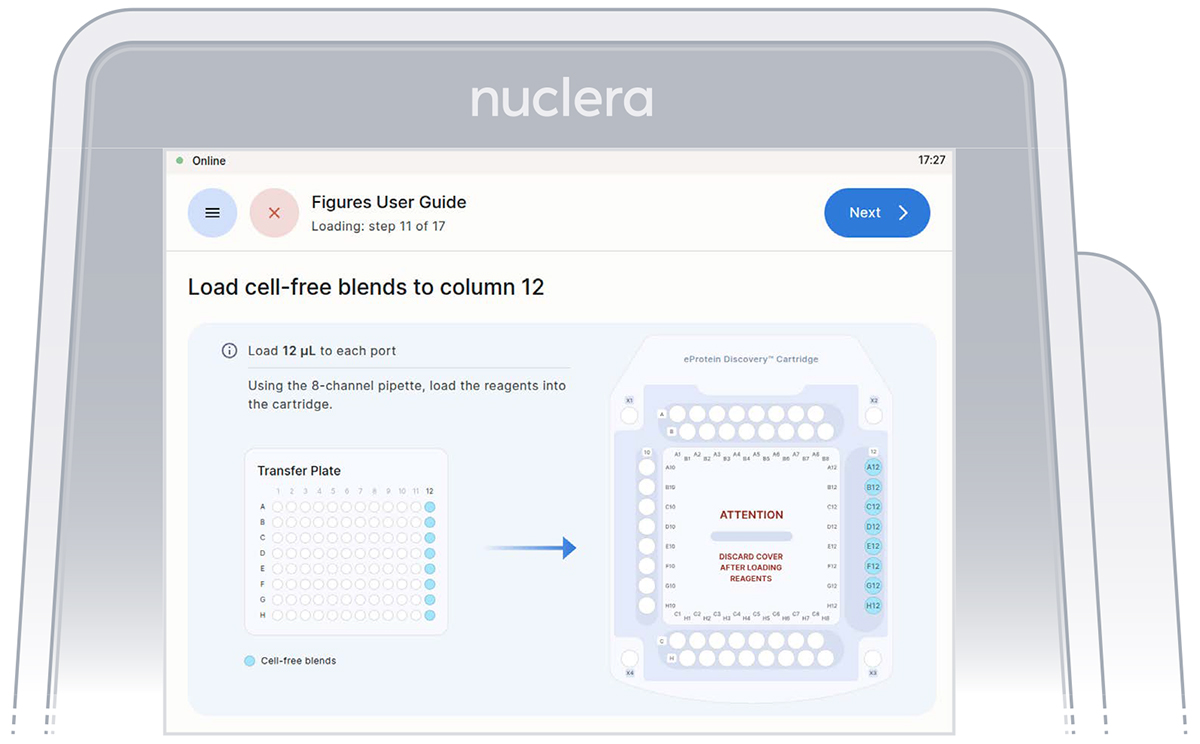 Figure 20: Loading of the Cell-free Blends onto column 12 of the cartridge
3. Reagents - column 10:
▷ Load 7x fresh p20 pipette tips and aspirate 12 µL of the reagents from the transfer plate wells A10-D10 and F10-H10 into ports A10-D10 and F10-H10 of the cartridge (Figure 21).
▷ Ensure the tip is immersed in the base fluid and dispense slowly until the first stop of the pipette is reached. Do not engage the pipette tips fully into the ports.
▷ Eject the pipette tips into a waste container.
▷ Press the [Next] button on the screen.
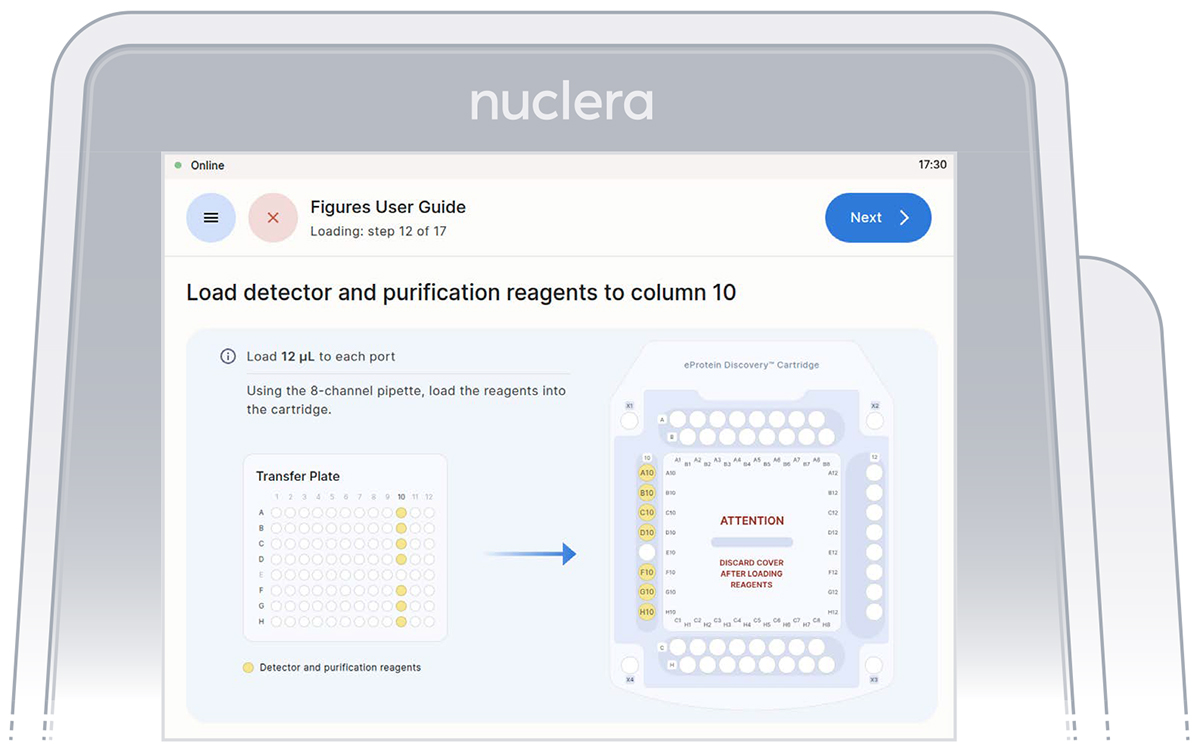 Figure 21: Loading of the reagents onto column 10 of the cartridge
4. Strep Purification Beads - port E10:
▷ Using a single channel p20 pipette, mix the Strep Purification Beads twelve times by gently pipetting up and down. Be careful not to introduce air bubbles. Aspirate 12 µL of the Strep Purification Beads prepared in a tube and dispense into port E10 of the cartridge (Figure 22).
▷ Ensure the tip is immersed in the base fluid and dispense slowly until the first stop of the pipette is reached. Do not engage the pipette tip fully into the port.
▷ Eject the pipette tip into a waste container.
▷ Press the [Next] button on the screen.
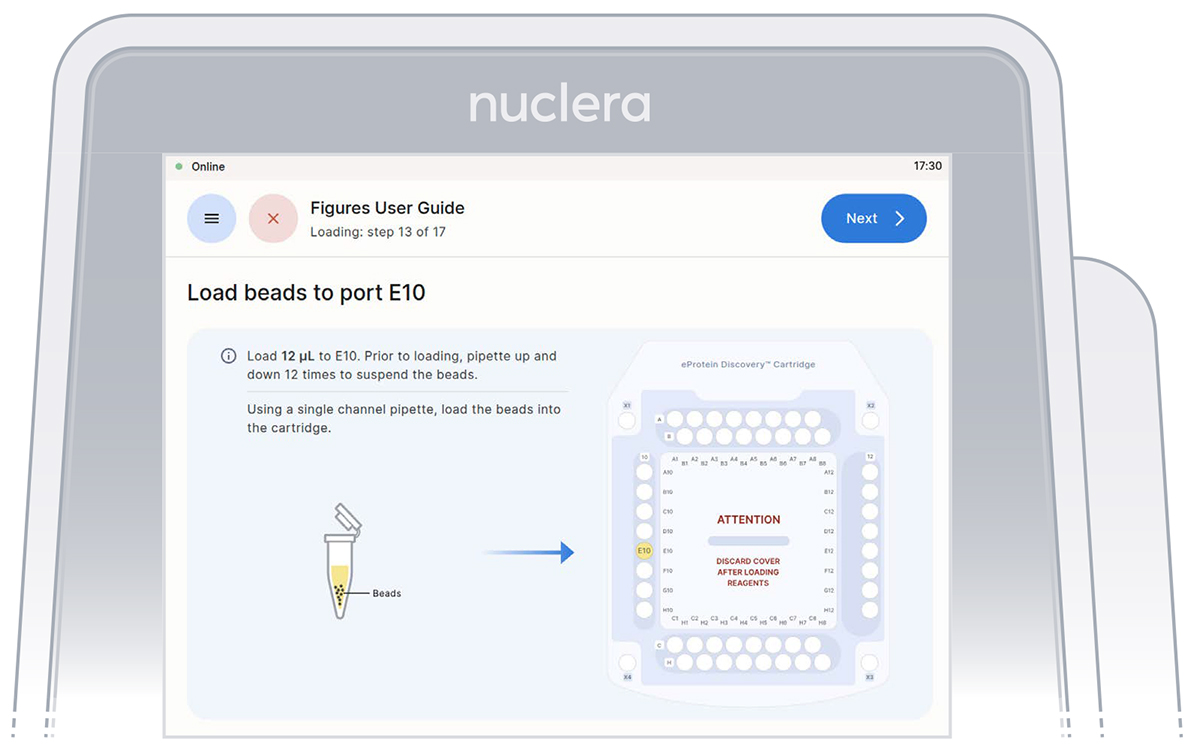 Figure 22: Loading of the Strep beads to port E10 of the cartridge
- Remove the cover from the cartridge (Figure 23)
 Figure 23: Remove the cover from the cartridge
Load reagents in the cartridge
- Press the [Next] button to start the aspiration of the base fluid and the loading of the reagents on the cartridge (Figure 24).
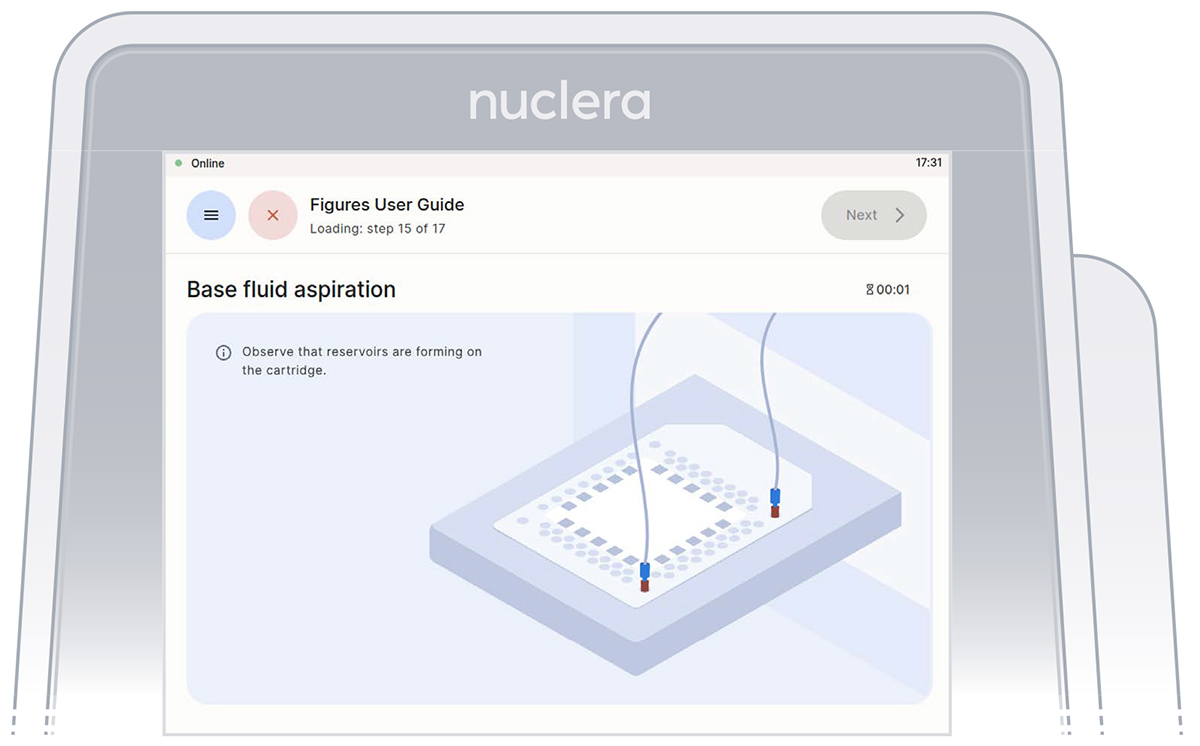 Figure 24: Base fluid aspiration
- Disconnect the tubes from the cartridge and place them in the tube holder on the right hand side of the instrument. Press the [Next] button on the screen (Figure 25), and the drawer will close. Quality controls will be performed, and the drawer will open.
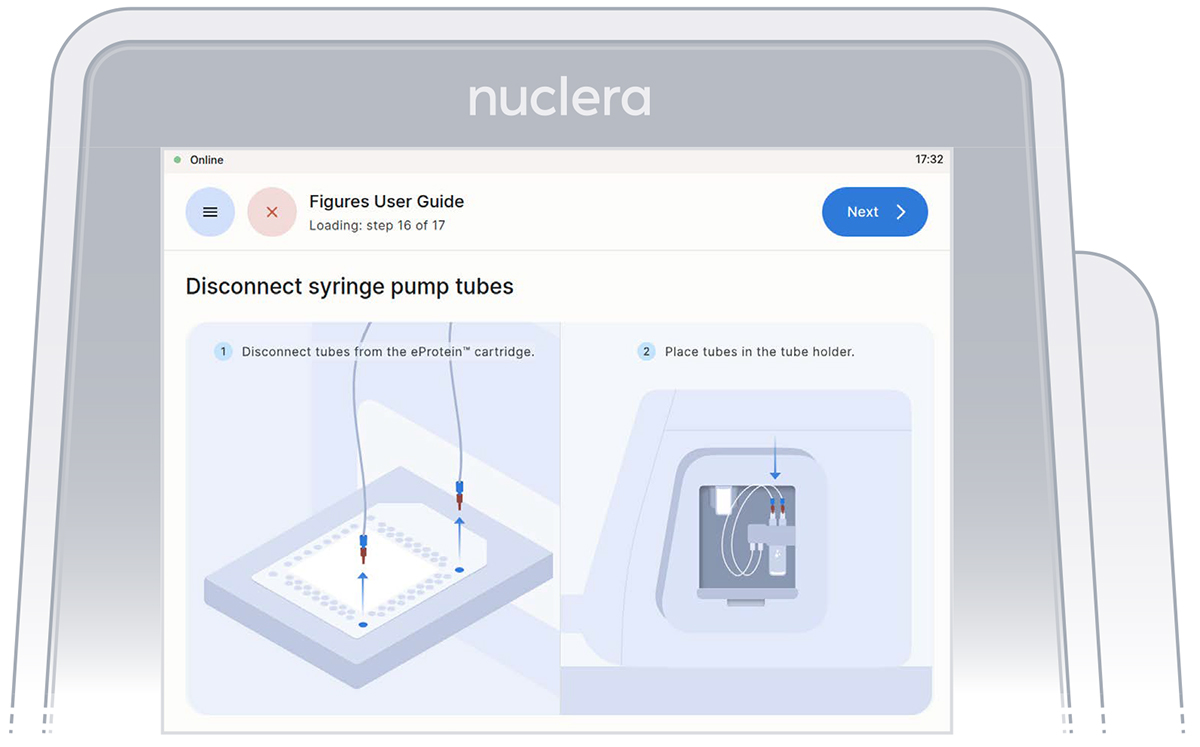 Figure 25: Disconnect the tubes and place them on the tube holder
- Inspect the reservoirs have formed correctly in the cartridge as shown on the screen. If so, Press the [Next] button (Figure 26).
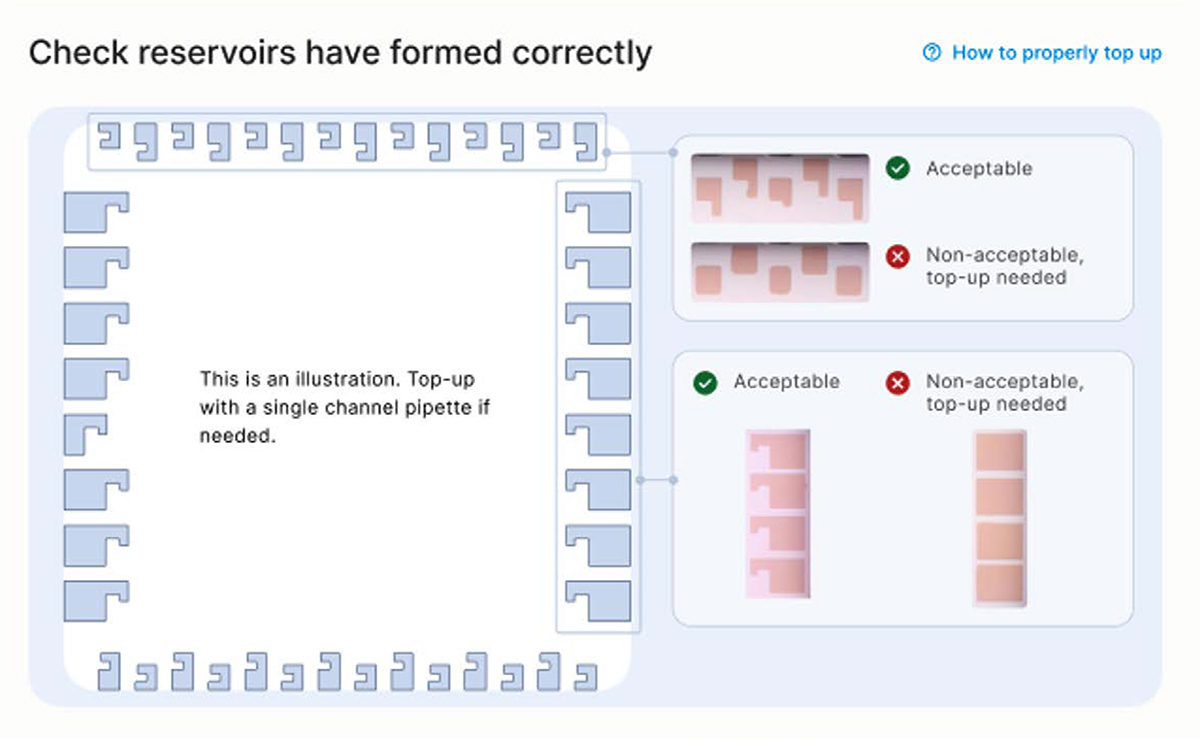
Note: Any presence of a marker on the reservoir is acceptable, as shown on the top right of Figure 26
Troubleshooting tip 1:
If a reservoir is not properly formed, first fully engage a new empty pipette tip into the port and reach the bottom of the port. This action may trigger the correct formation of the reservoir.
Troubleshooting tip 2:
▷ If the shape of a reservoir is still not correct, remove the empty tip from the port, replace with a new tip, then add a small volume of the corresponding reagent using a p20 pipette with a pipette tip. Do not depress the pipette past the first stop as this could introduce air bubbles inside the cartridge.
▷ Re-engage the tip until reaching the bottom to the port and dispense the reagent slowly until correction is complete (Figure 27).
▷ The recommended volumes for manual correction are:
▷ 1.5 µL for ports in rows A, B, C or H
▷ 3 µL for ports in columns 10 or 12

Analyze the results
Instrument software results screen
After completion of the experiment, the results are shown on the instrument screen. The four best obtainable combinations of eGene and Cell-free Blend are displayed with the predicted in-tube scale-up yields (Figure 28). Further analysis can be carried out from the eProtein Discovery Cloud Software.
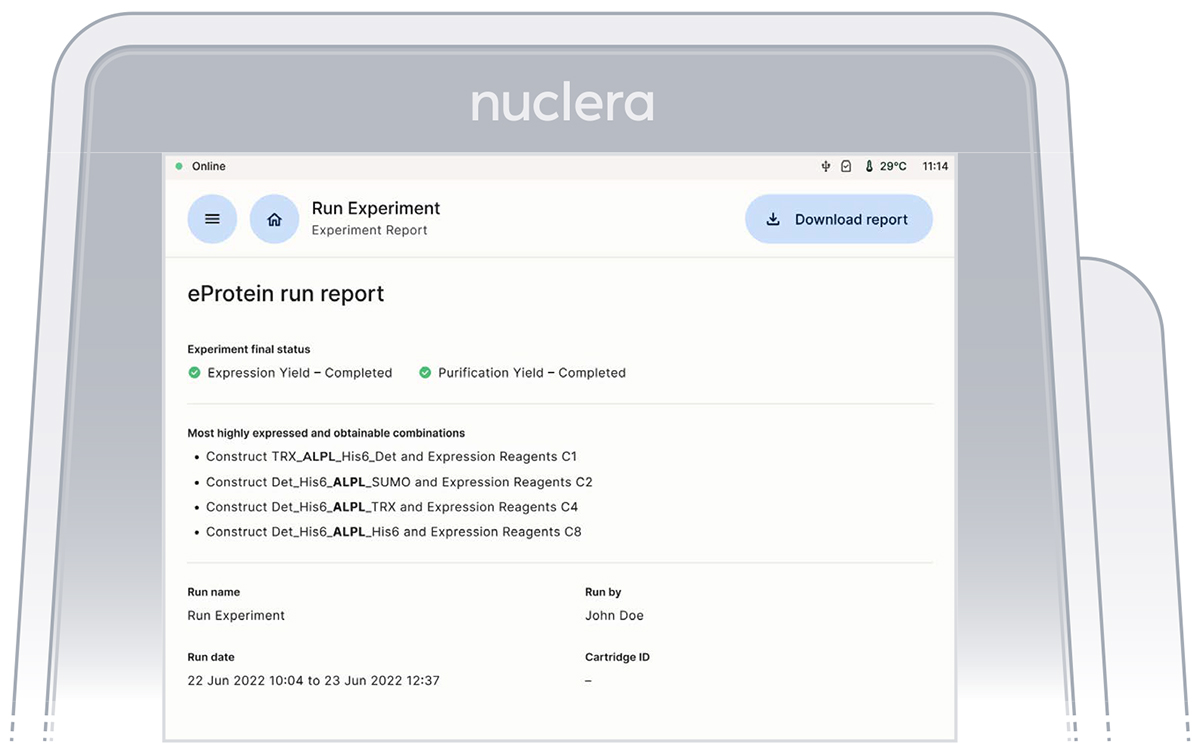
eProtein Discovery Cloud Software report
At the end of the experiment a report containing all the information about the experimental setup is transferred onto the eProtein Discovery Cloud Software. The upload takes about 15 minutes and during this time the [Download Report] button at the top right corner of the screen is grayed out.
Note: the instrument should not be switched off until the report is transferred and becomes available on the eProtein Discovery Cloud Software.
The experiment report contains:
▷ Experiment video
The video should be watched to ensure the correct operation of the instrument and cartridge during the experiment. Any questions or concerns regarding the operation of the droplets should be directed to the Nuclera Technical Support team (techsupport@nuclera.com).
▷ PDF report file
The PDF report file is a summary of the experiment setup and the results, saved in the report folder with the name given to the experiment included in the file name
▷ CSV report file
The report file is a csv file saved in the report folder with the name given to the experiment included in the file name. The results for each one of the 30 purified target protein conditions, and the 192 conditions for the produced protein are listed in the csv file. It also contains the measured values for the controls, the expected range for the controls, and a PASS/FAIL score if the measured values are within the expected range.
▷ Blue light images (TIFF images)
Images acquired at the end of expressions and purification. These images can give the user
information about the solubility of the protein.
▷ Other files
The folder contains additional files that can be used by the Nuclera Technical Support team for troubleshooting purposes
Finishing the experiment
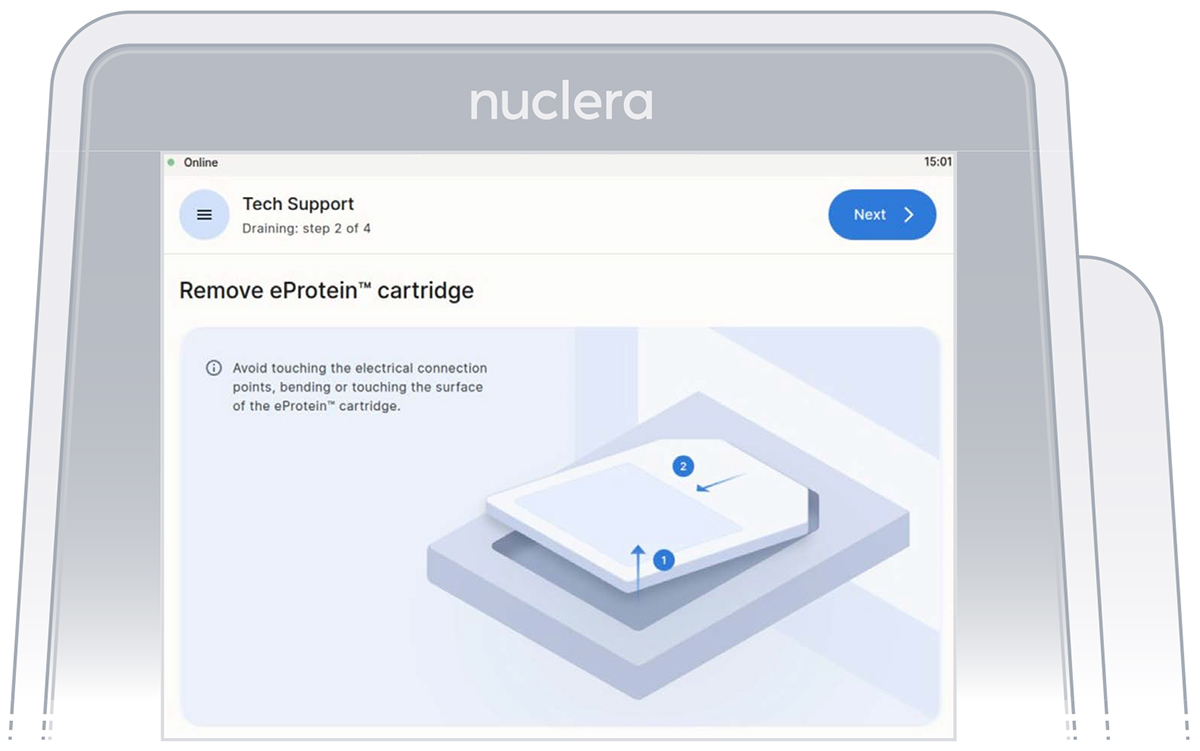
- Remove the cartridge from the instrument drawer by lifting it as shown on the screen and place it in its original packaging. Press the [Next] button (Figure 29).
Note: there is no need to drain the base fluid out of the cartridge.
- Remove the waste container from the holder, empty its content, and place it back on the instrument.
- Remove the vial of base fluid and dispose of it with biohazard sharps waste container according to local waste disposal rules and regulations.
Note: Do not reuse consumed cartridges and dispose of any residual reagents, kits are intended as single use only.
- Dispose the packaged used cartridge in a biohazard sharps container, according to local waste disposal rules and regulations.
- The experiment report is available for download from the eProtein Discovery software.
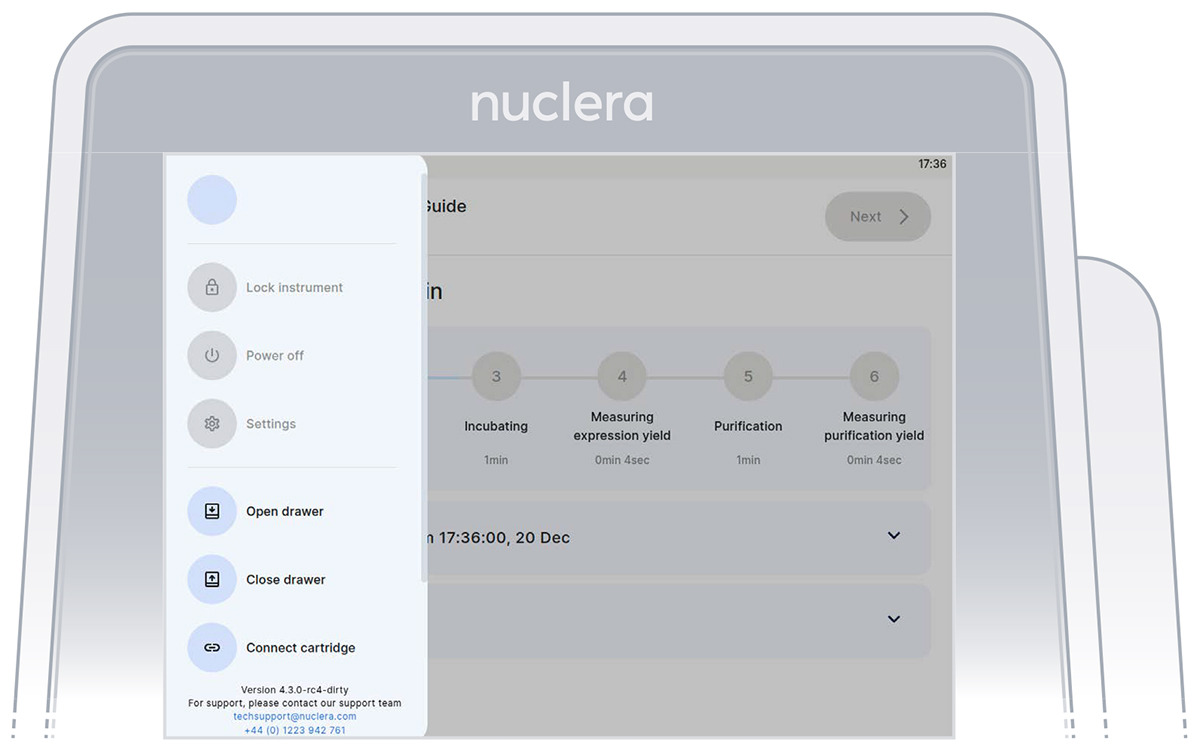
- Power down the instrument after use by pressing the [Power off] button (Figure 30)
Frequently Asked Questions (FAQ)
1. General
| Questions/Issues | Answers |
|---|---|
| Where can I suggest future improvements? | Please email us at techsupport@nuclera.com, your feedback is very important to us as it allows us to improve the instrument, the technology and our services. |
| A component or reagent is missing | If a component or a reagent is missing, please contact the Nuclera Technical Support team |
2.Technical issues (software / hardware)
| Questions/Issues | Answers |
|---|---|
| The eProtein instrument doesn’t start (blank screen and no light) - no power |
|
| WiFi is not connected |
|
| On the eProtein Discovery software, I don’t remember my username / password | Search for the email received from “eProtein Cloud Software”. You can also contact your administrator or the Nuclera Technical Support team to reset your password. |
| On the Instrument Software, I don’t remember my username / password | Contact your administrator or the Nuclera Technical Support team |
| On the eProtein Discovery software, my username and password are correct but not recognised | Contact your administrator or the Nuclera Technical Support team. |
| On the Instrument Software, my username and password are correct but not recognised | Contact your administrator or the Nuclera Technical Support team. |
| The screen of the eProtein Discovery instrument is on but not responding | During the experiment it is possible that the touch-screen will stop responding. If this happens, the software is still running in the background. It is possible to remotely access the instrument desktop from another computer. Please inform the Nuclera Technical Support team. |
| One of the reservoirs is not formed as shown on the instrument | For manually topping up reservoirs, draw 1.5 µL to 3 µL of each desired reagent into a single channel pipette and load with gentle pressure in each port, holding the plunger for about 30 sec to 1 min. Once the fluid connection from the port is made to the existing liquid, wait until the reservoir is fully formed and gently remove the pipette tip from the hole. |
| It looks like my reagents merged together on the cartridge. | Depending on which reagents, it is likely that the results of the experiment will be compromised. It is up to the user whether they wish to continue the experiment at this point or to abort the run. Please inform the Nuclera Technical Support team. |
| Reagent port not filled with base fluid | If a given port is not filled with base fluid, the most common reason is that there is an air bubble blocking the base fluid flow. This can be |
| easily fixed by removing the bubble with a single-channel pipette tip |
Nuclera Technical Support:
UK Phone: +44 1223 942 761
US Phone: +1 508-306-1297
Email: techsupport@nuclera.com
Offices:
Nuclera UK (HQ):
One Vision Park, Station Road, Cambridge, CB24 9NP, UK
Nuclera USA:
1000 Technology Park Drive, Suite B, Billerica MA 01821, USA
www.nuclera.com
Genscript is a registered trademark of Nanjing GenScript Biotech Co., Ltd.
GeneArt is a registered trademark of Thermo Fisher Scientific GeneArt GmbH
Copyright © 2025 Nuclera Ltd. All trademarks are the property of Nuclera, Ltd. Visit nuclera.com/legal for more info.